How to Get Started with Editing in DaVinci Resolve (Beginner's Guide + Podcast Example)
Leah Smith •
Share
So you’ve been to The Native Space Studio, you’ve recorded your podcast episode, and now you’re sitting with your video files and separate audio from the mics. You’re ready to pull everything together - and for that, my go-to edting software is DaVinci Resolve.
This blog isn’t just for podcasters though - it’s for anyone opening Resolve for the first time and wondering: What do I actually do now?
Why use DaVinci Resolve for podcast edits?
DaVinci Resolve is:
✅ Free to download
✅ Industry-level quality
✅ Suitable for everything from YouTube videos to short films to podcast edits
Yes, there is a paid version (DaVinci Resolve Studio), but for most content creators and beginners, *the free version is more than enough.
A Quick Overview of the Davinci Resolve Interface
When you open Resolve, you’ll see a row of tabs along the bottom of the screen. These are your workspaces, and each one is focused on a different part of the editing process:
Media – import and organise footage (the best place to import files)
Cut – a simplified, fast editing workspace f‰or quick assembly
Edit – the full editing suite for precise, detailed edits (use this for podcast and most video projects)
Check Your Project Settings First
Before you start importing media or editing, check your project settings to avoid issues later on:
Open Davinci Resolve
Click the Settings button (gear icon) in the bottom-right corner of the interface.
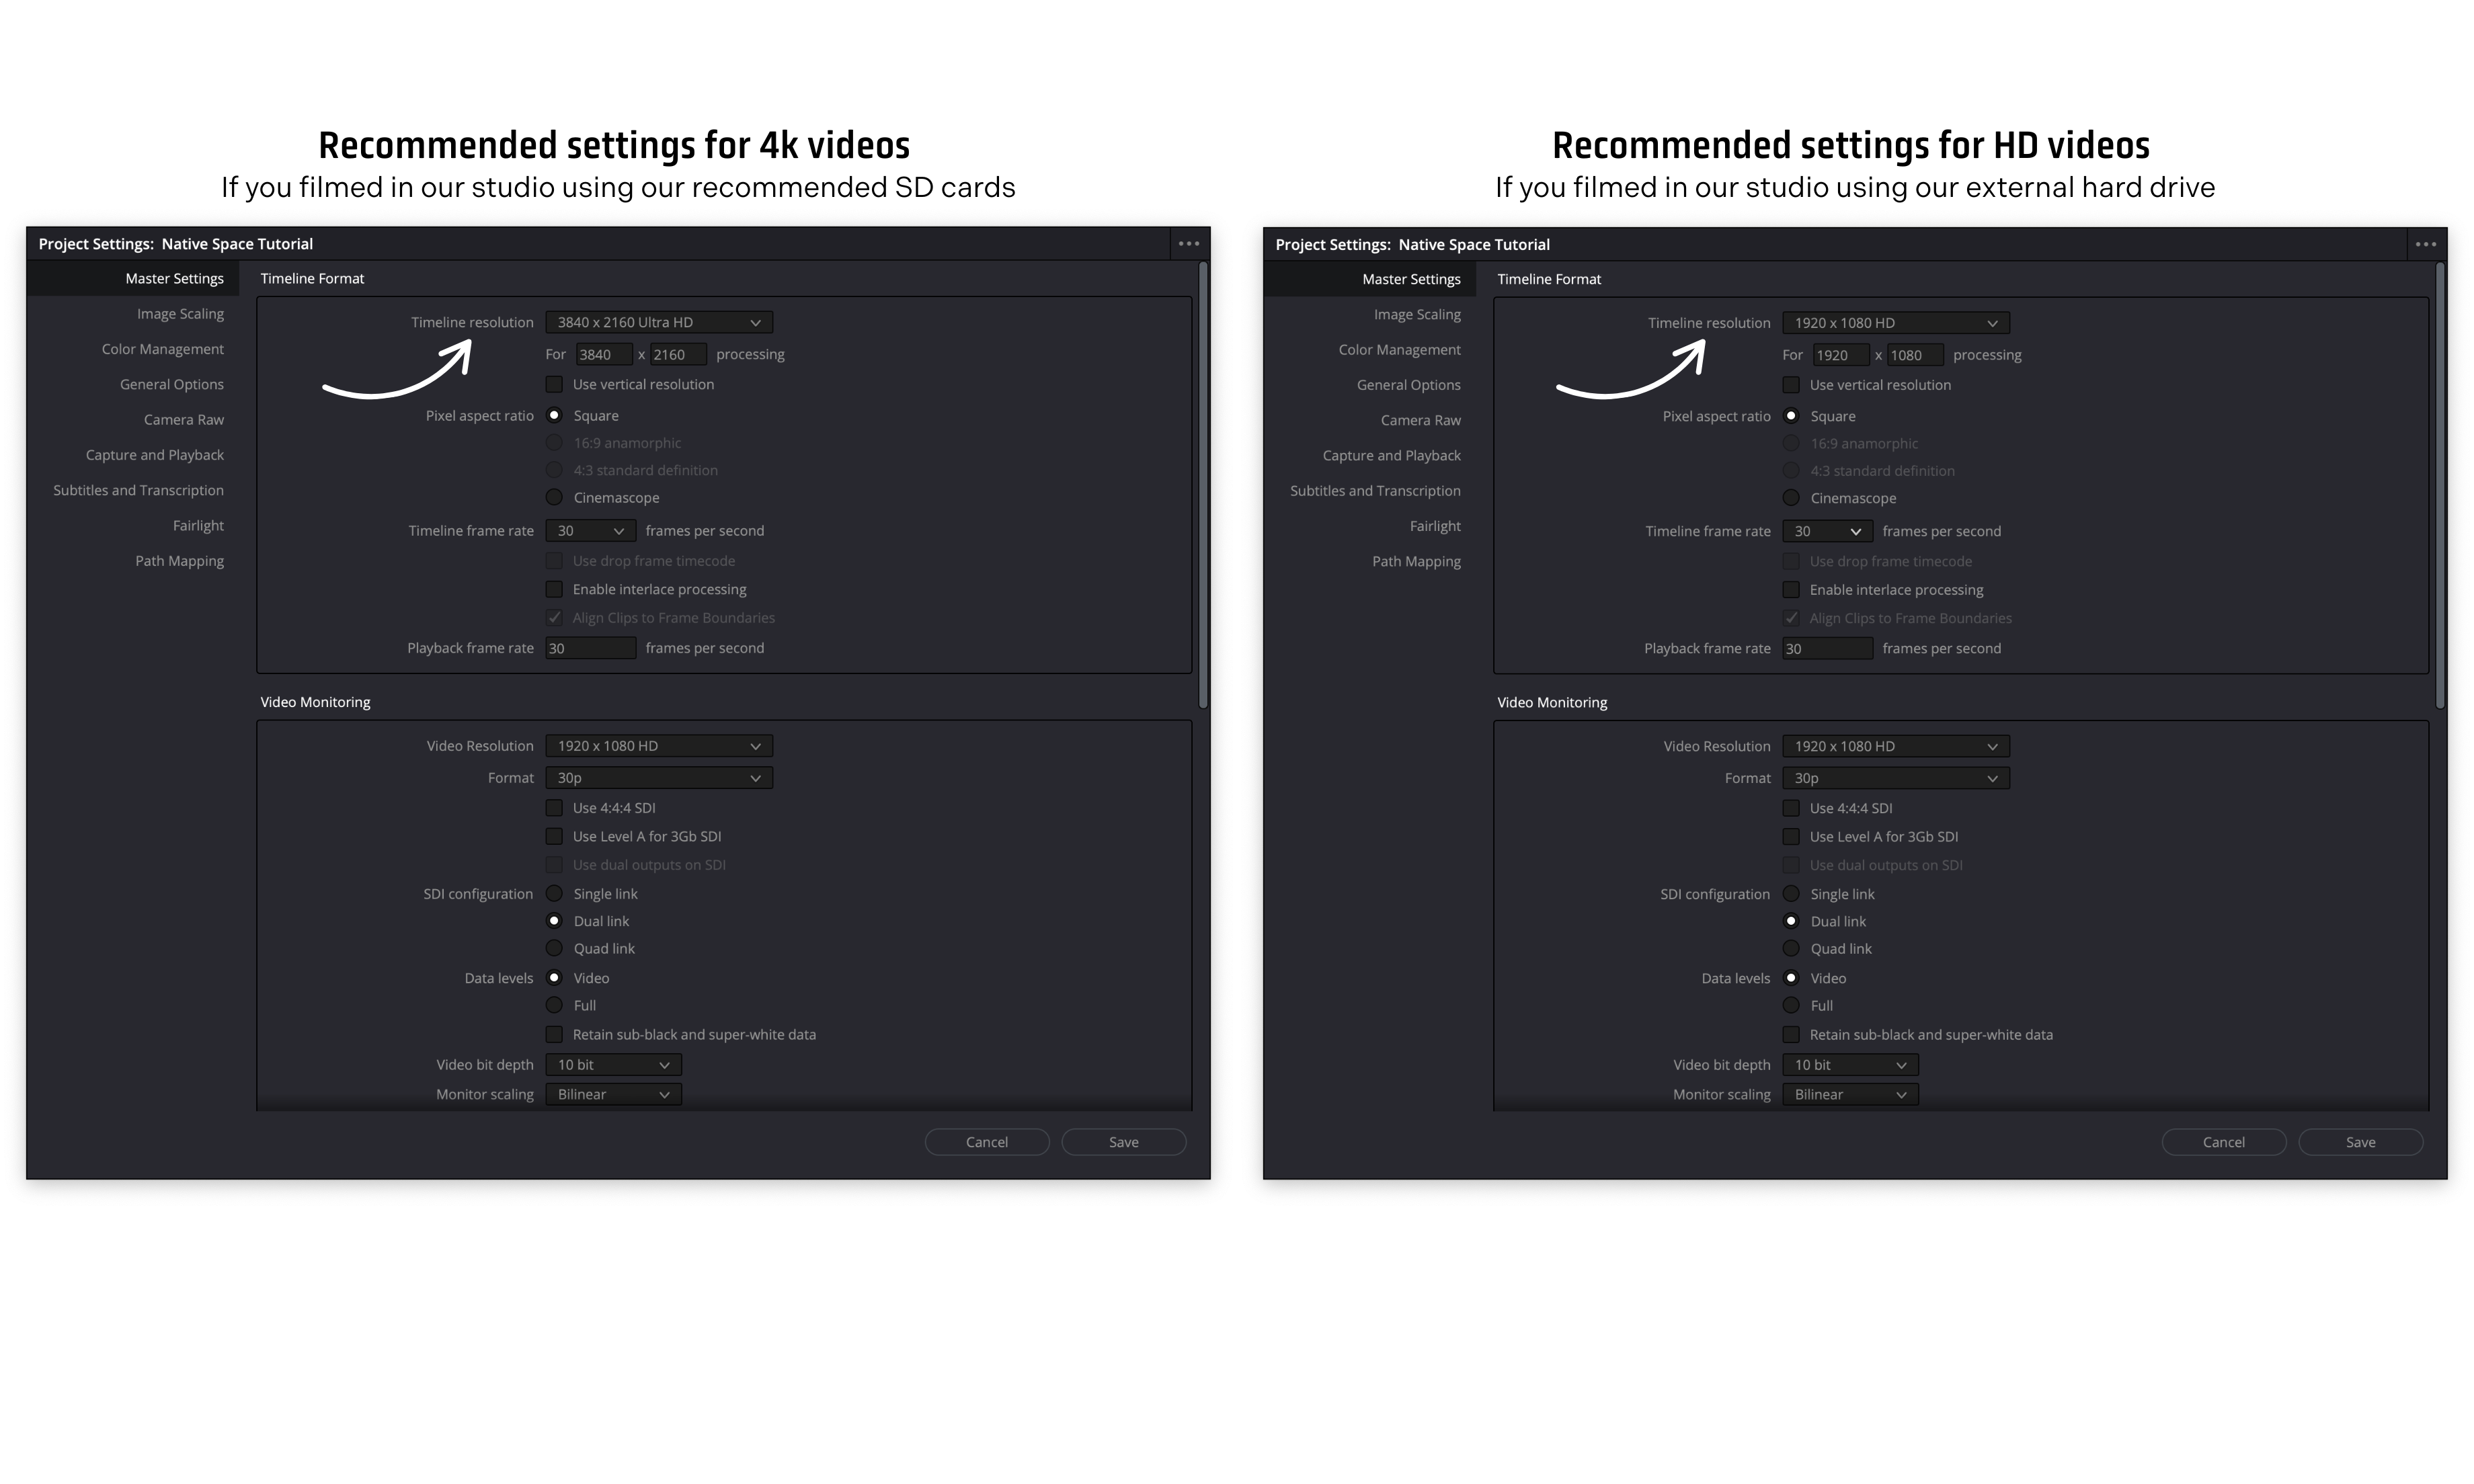
Under Timeline Format, set your Timeline Resolution:
Choose Ultra HD if you recorded in 4K (e.g. using Native Space SD cards or our recommended ones)
Choose HD (1920x1080) if you recorded to one of our external hard drives
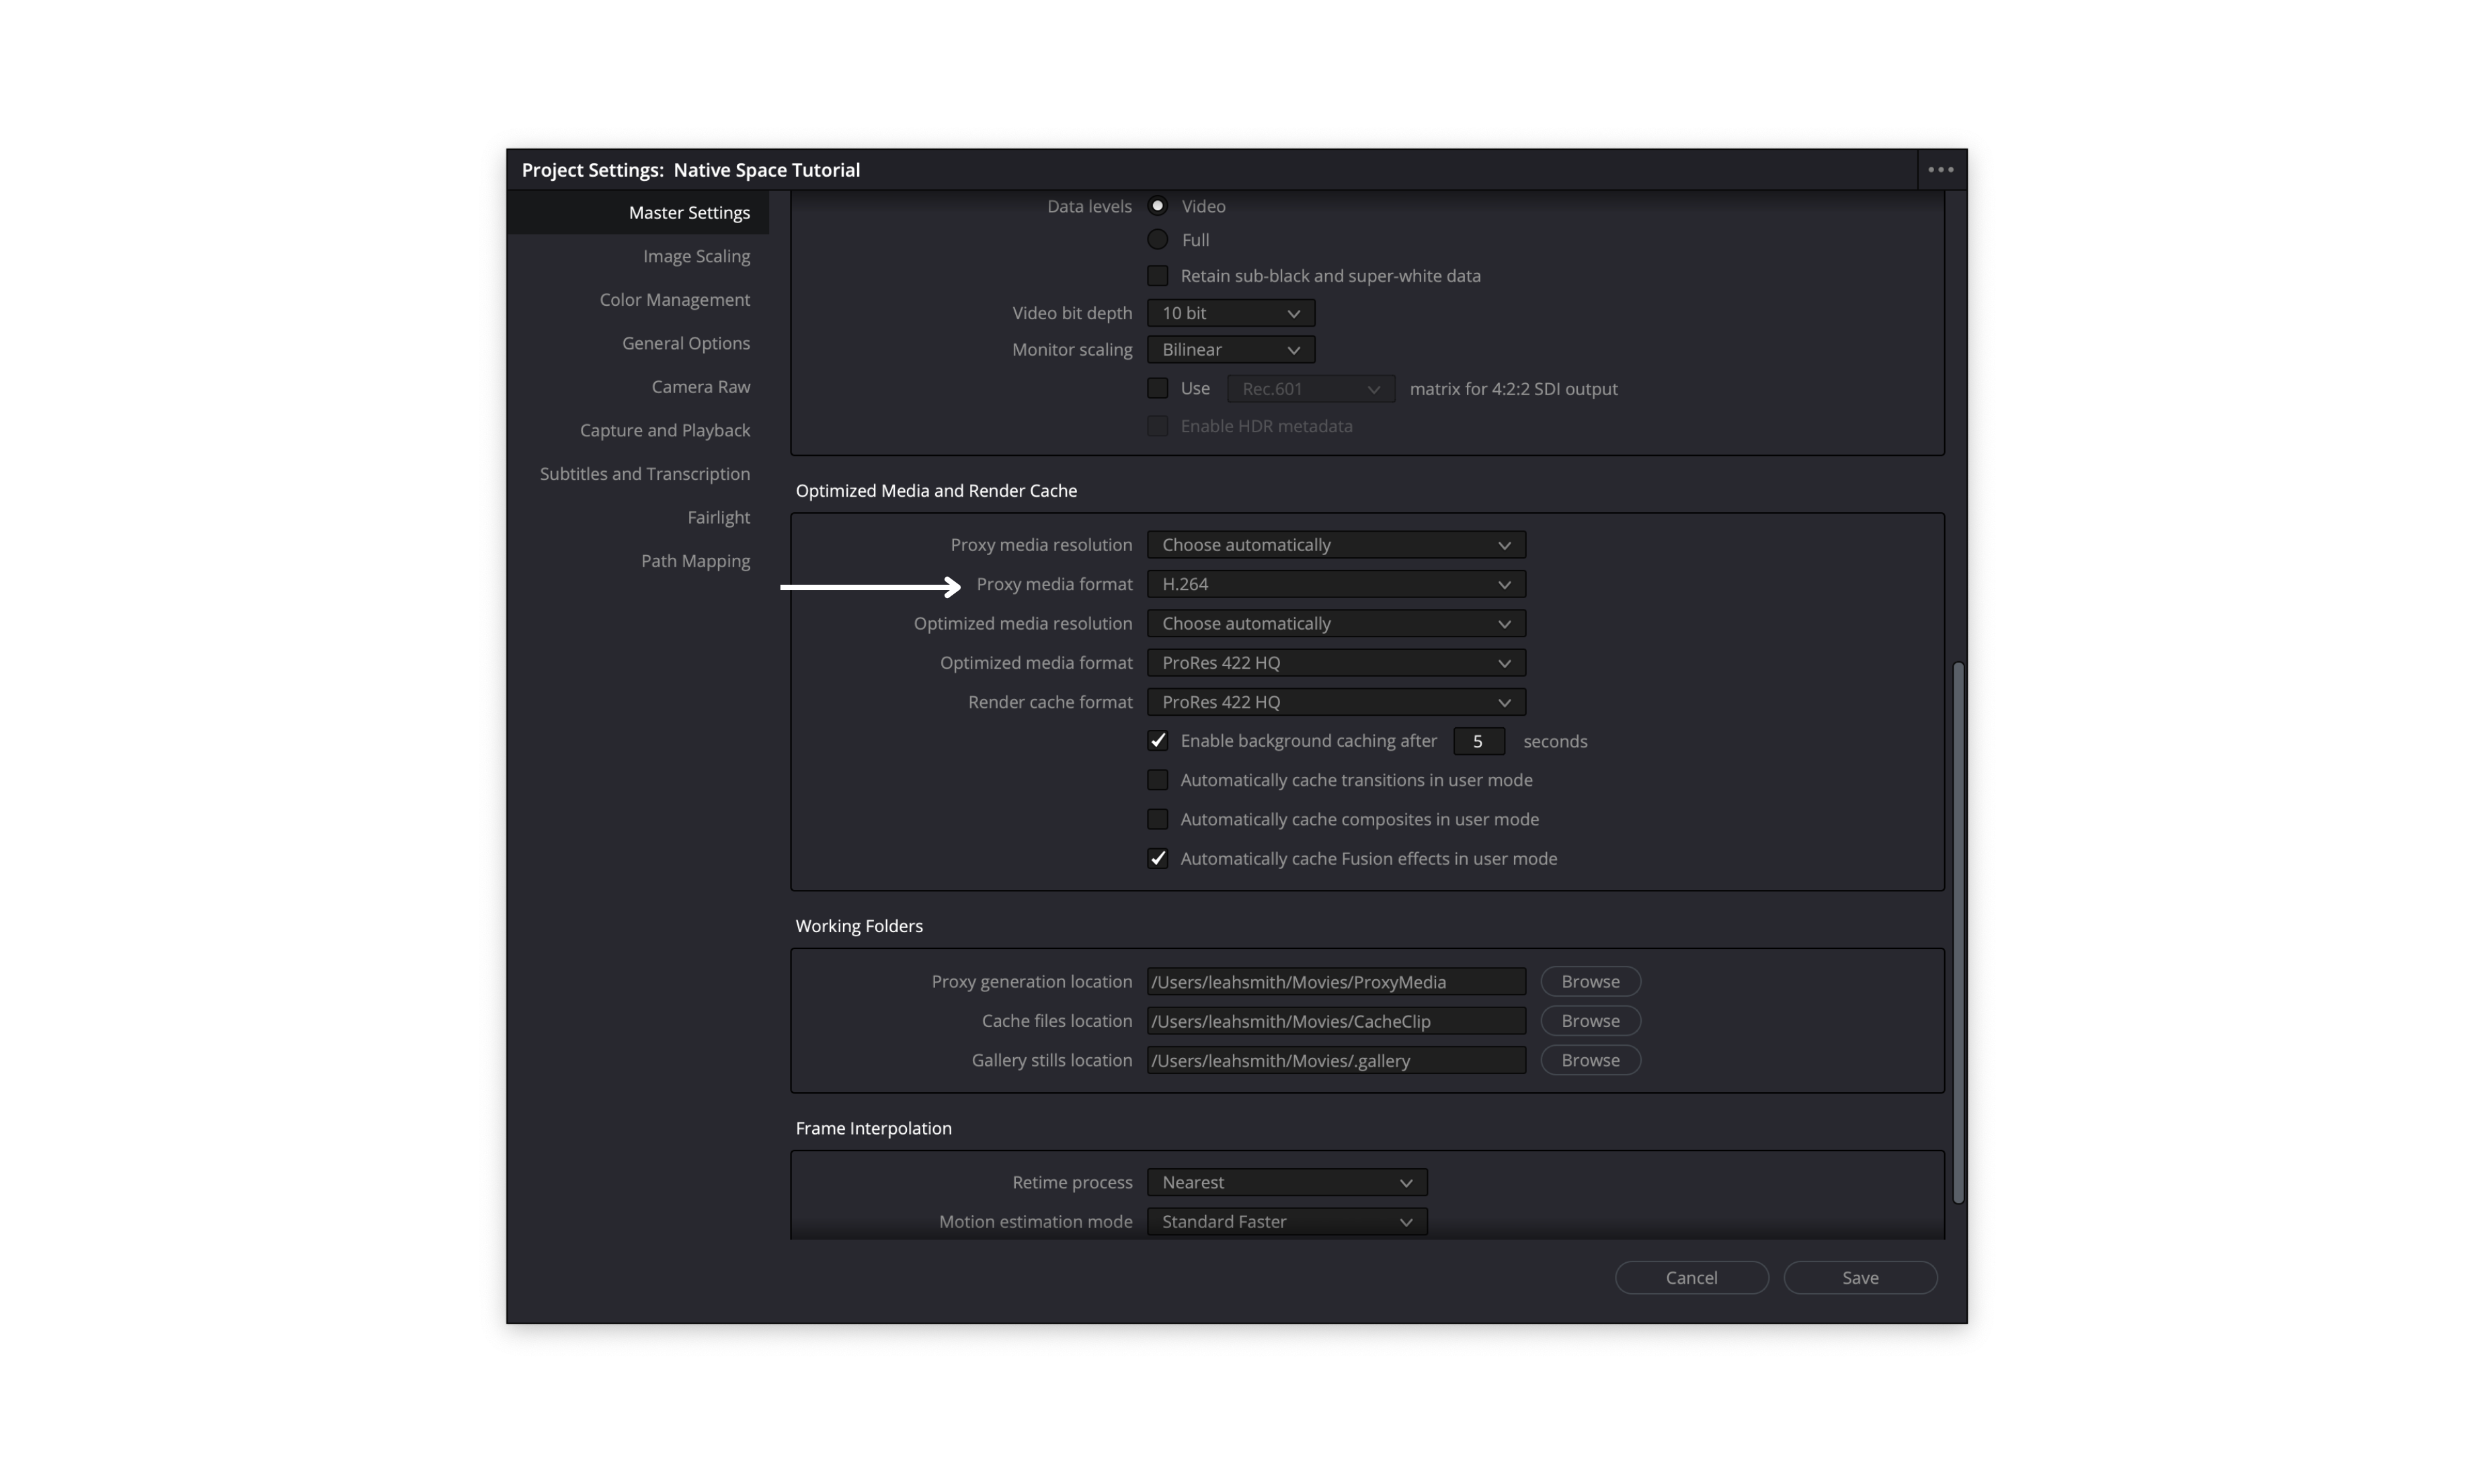
Scroll down to Proxy Media Format and change it to H.264 for smoother playback
Click Save to lock in these preferences
Here’s a beginner-friendly Davinci Resolve editing guide you can use for most projects - and we’ll use a podcast video as our example.
Step 1: Create Your Project
Open DaVinci Resolve home page (you can always go back to the home page by pressing the home icon in the bottom right hand corner)
Click “New Project”
Name it (e.g. Native Space Tutorial) and hit Create
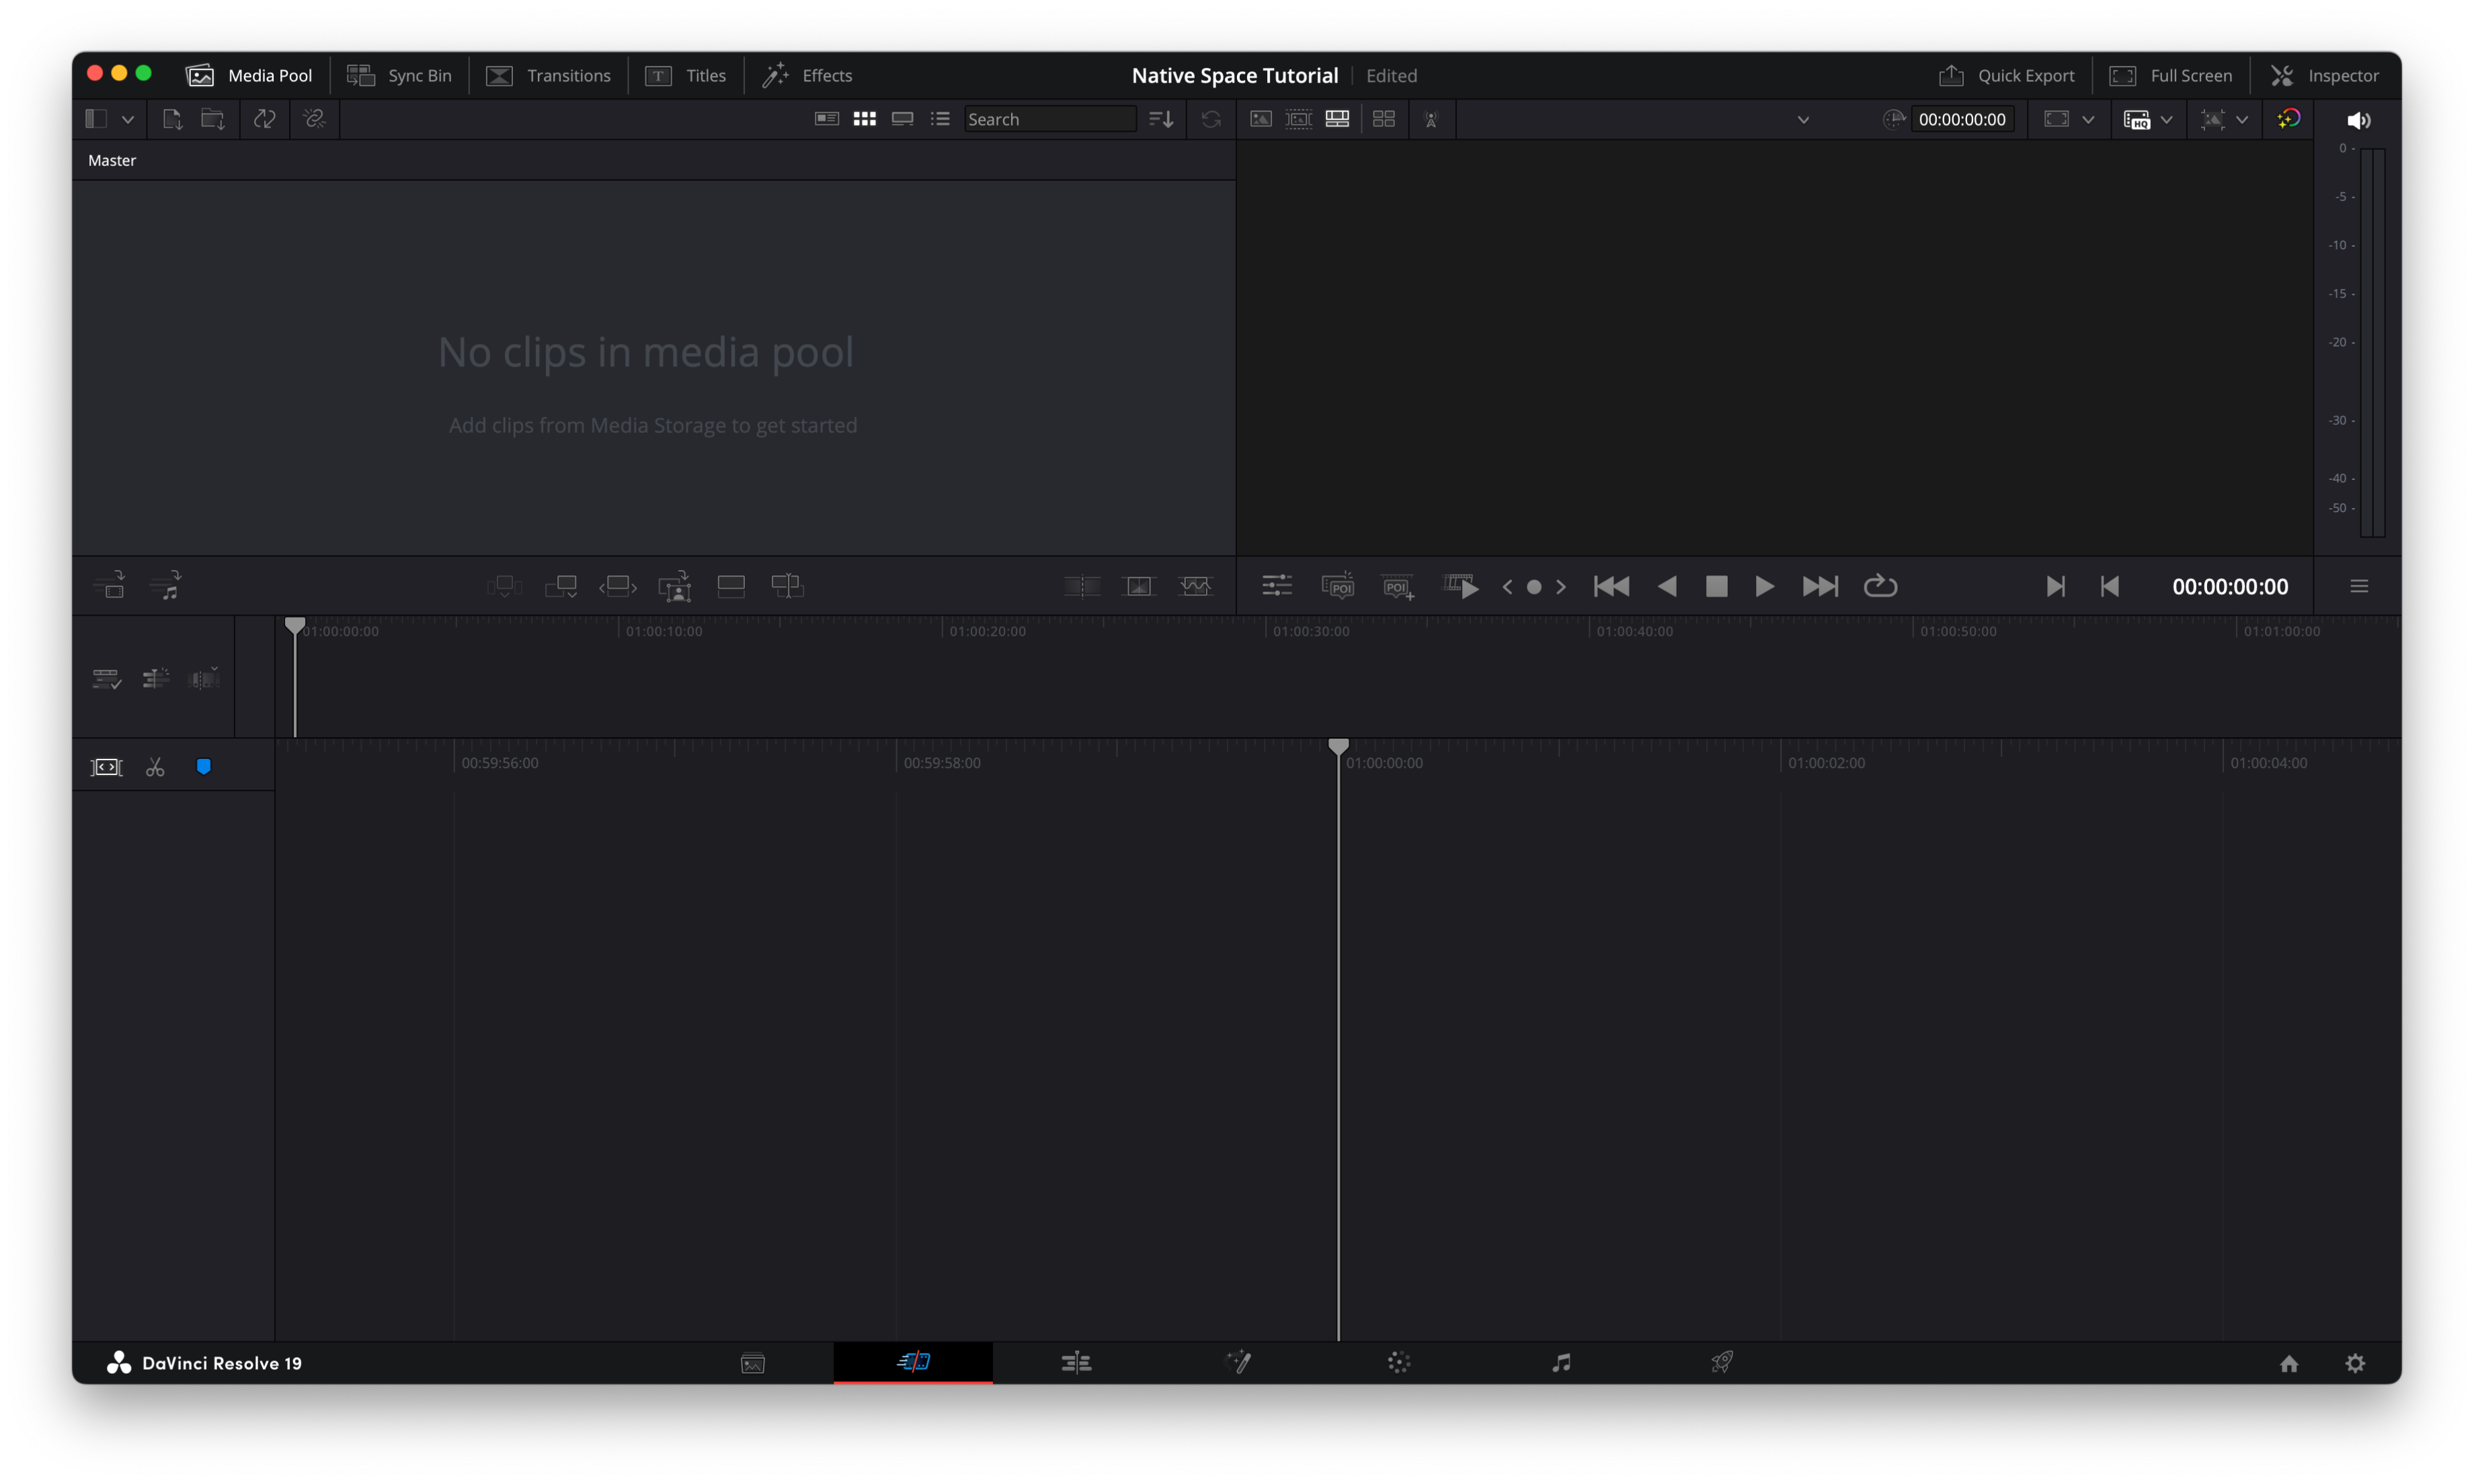
DaVinci will create Timeline 1, where all your editing will happen.
🎥 Timelines are where you drag your clips and build your video. You can create more, but one is perfect for most edits.
Step 2: Import Your Media
You’re going to select the Media tab (from the icons along the bottom - refer to the image above for a reminder if needed):
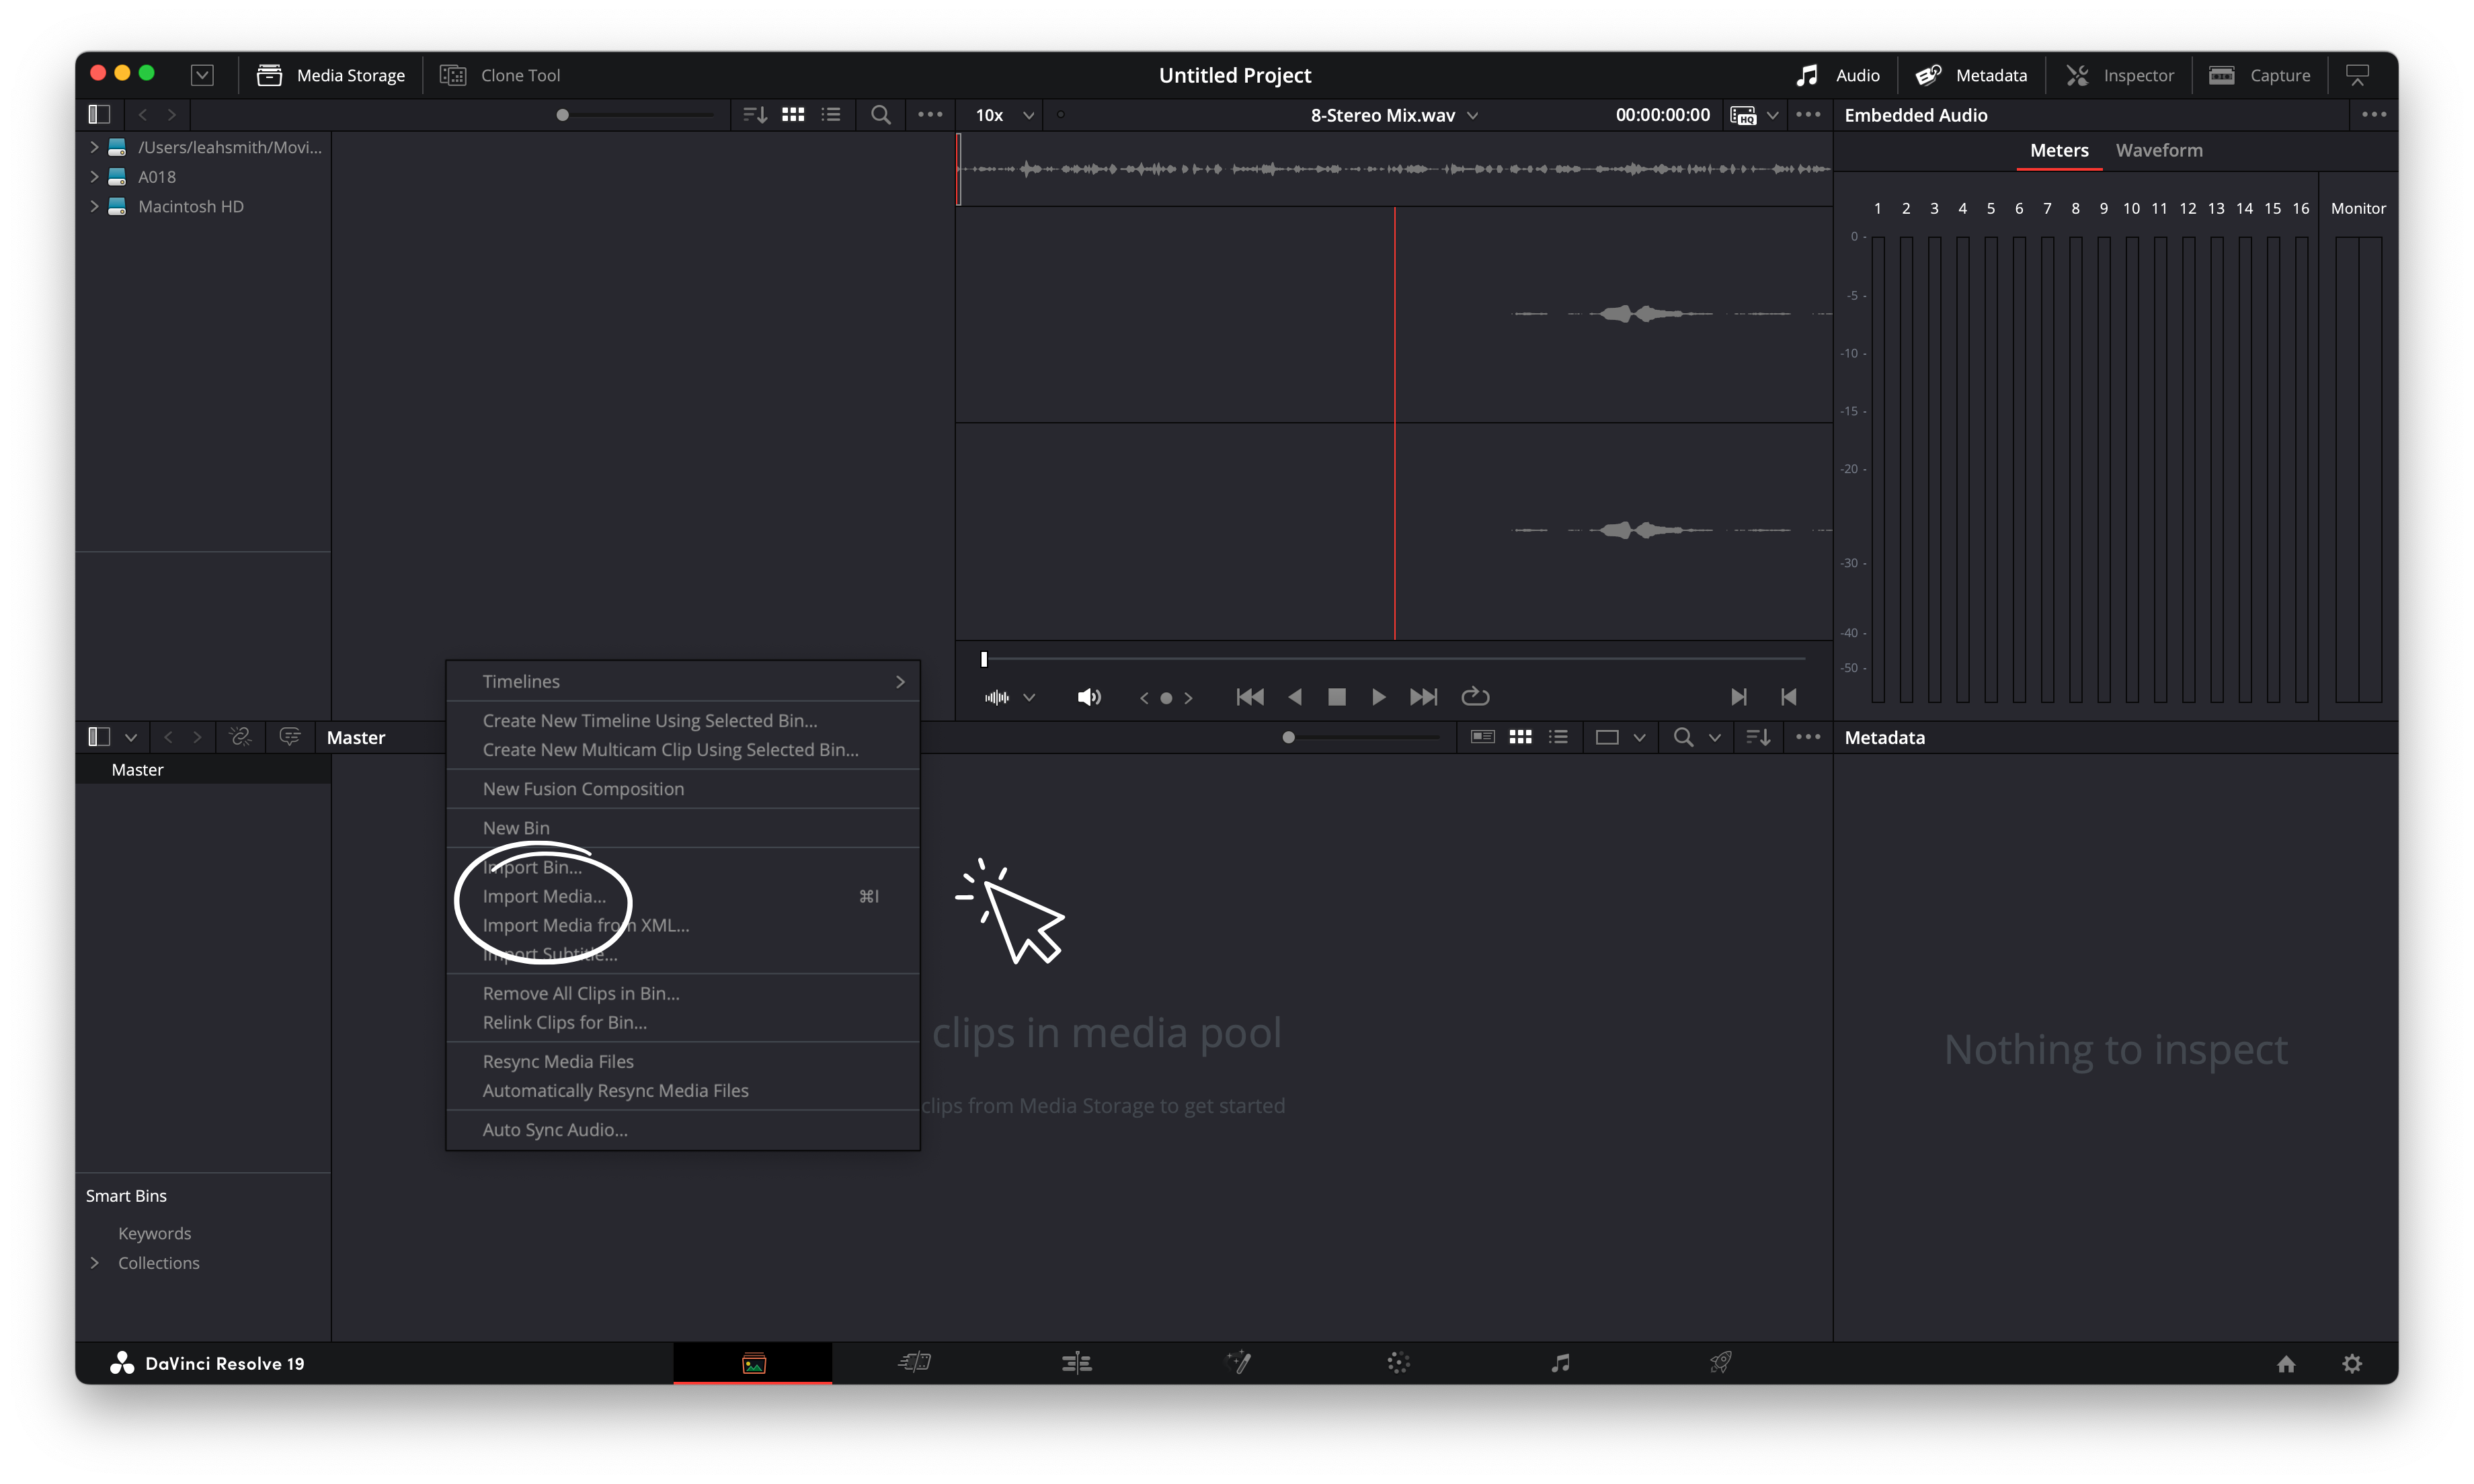
Right-click in the area that says ‘No clips in media pool’
Select Import Media
Choose your video files and audio file (e.g. stereo mix)
Click Open to bring them into your project
⚠️Frame Rate Warning When Importing
When you import your media, you may see a pop-up asking to change the frame rate. Click “Change” so your project matches the footage correctly.
Once imported, you’ll see your files appear in the Media Pool. From here, they are accessible in other tabs.
Previewing Media:
You can double-click any clip in the Media Pool (top left of the Edit tab) to preview it in the viewer above. This is handy to confirm you imported the correct clips.
Step 3: Sync Audio to Video
If you recorded separate audio, e.g. from a podcast mic (which you likely did if recording in the Native Space Studio) it’s now time to sync it with your video:
Switch to the Edit tab along the bottom
You should see your files in the media pool of the edit tab (top left corner)
If they’re not there, you’ll just need to right click in the media pool and repeat step 2
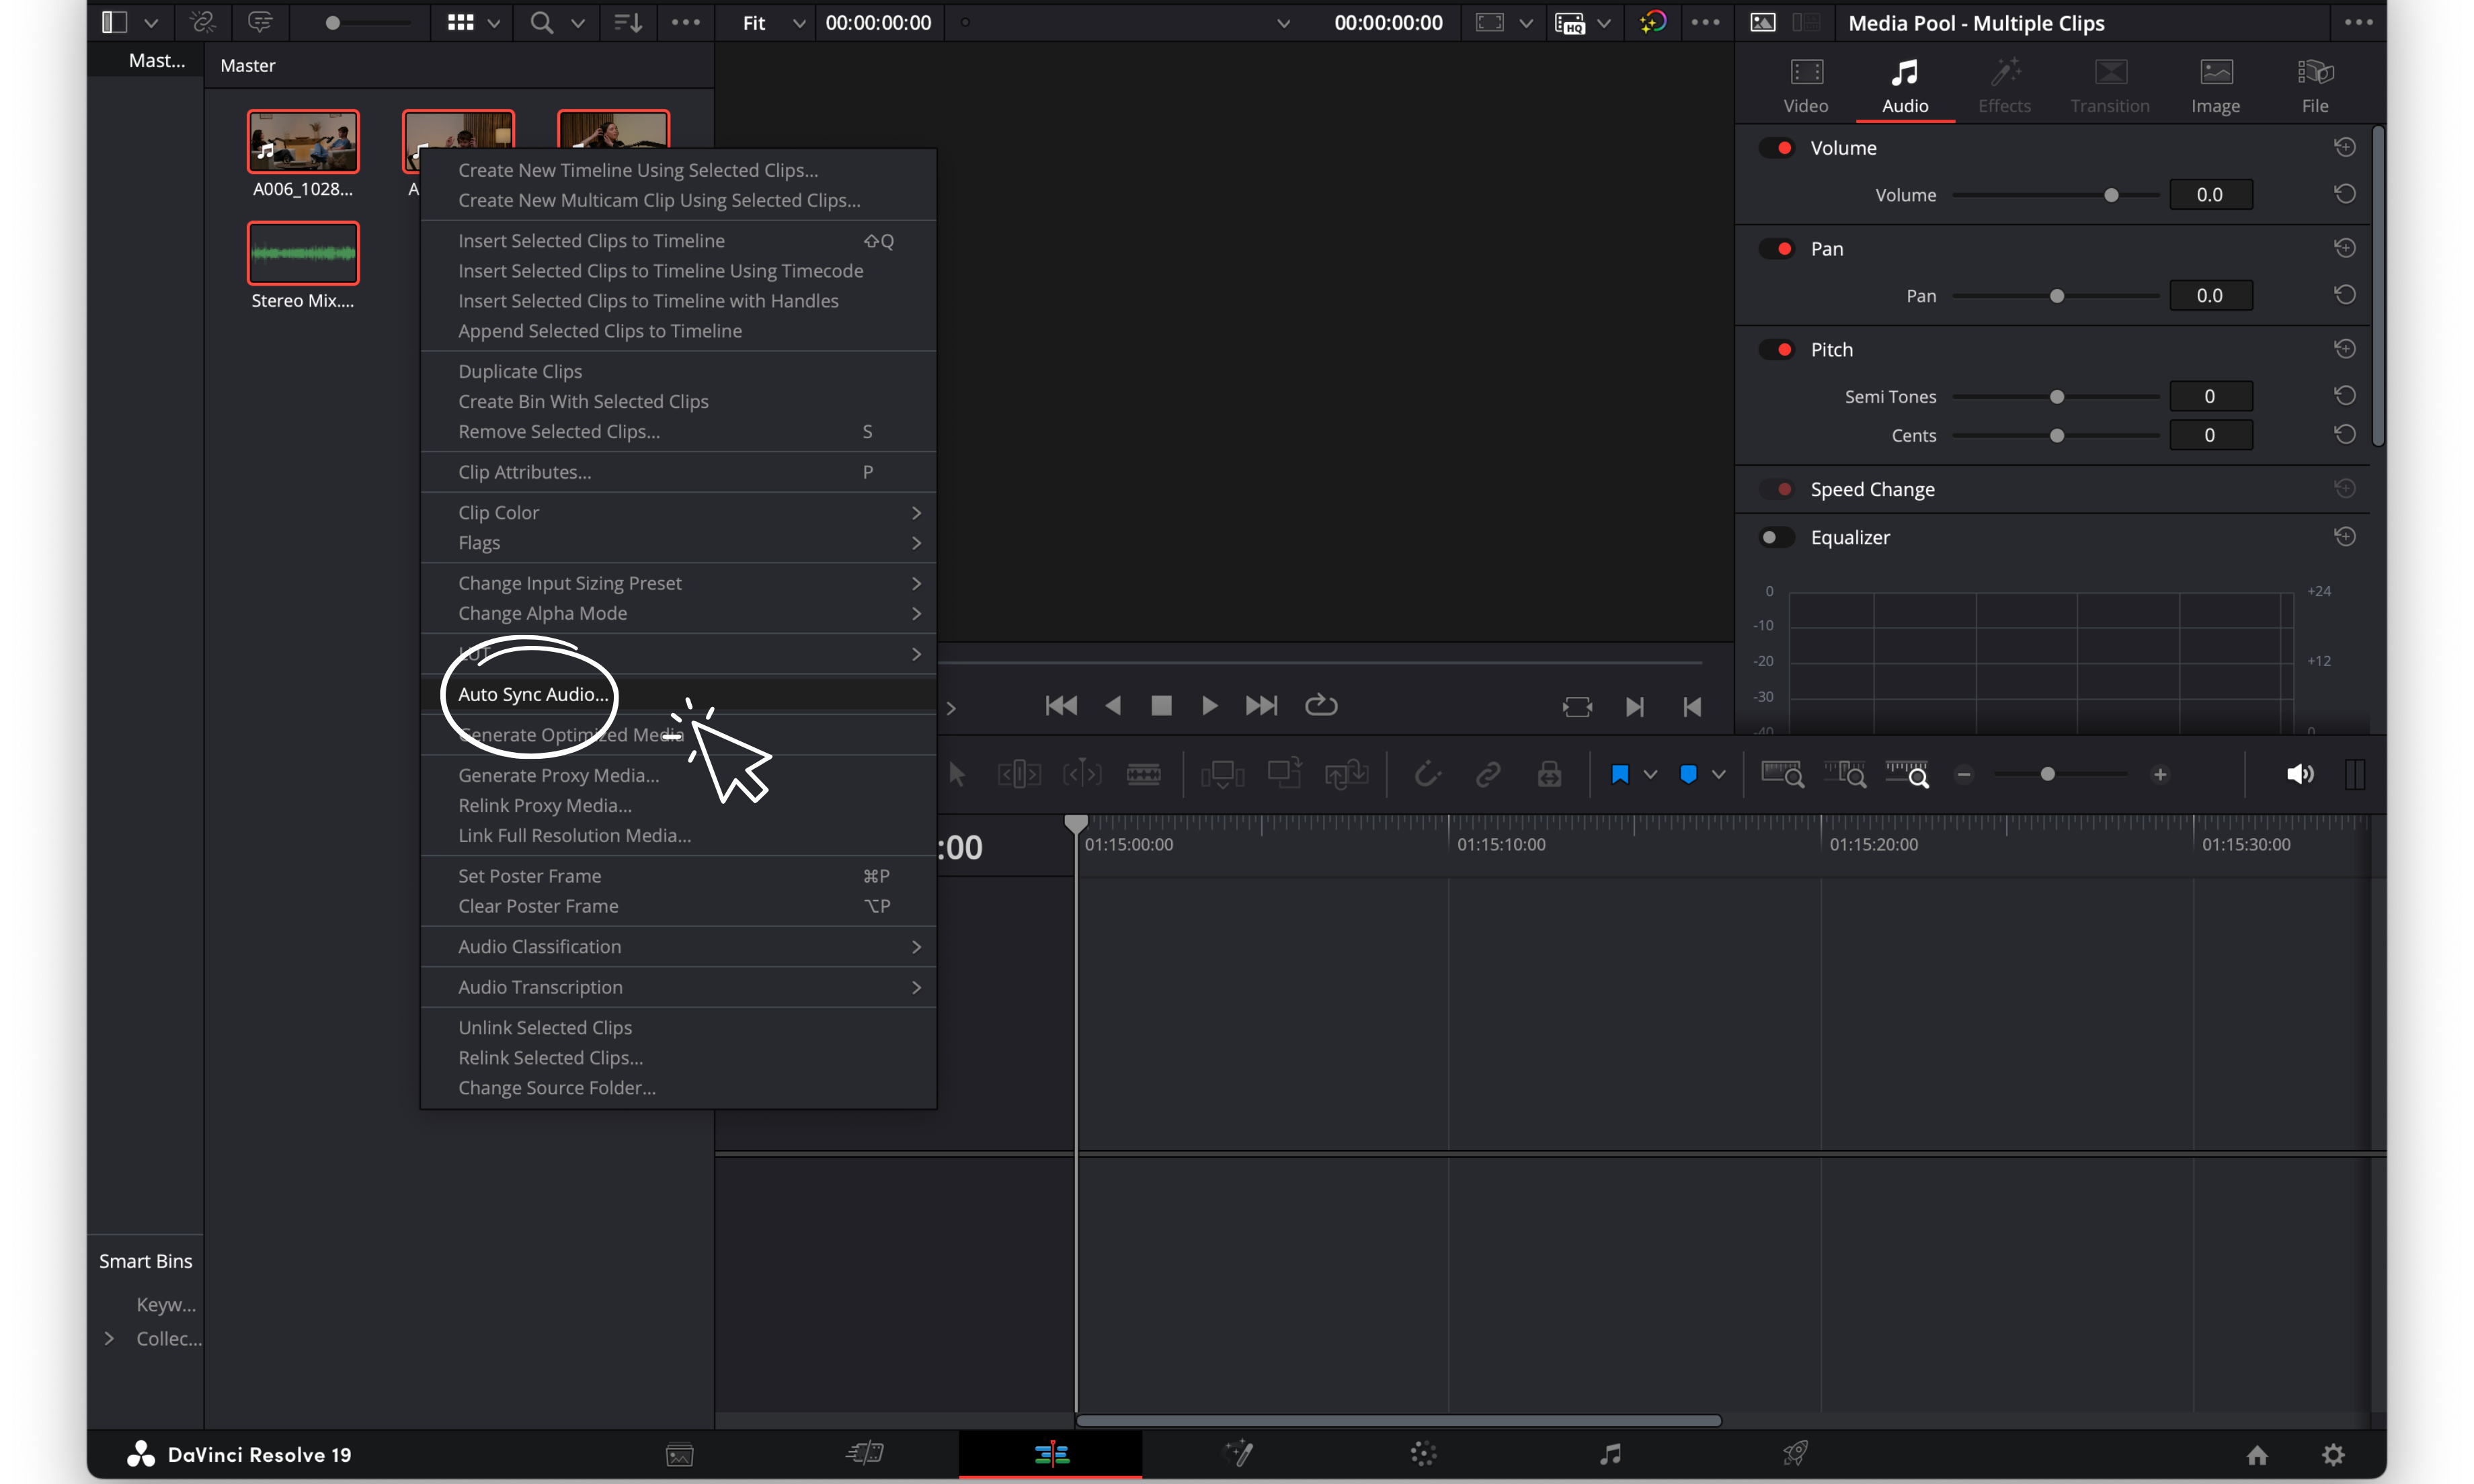
Highlight all of the video clips that you would like syncing to the audio file (stereo mix) by dragging over the relevant files
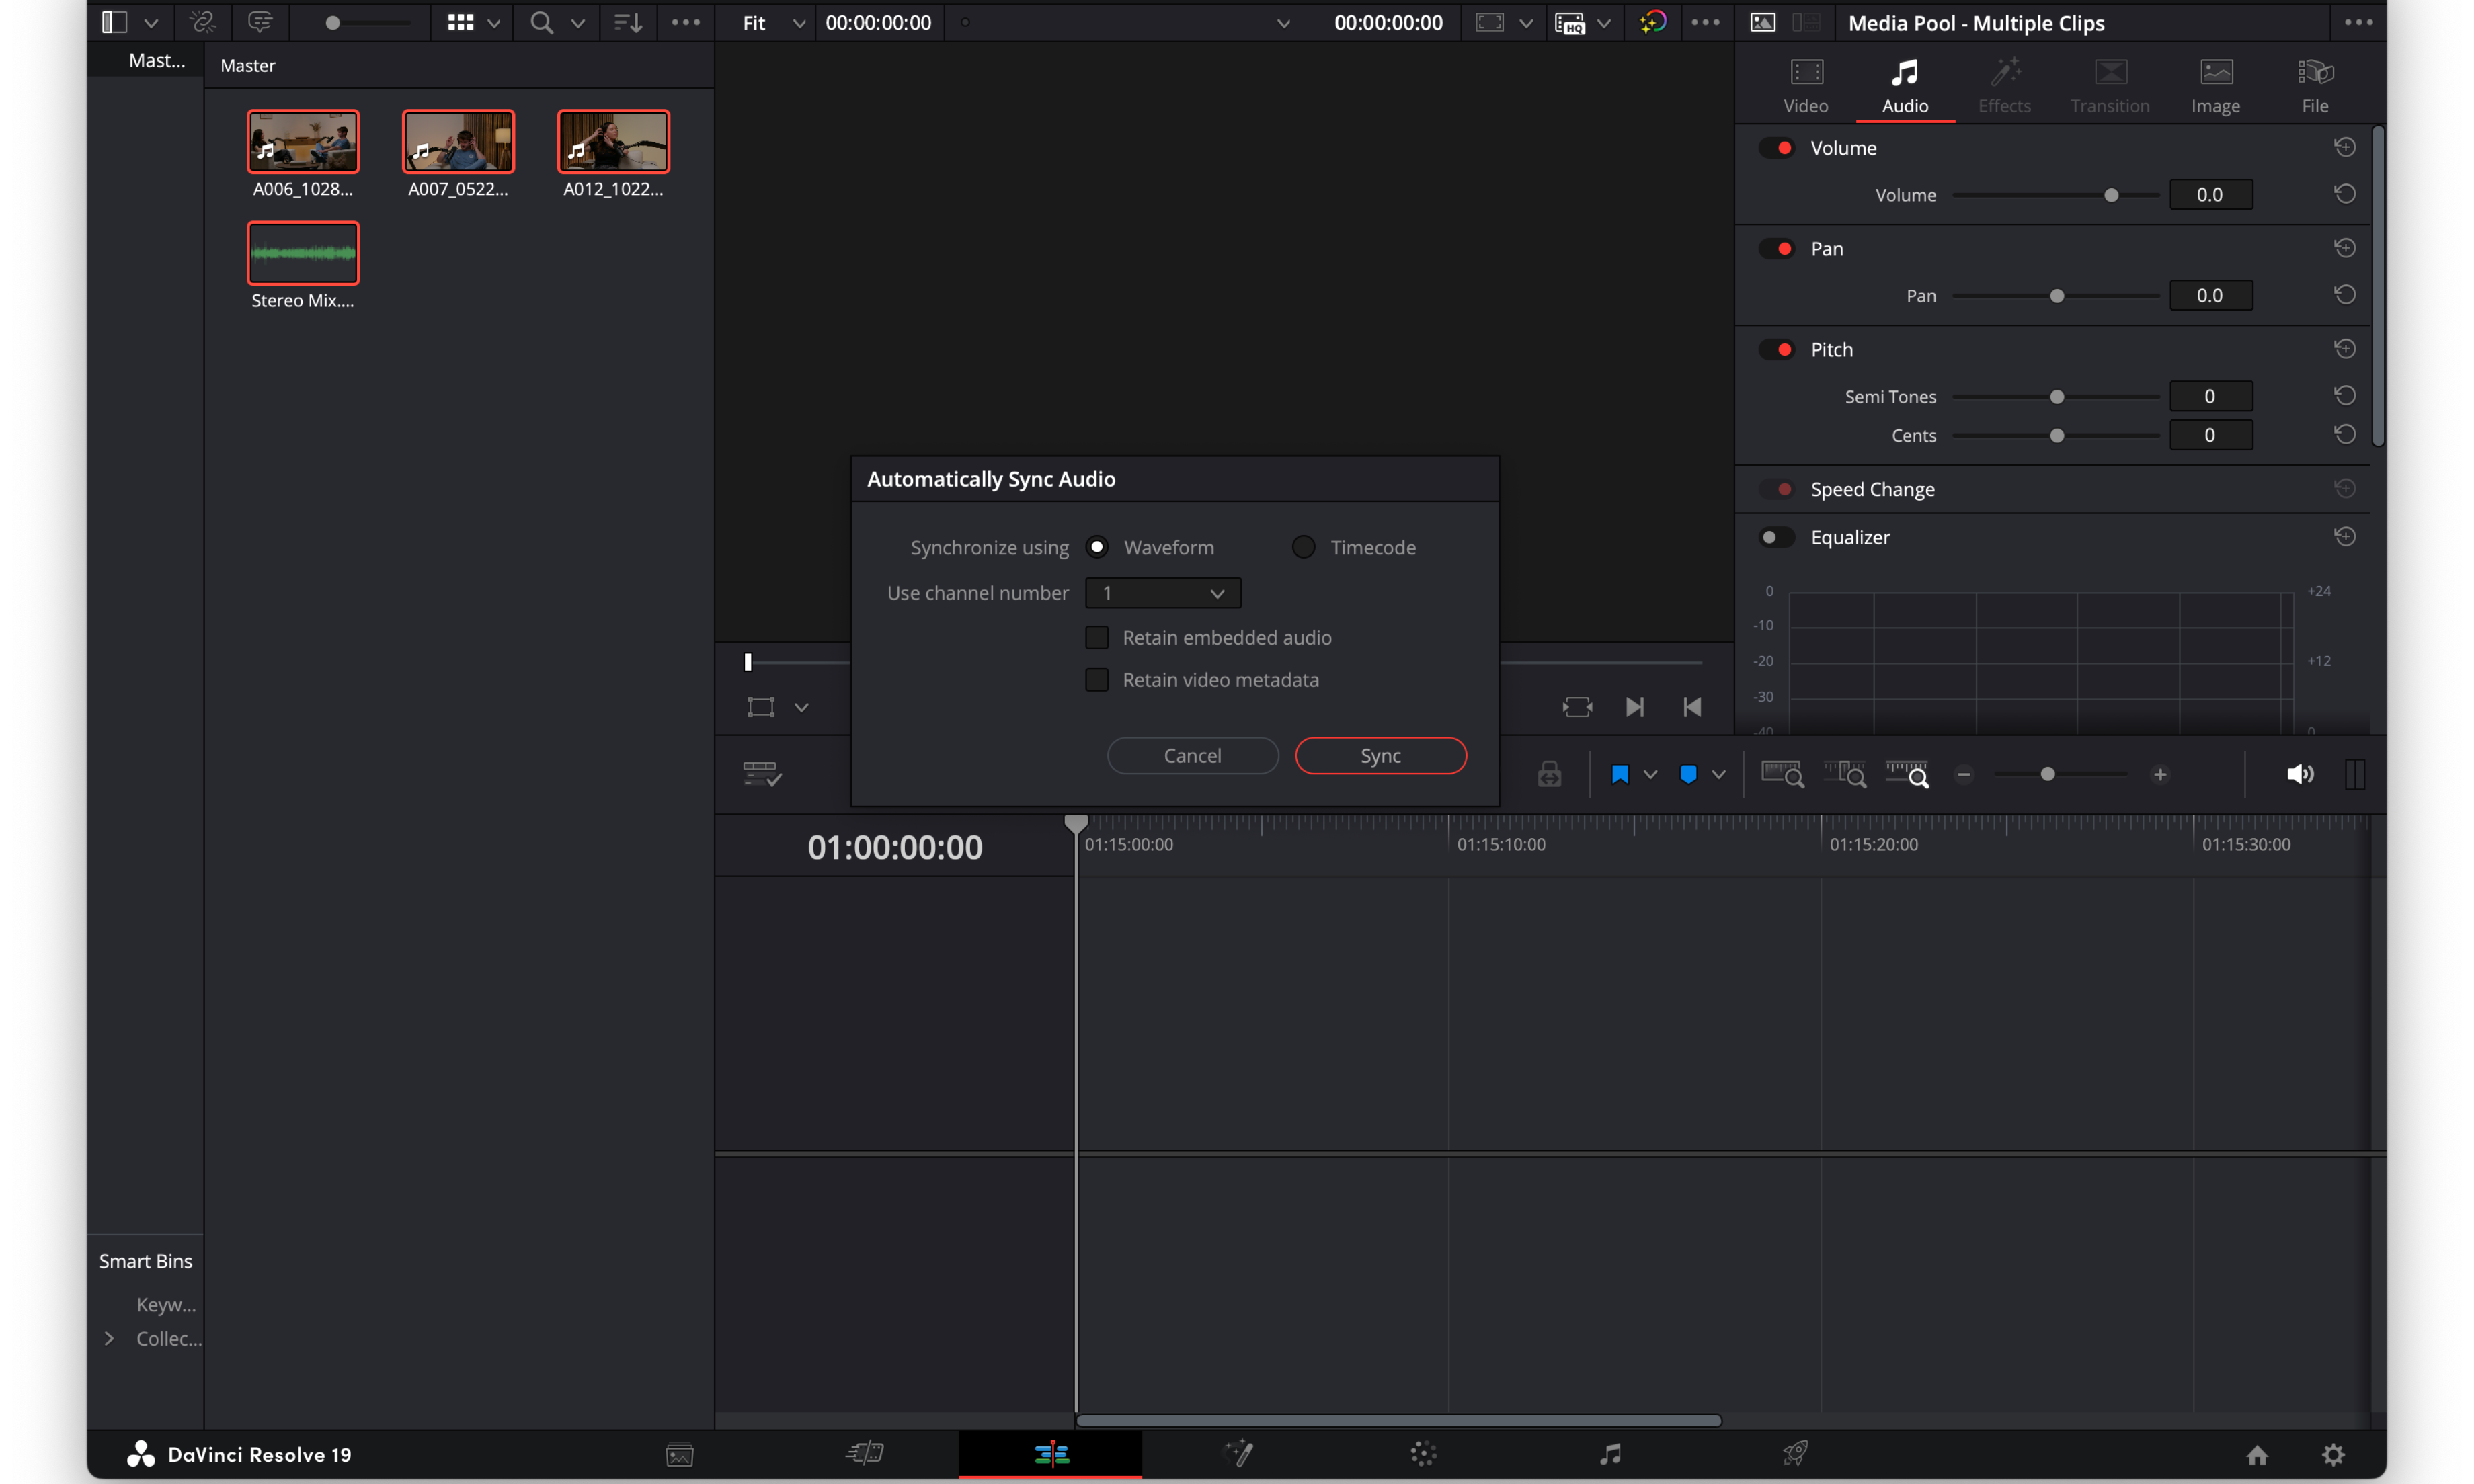
Right-click > Auto Sync Clips > choose Sync by Waveform
🔊 This syncs the mic audio with the camera audio using sound waves. Only use “Timecode” if you recorded with synced timestamps (unlikely for beginners).
Your video clips are now using the better-quality mic audio rather than the camera audio
Step 4: Add to Timeline & Start Editing
Understanding the Timeline:
The Timeline is where you build your project
The blue clips represent video, and the green clips represent audio
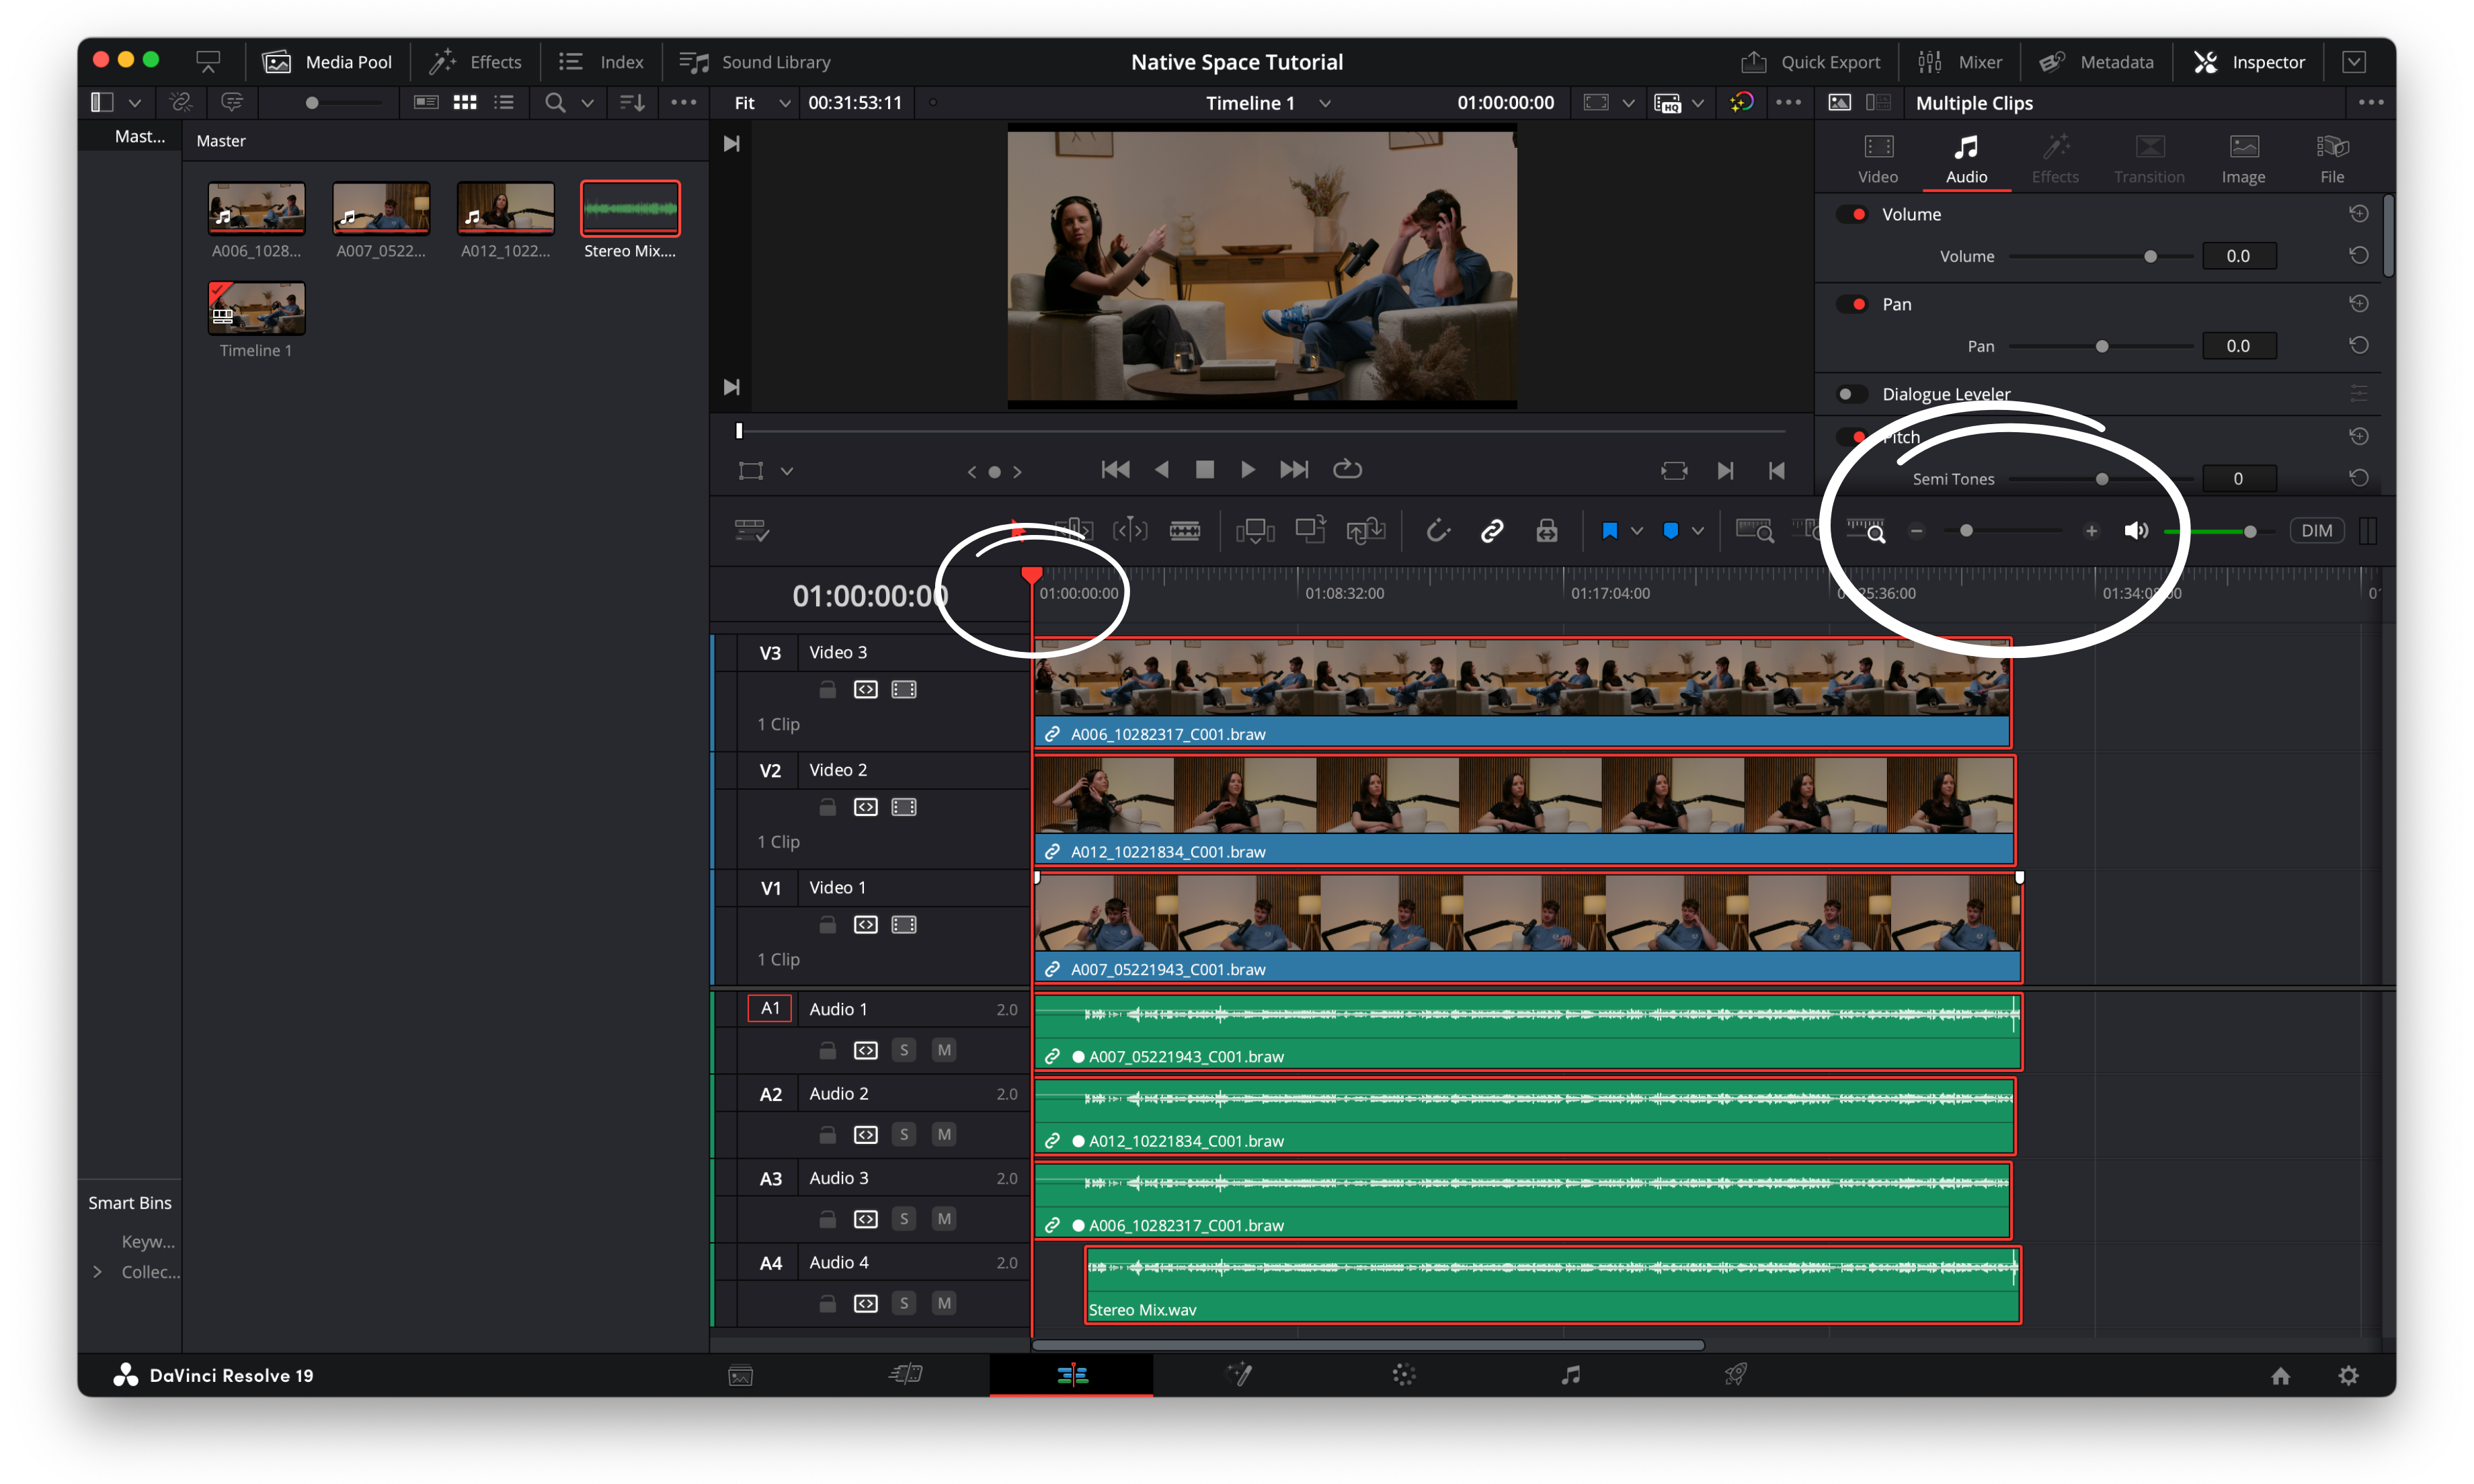
The red vertical line is the playhead — it shows where you are in the timeline. You can drag it around to navigate, or hit the Spacebar to play in real time
Use the + and - icons on the timeline to zoom in or out. Zooming in gives you finer control when making detailed cuts
You can also adjust the height of your video and audio tracks in the timeline by dragging the divider between them. This helps you see your waveforms more clearly.
Stack Your Camera Angles
If you recorded in the Native Space Studio, it’s likely you used multiple camera’s to film multiple angles if your podcast. Correctly organising the 2-3 camera tracks and your audio track to your timeline will make the editing process a lot smoother.
We’ll continue with the set up of having 3 camera files to contend with.
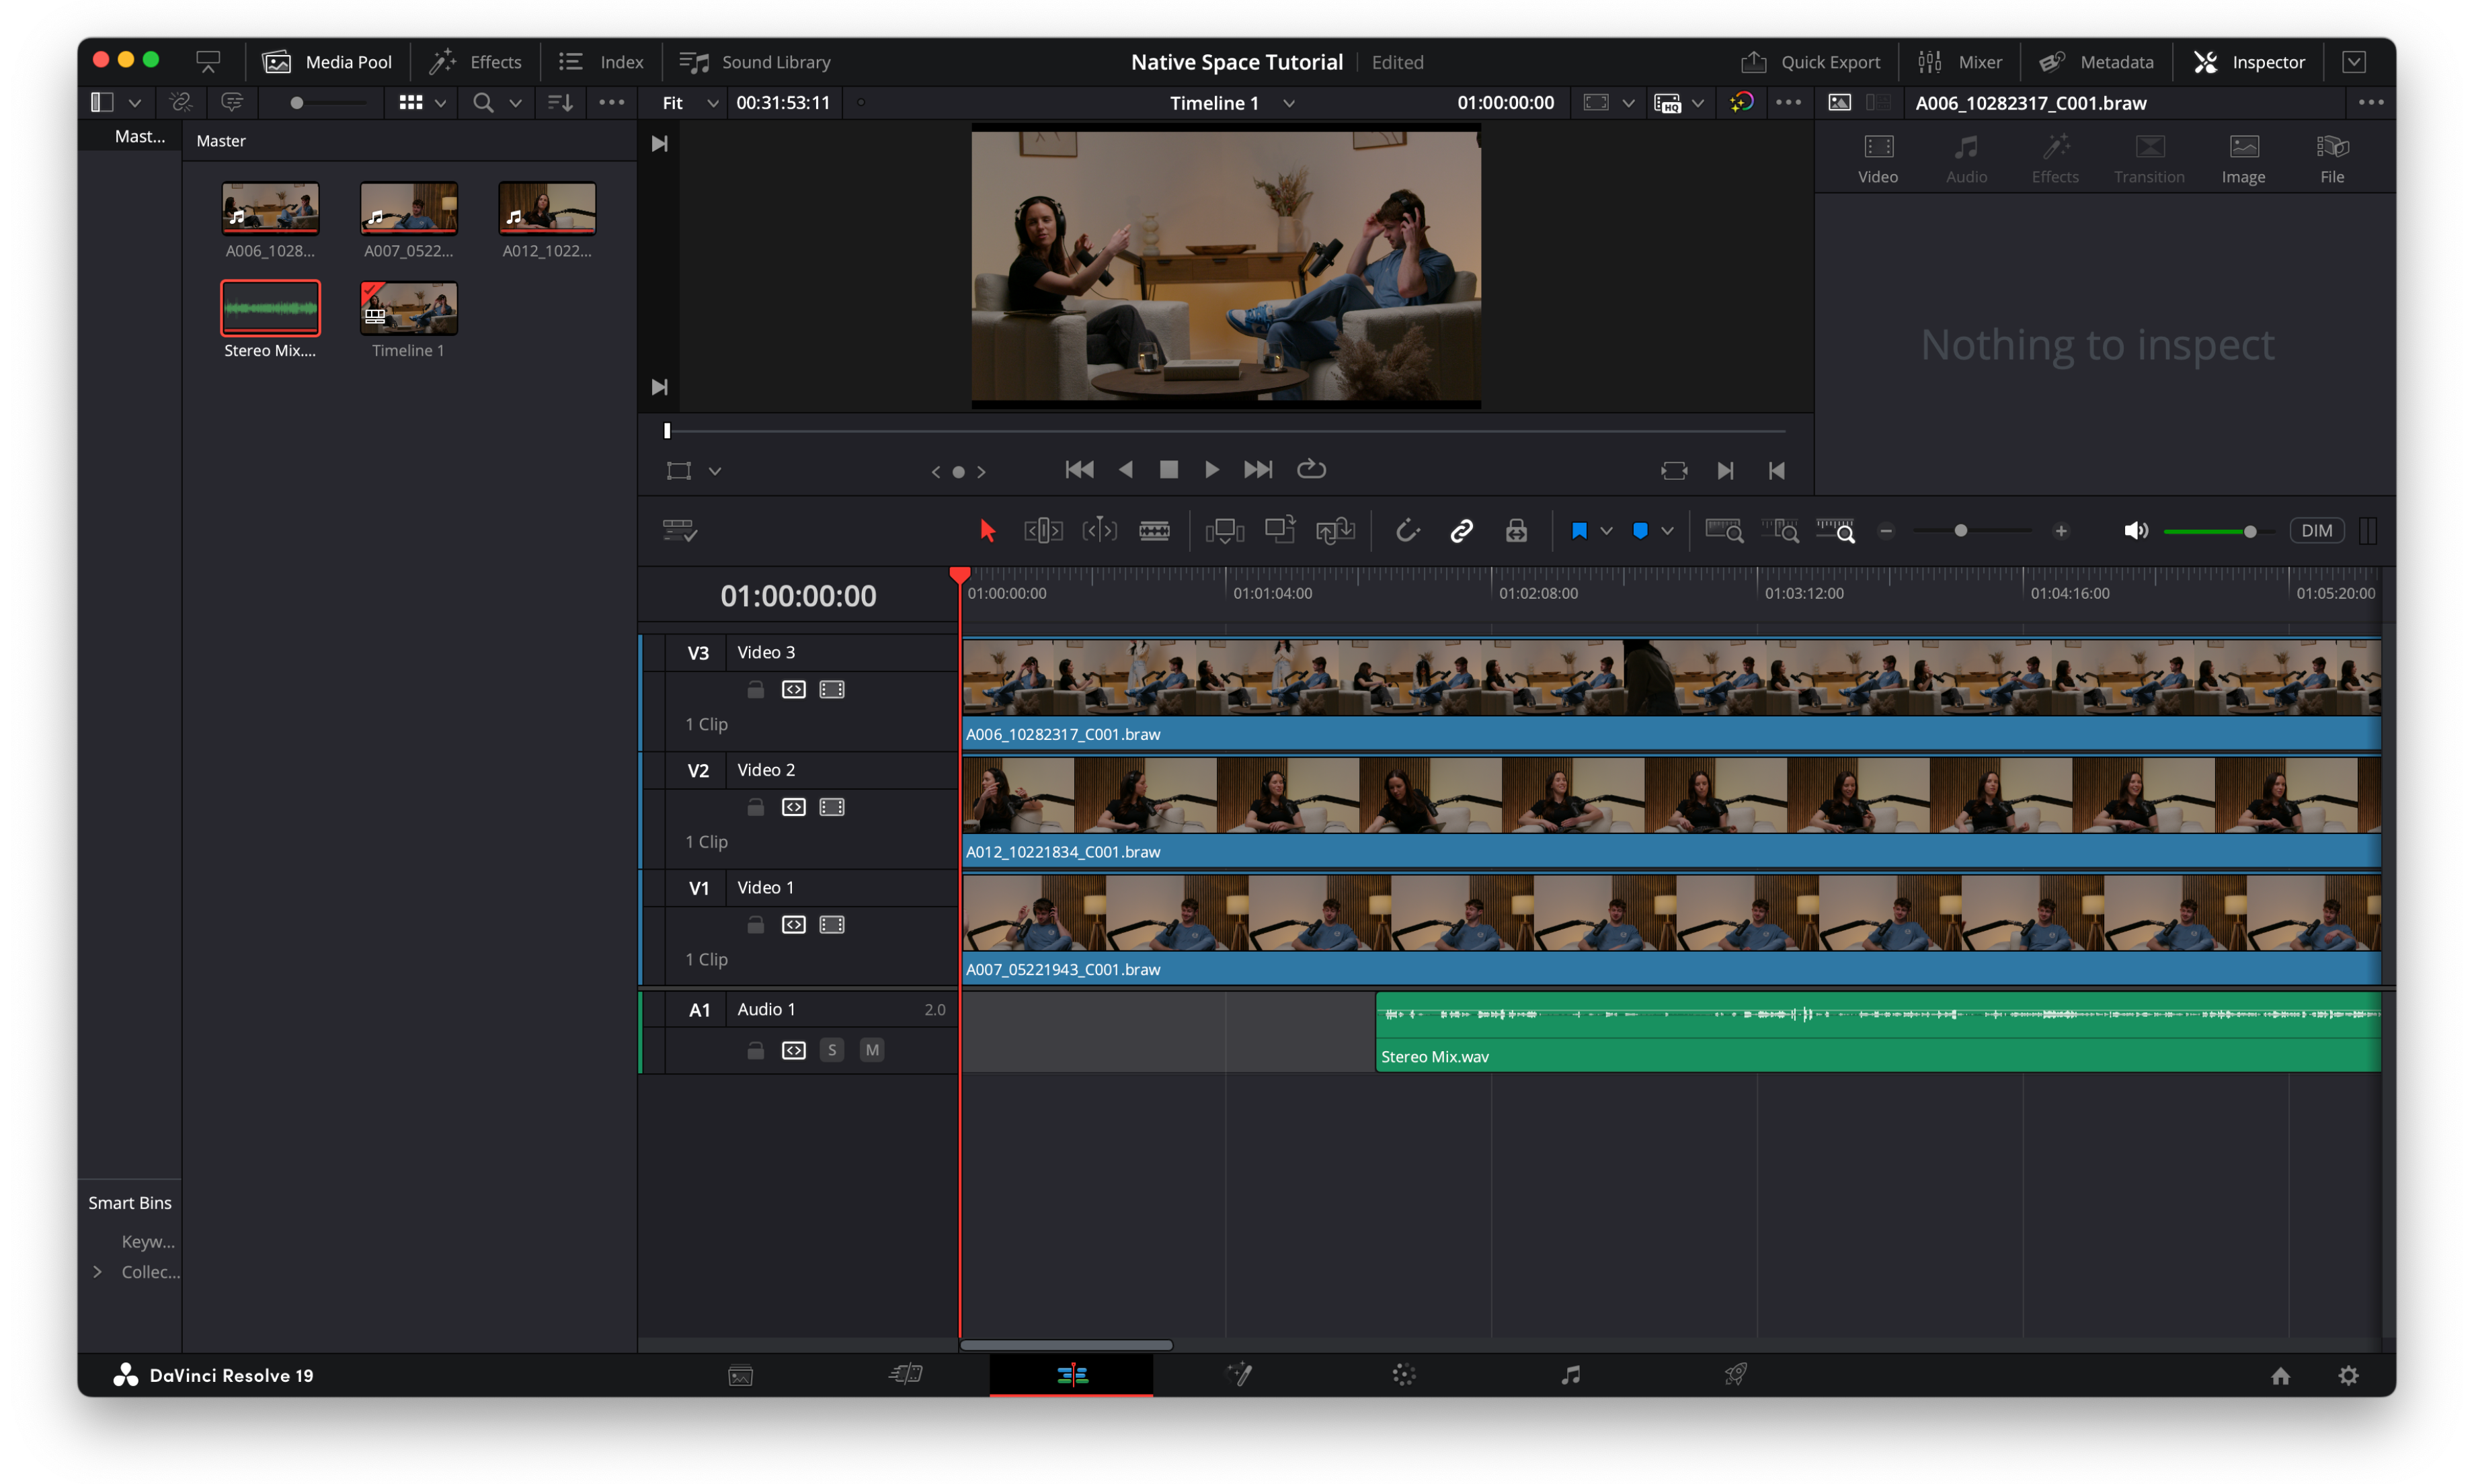
Add your three synced video clips onto the timeline like this:
•V3: Main wide shot (used as the base layer — always visible unless something plays over it)
• V2: Person 1
• V1: Person 2
This step can be a little confusing as they stack in reverse order with V1 at the bottom of the stack. You can see the V1, V2 and V3 on the left of your tracks to make sure you’ve got them in the correct order.
If your clips need realigning once they’re in the timeline, or if the audio doesn’t seem to be synced properly, you can select all the video and audio tracks (including the stereo mix) by fragging over them, right-click, and choose Auto Align Clips. You’ll see the tracks shift slightly to align correctly. At this point, things should look something like the image below.
🎙 Organising the timeline and audio tracks.
You’ll now have several tracks that need tidying up and organising.
It’s vital that you keep the camera audio tracks until you’re certain the stereo mix has aligned correctly, as the stereo mix uses the camera audio to sync. Without them, functions like Auto Align Clips (by waveform) won’t work properly.
Once the clips are aligned, you can remove the camera audio tracks (A1, A2, and A3). This will leave just the stereo mix (the high-quality audio from your mics) and your three camera video tracks.
To do so, you can right click on the ‘Audio 1’ section (not the green track but the text to the left of it) and select delete.
Repeat this process forthe other two camera audio tracks
this will now leave your stereo mix in the A1 track - where it should be!
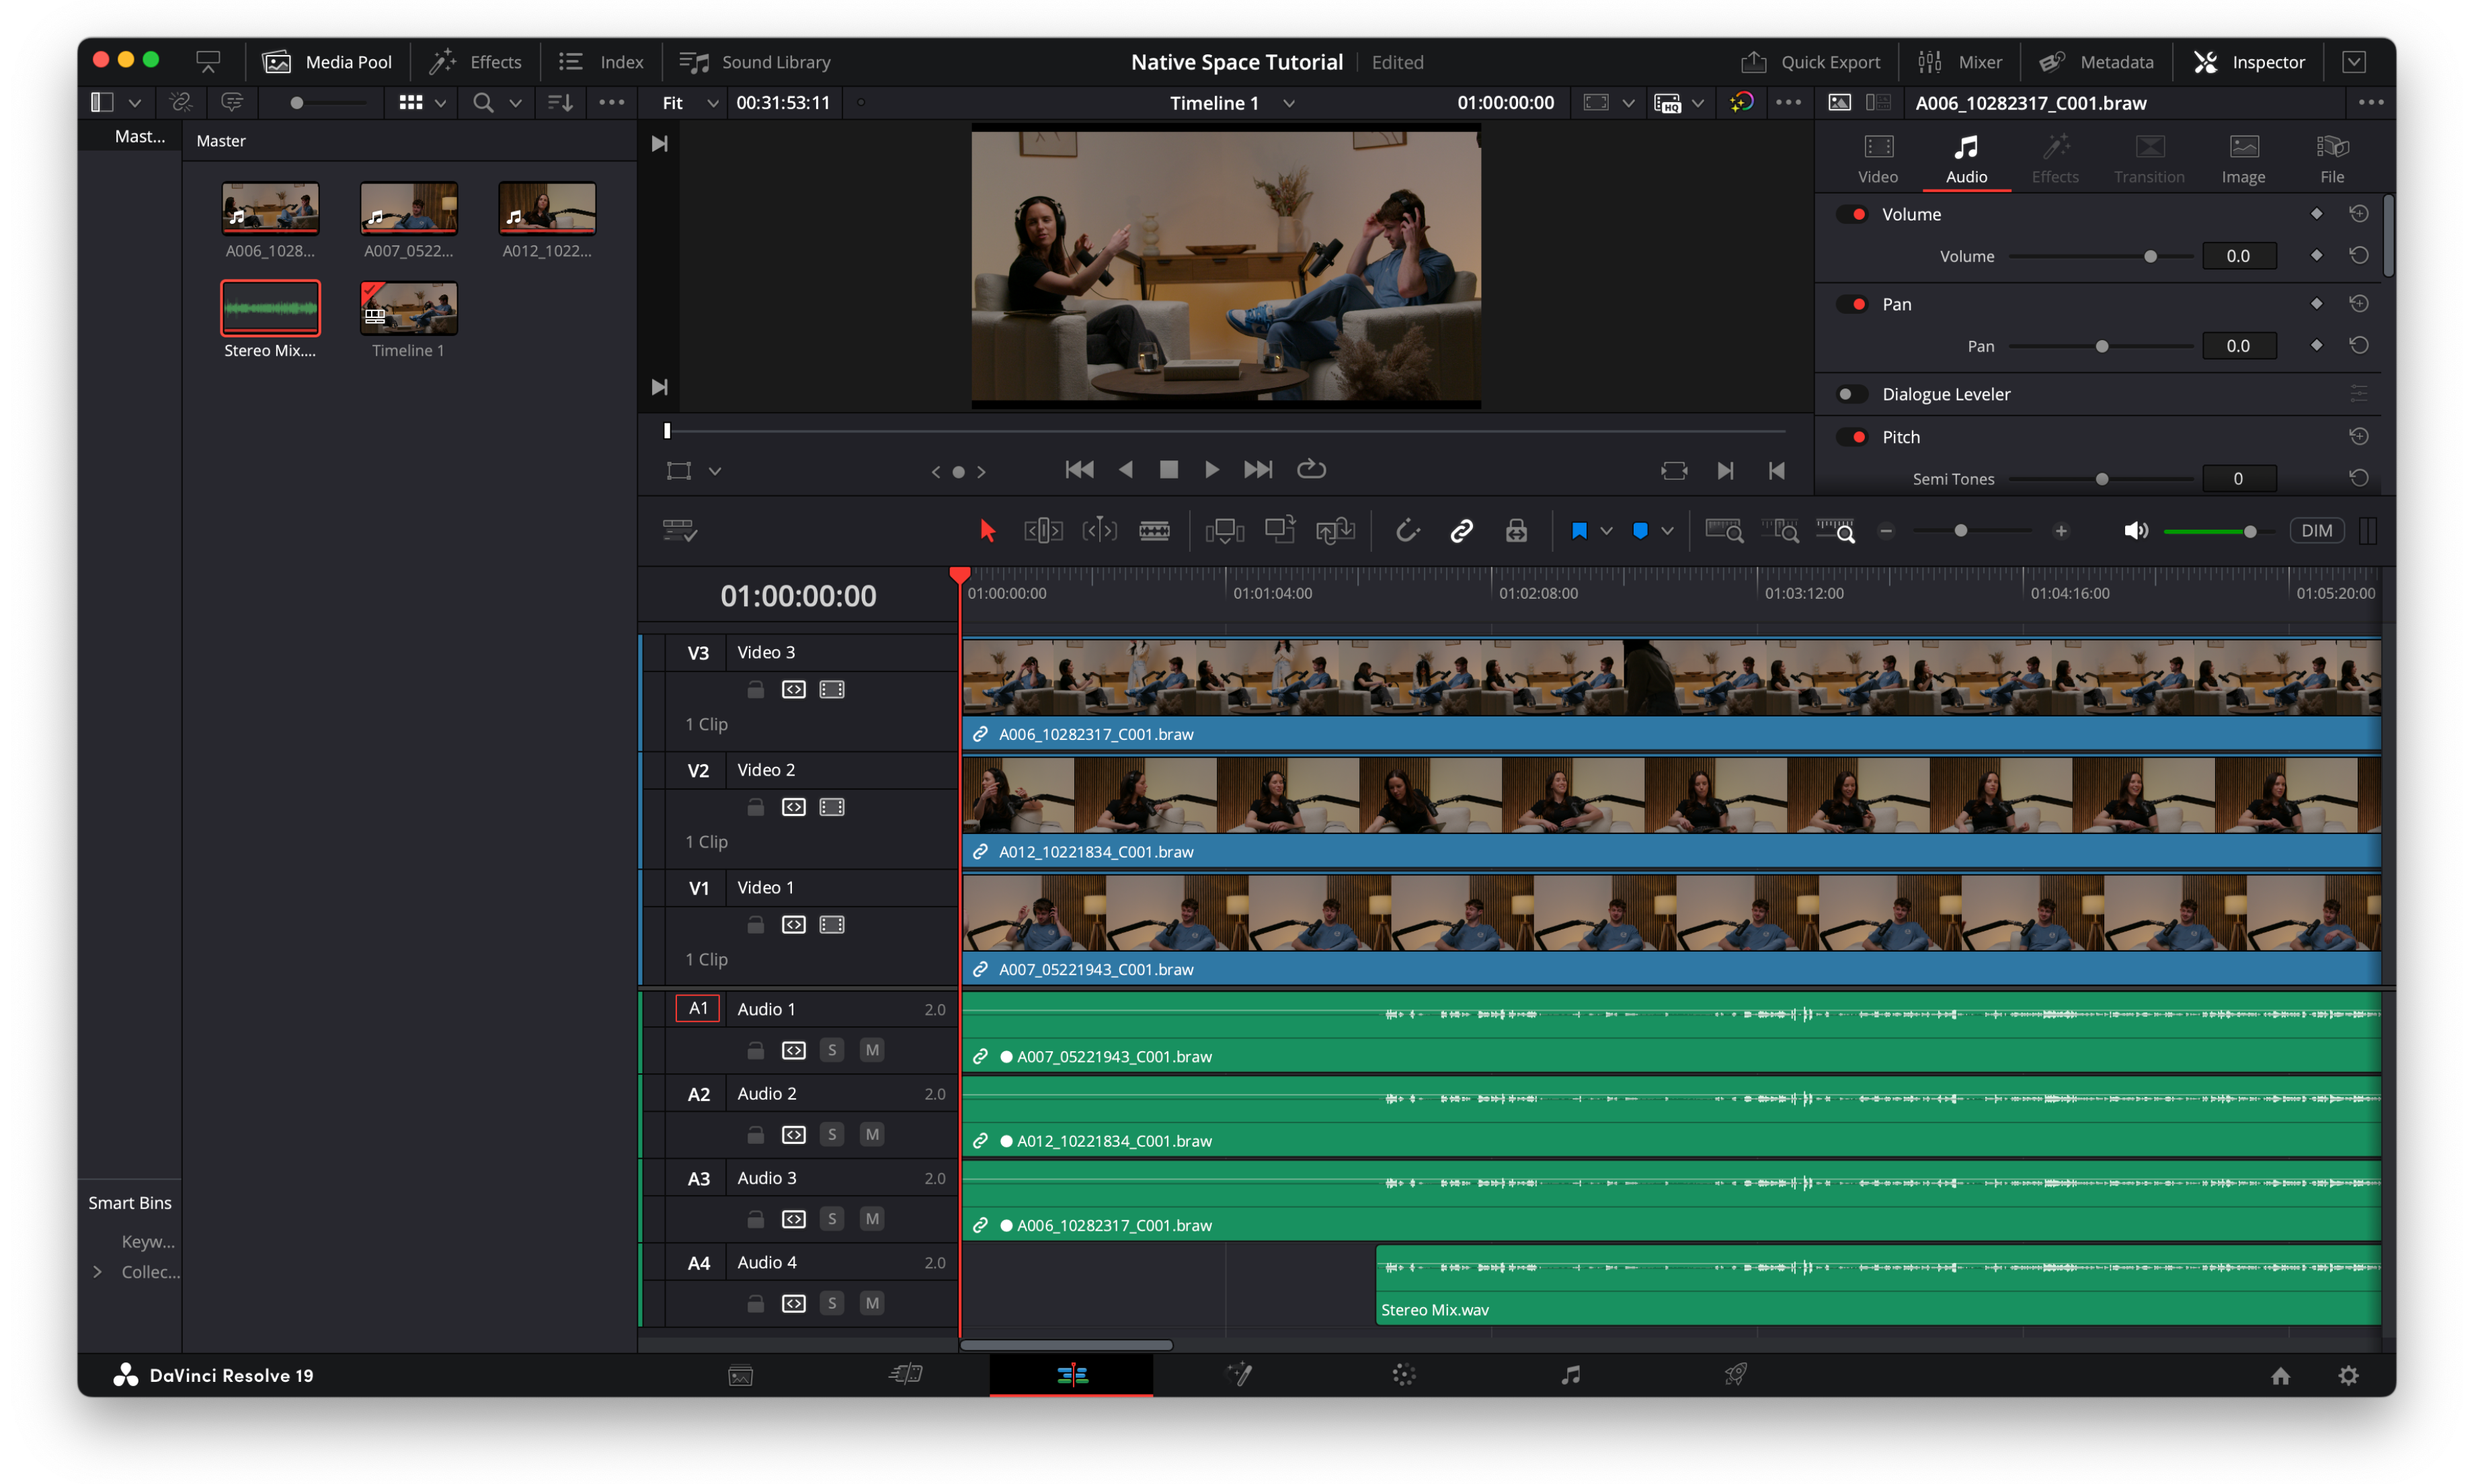
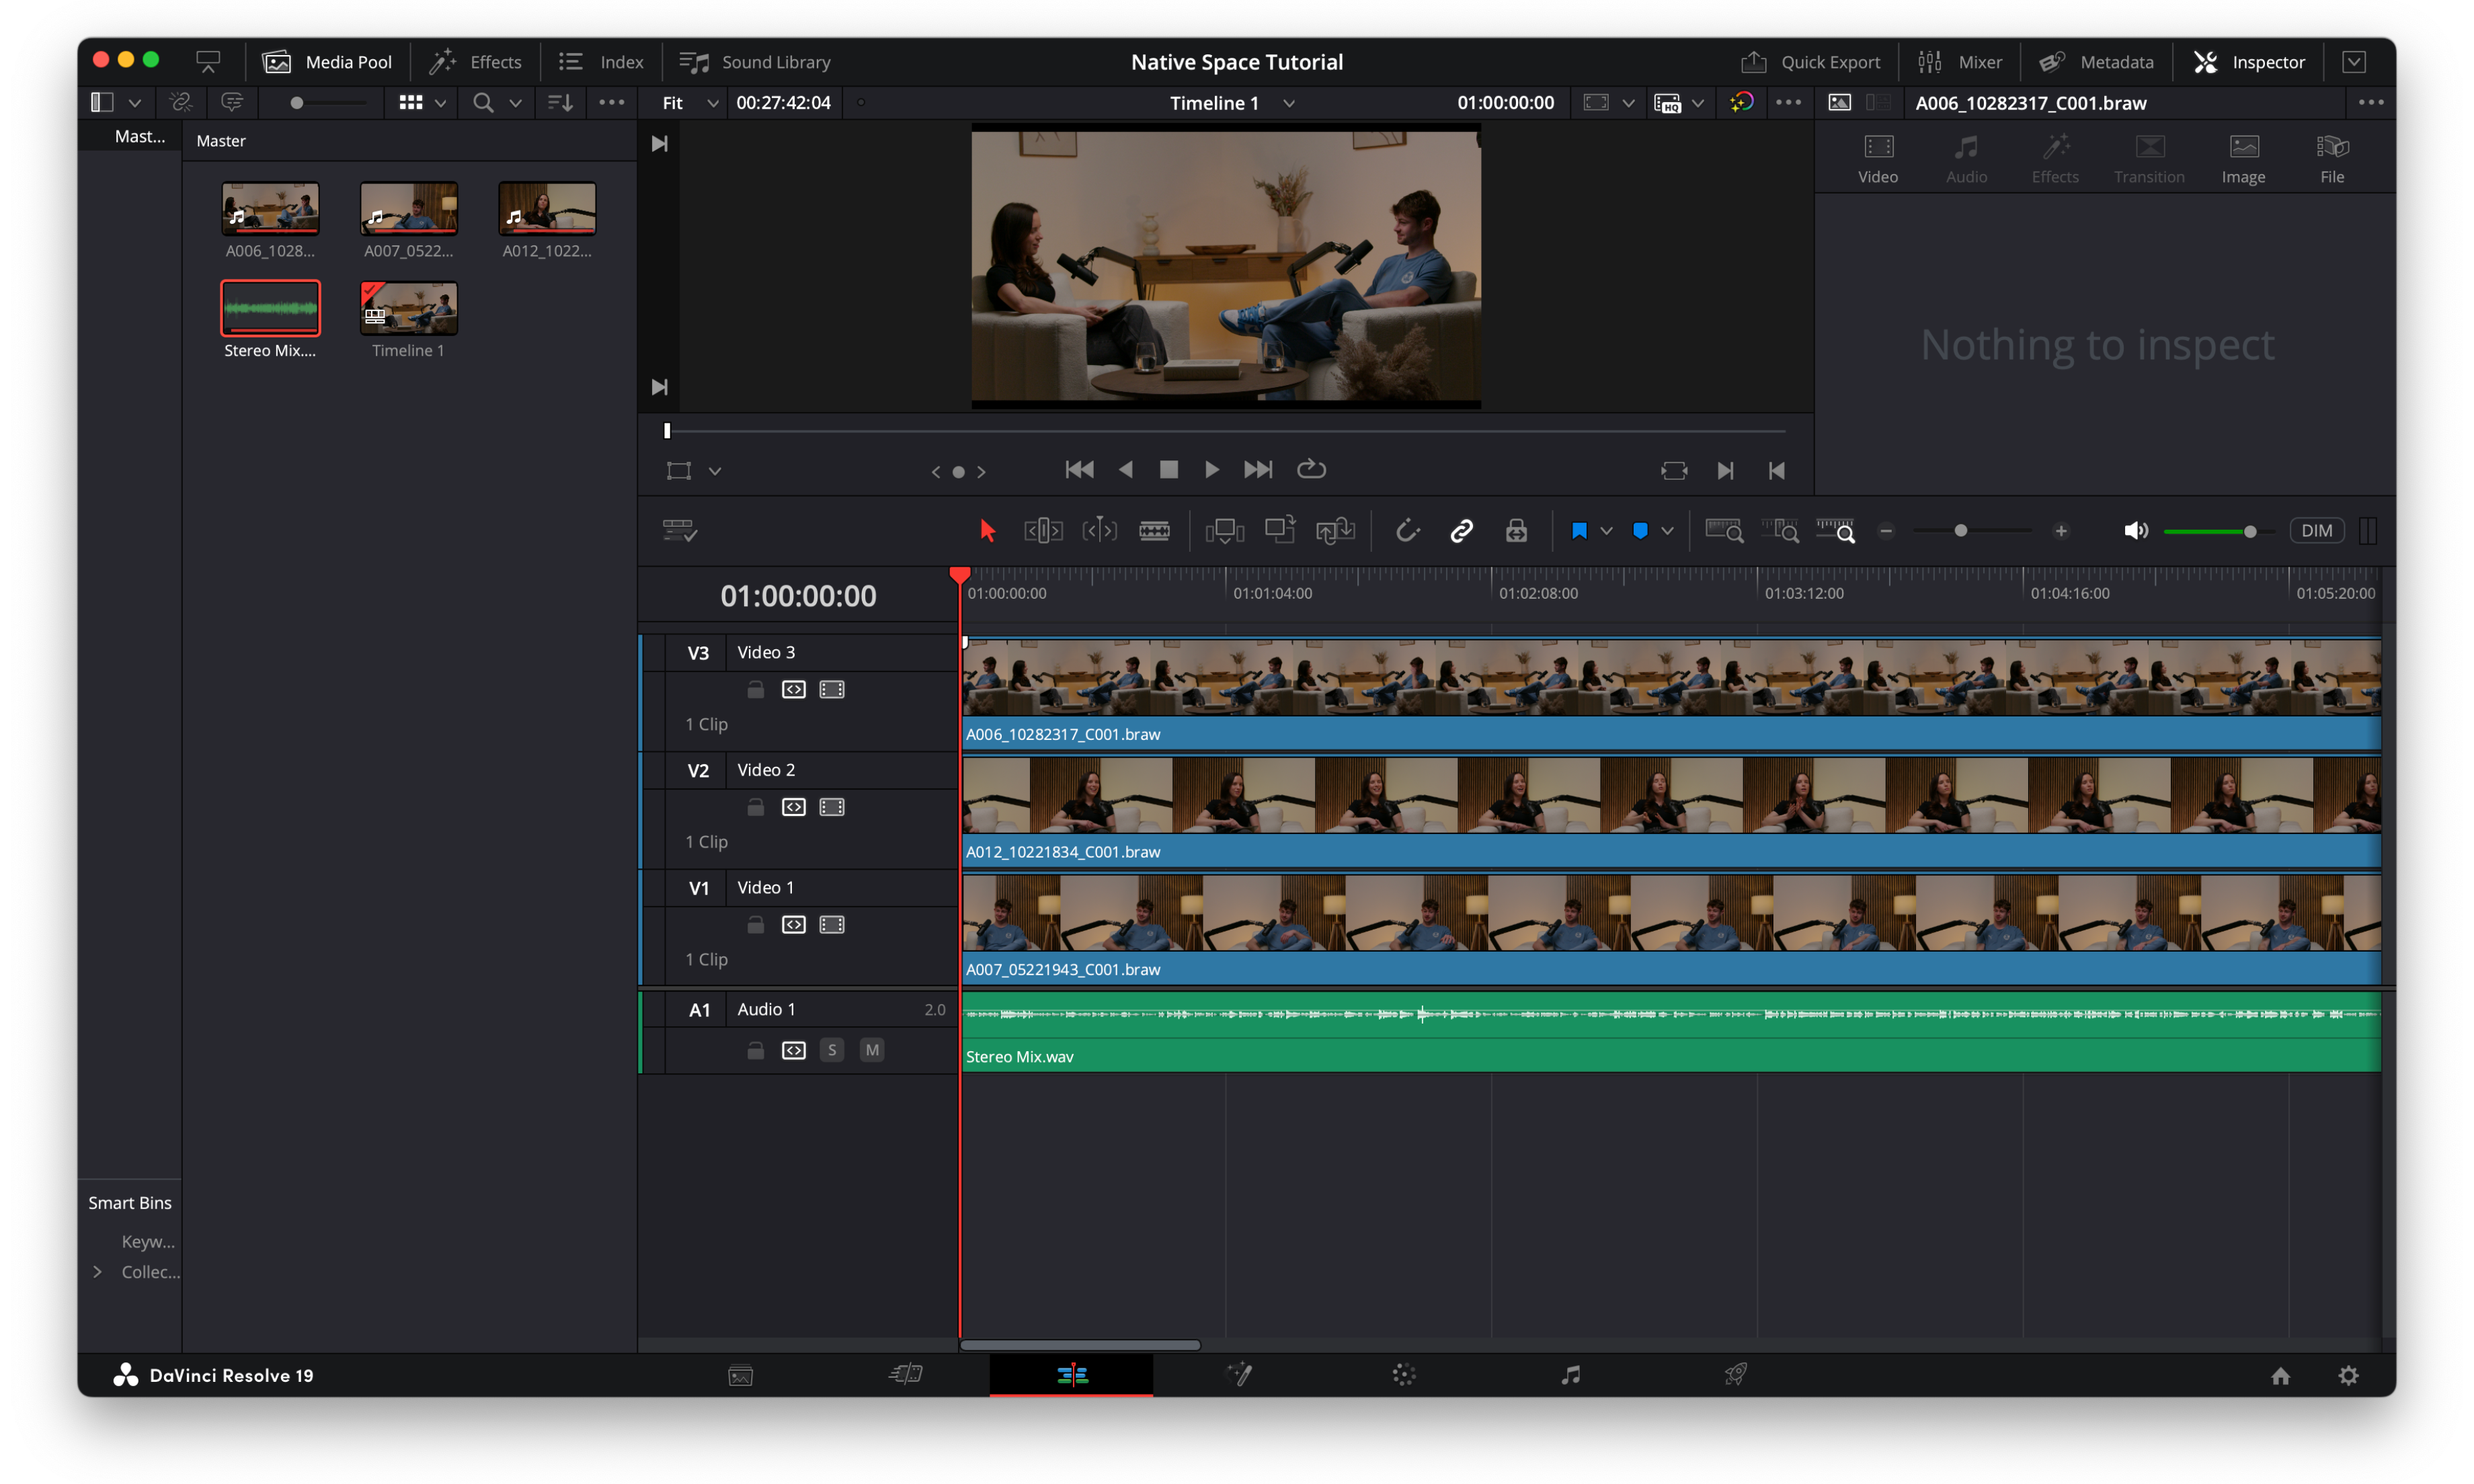
Make sure each video clip is aligned at the same starting point in the timeline - they must stay perfectly in sync the entire way through.
By syncing the audio, you’ll notice audio track starts at different points depending on how long the camera was running before the audio was started.
You can delete any of the footage up until the audio starts
this way your video clips will all start at the same point.
Your timeline should now look something like this
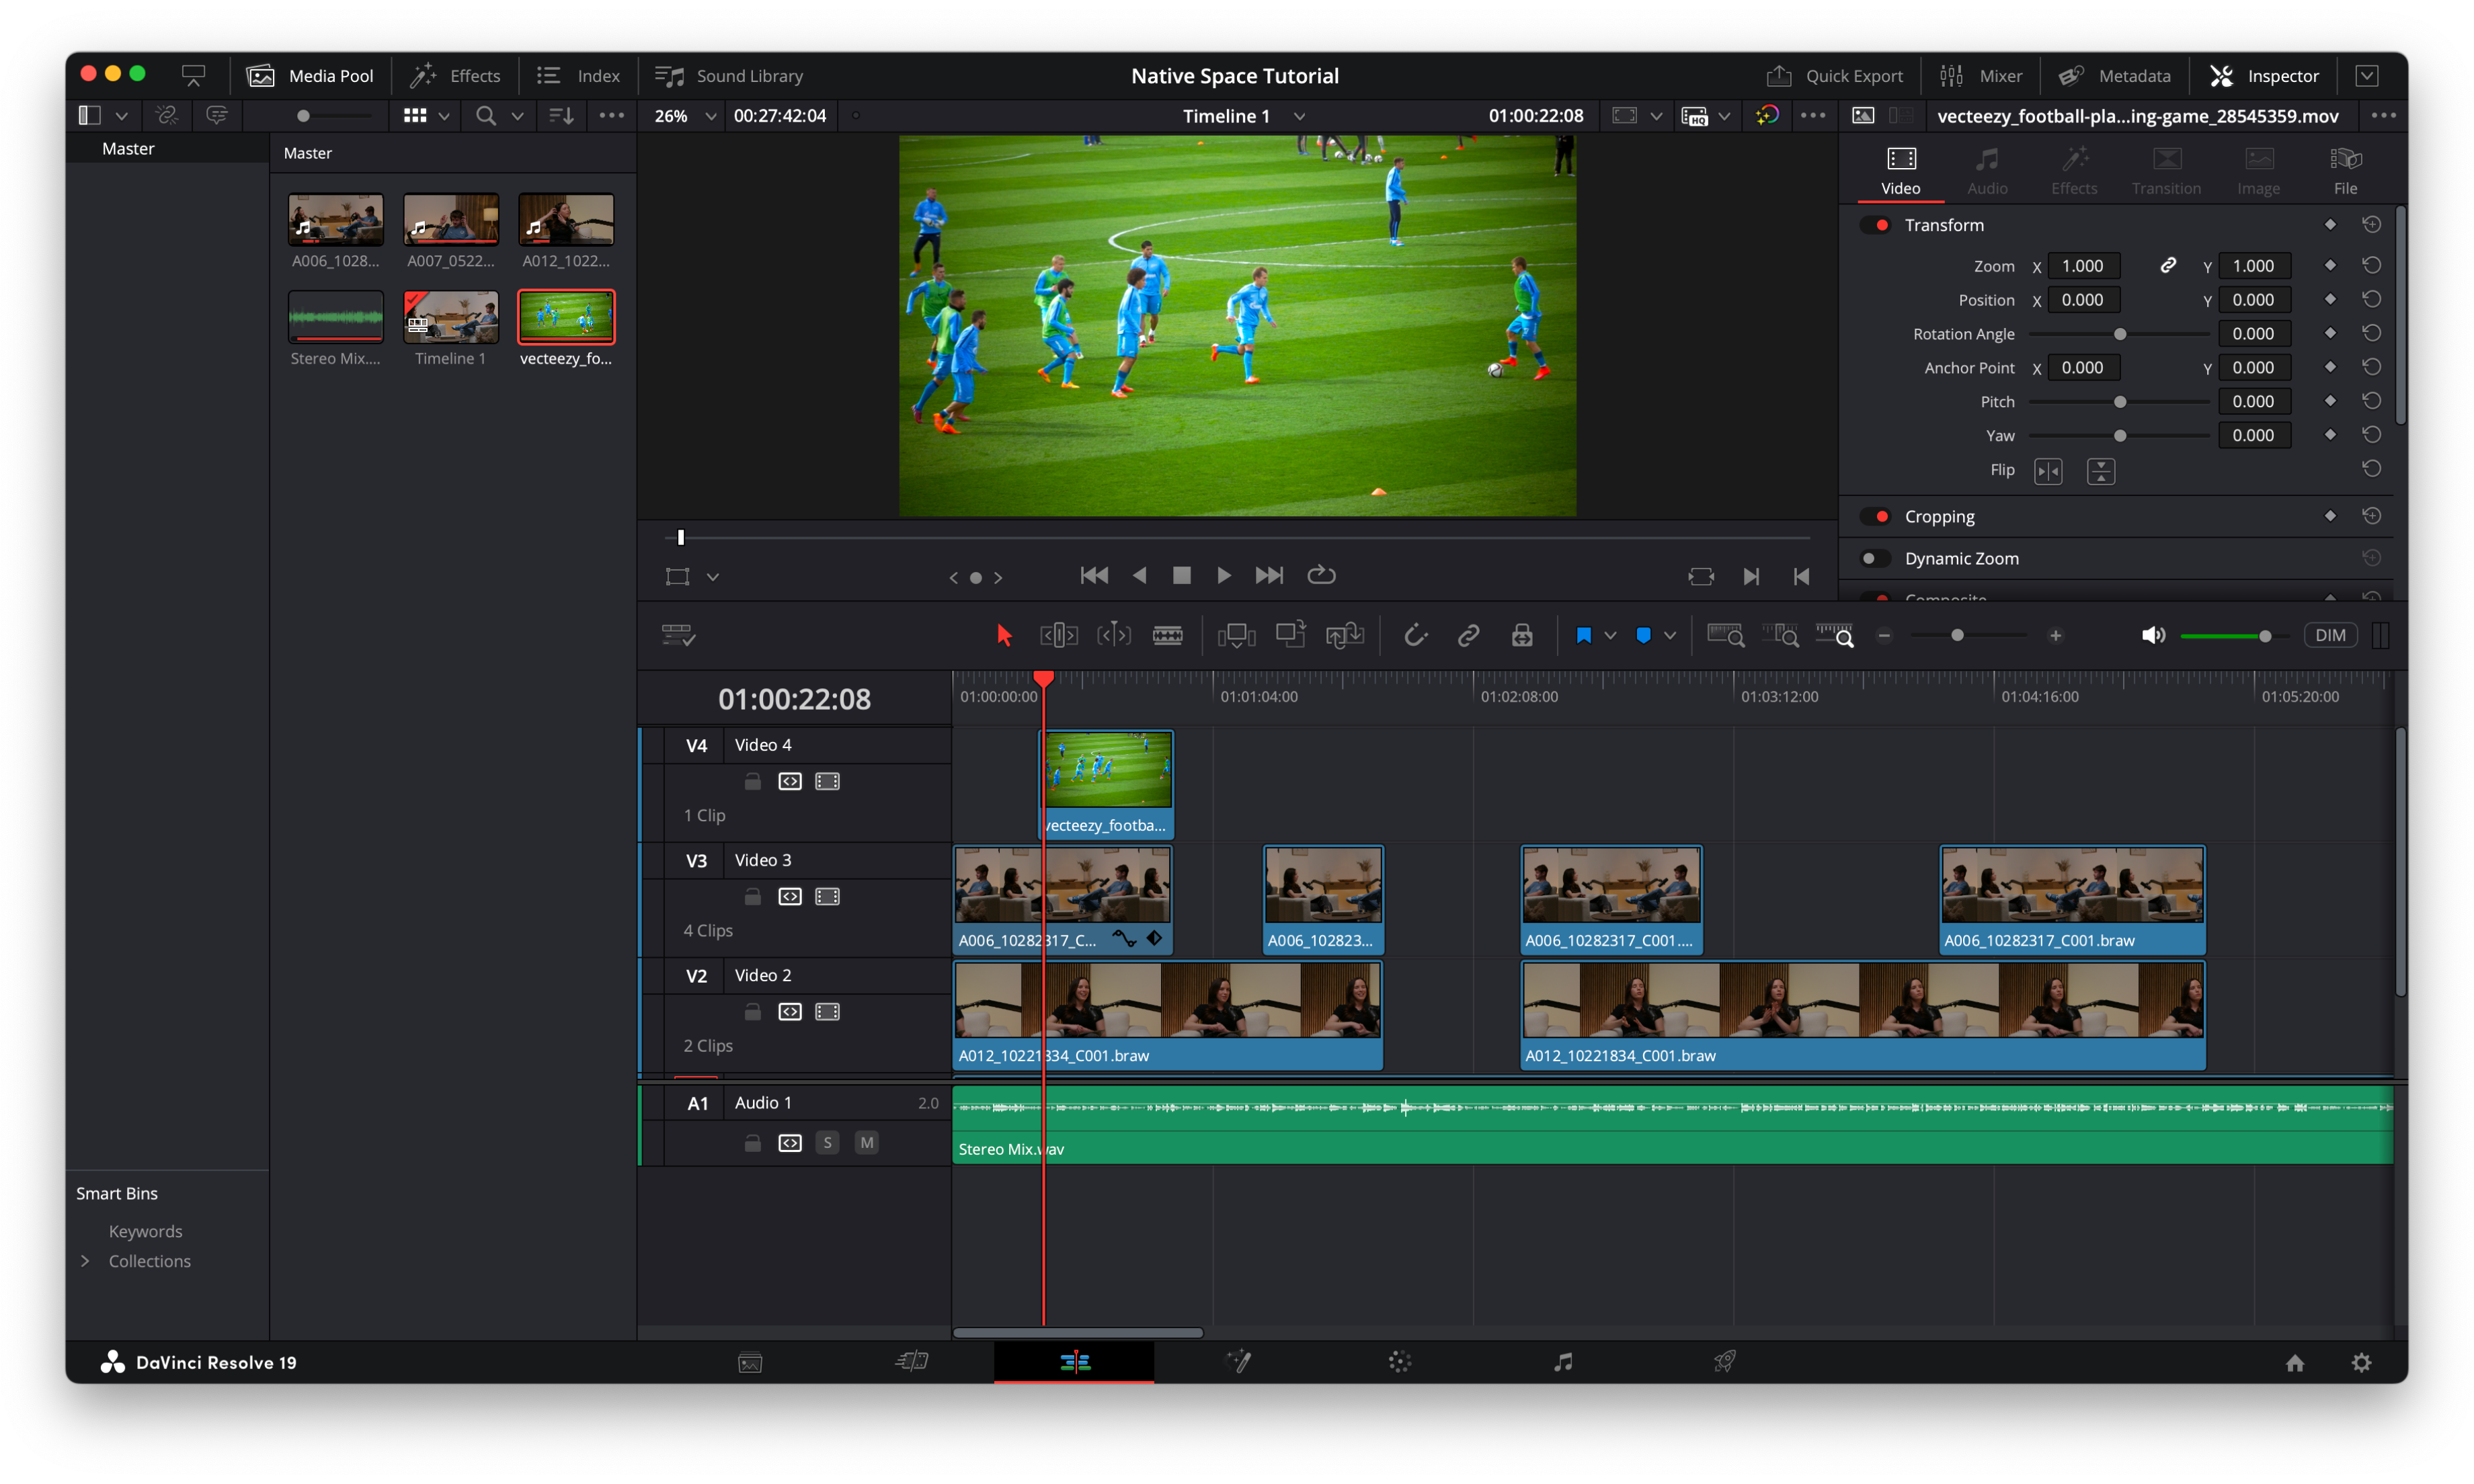
✂️ Step 5: Cropping or Reframing the Video
You might not always need to crop or reframe your video, but if you want to adjust the visible portion of the clip — for example, to zoom in slightly or shift the framing — you’ll need to do this in the Edit tab.
Here’s how to do it:
Go to the Edit tab.
In the timeline, select the clip you want to adjust.
In the top right corner, make sure the Inspector panel is open. If it isn’t, click the Inspector button to reveal it.
Under the Video section in the Inspector, look for the Transform controls.
Here you’ll find:
Zoom – Adjust this to scale your video in or out. You can link or unlink the X and Y axes depending on how you want to scale the frame.
Position – Shift the video frame left/right (X axis) or up/down (Y axis) to centre your subject or crop out unwanted edges.
🎥 These changes don’t affect the original file — they just alter how the clip appears in the frame.
⚠️ Important:
It’s best to make any framing or cropping adjustments before you start cutting the clip, especially in multi-camera edits.
If you apply cuts first, you’ll have to manually copy and paste the same framing changes to every cut on that track — which is time-consuming and easy to miss.
Step 6 - Colour Correction (Fun Fact: This is What DaVinci Resolve Was Originally Known For!)
DaVinci Resolve built its reputation on high-end colour grading, and while it has tons of advanced tools, you only need the basics to get started.
What to Expect:
If you recorded in RAW or a flat colour profile, your footage may look grey or dull - this is intentional and allows more flexibility when correcting colours
Footage recorded on our Native Space cameras is RAW footage so it starts flat and needs some light tweaking
📷 What is RAW Camera FootageRAW footage is unprocessed video or image data captured directly from a camera’s sensor. Think of it as the digital version of a film negative- it hasn’t been altered, compressed, or colour-corrected yet.
Try to apply your colour adjustments before you start cutting. This saves time and avoids needing to copy changes to each clip.
Apply a basic colour edit:
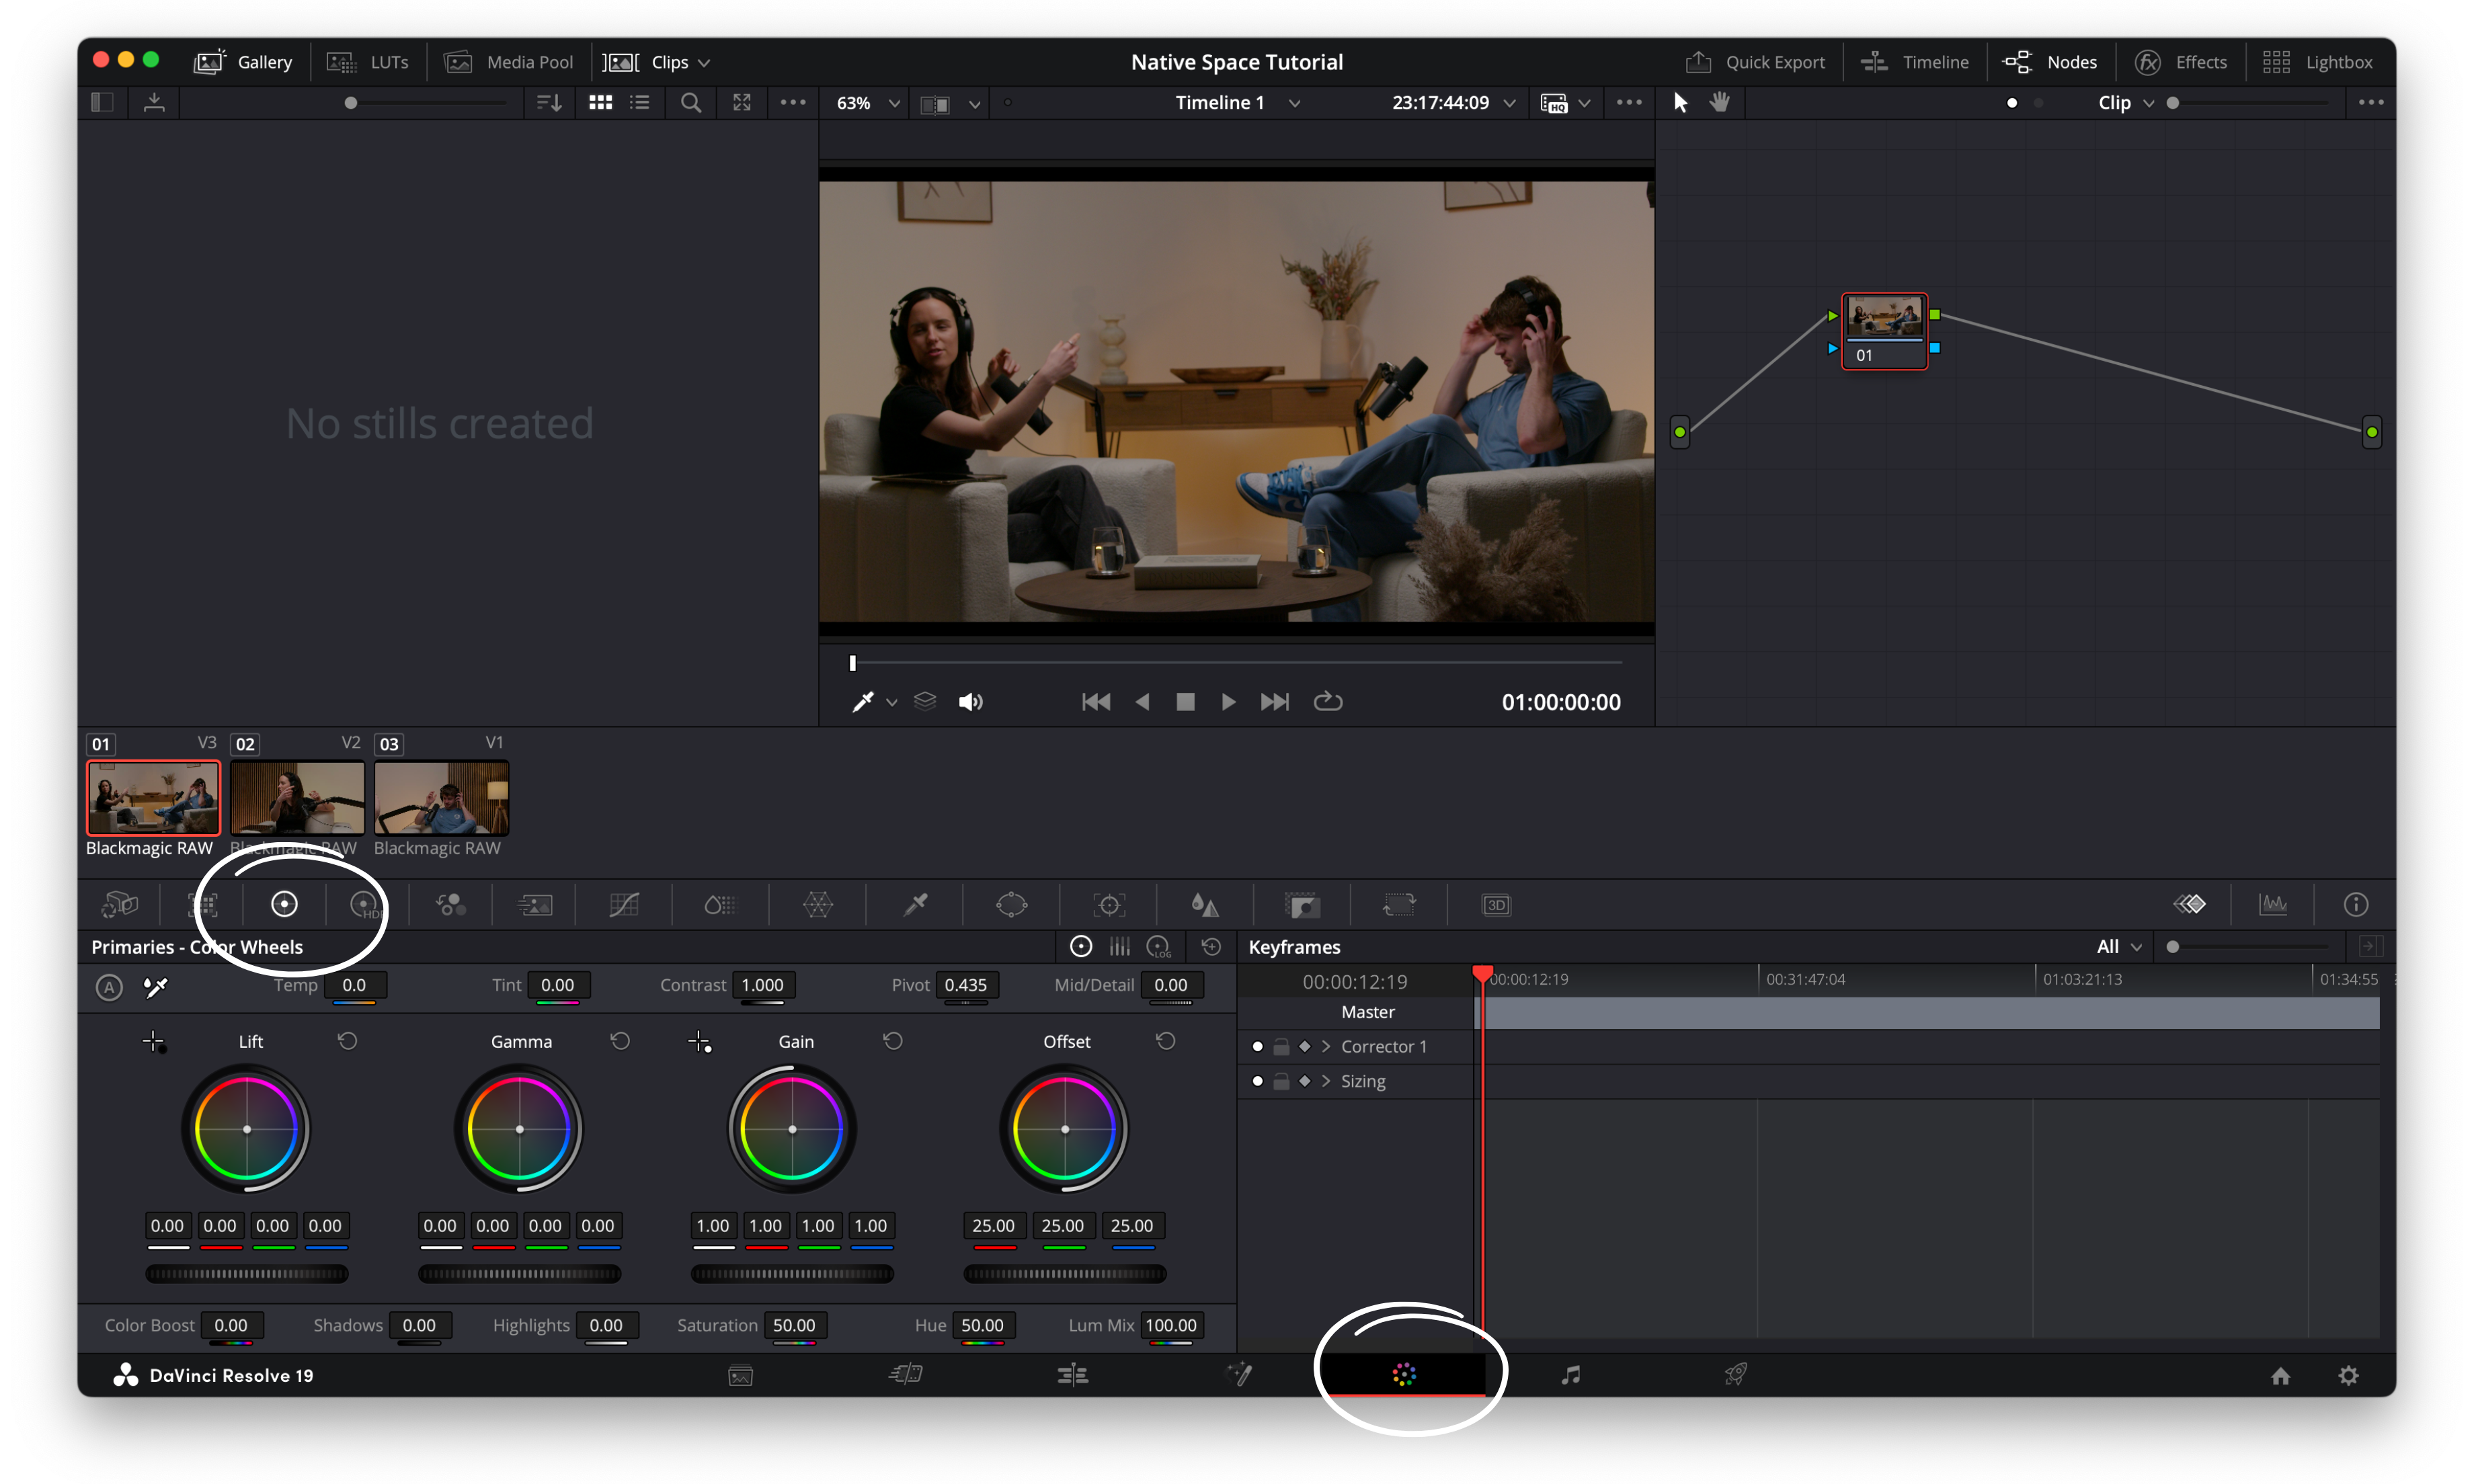
Switch to the Colour tab
Select the colour wheel icon (pictured below)
Select a clip in the viewer
Adjust the right-hand controls:
Lift – darkens shadows
Gamma – adjusts mid-tones
Gain – brightens highlights
Saturation – boosts colour intensity
Play around with these dials by dragging left and right on each to create a more vibrant image. For more information on colour grading, check out our colour grading guide.
If you’ve already cut your clips or would like to make further colour edits after cutting clips :
Follow the above steps to apply the colour grade to one clip
Select the edited thumbnail > Command+C (or Cntrl +C)
Select the clips you would like to apply to edit to (hold shift when selecting to select multiple)
Once all the desired clips are selected press Command + V to paste the edits.
If you filmed in different lighting conditions or with different cameras, each shot may need its own correction.
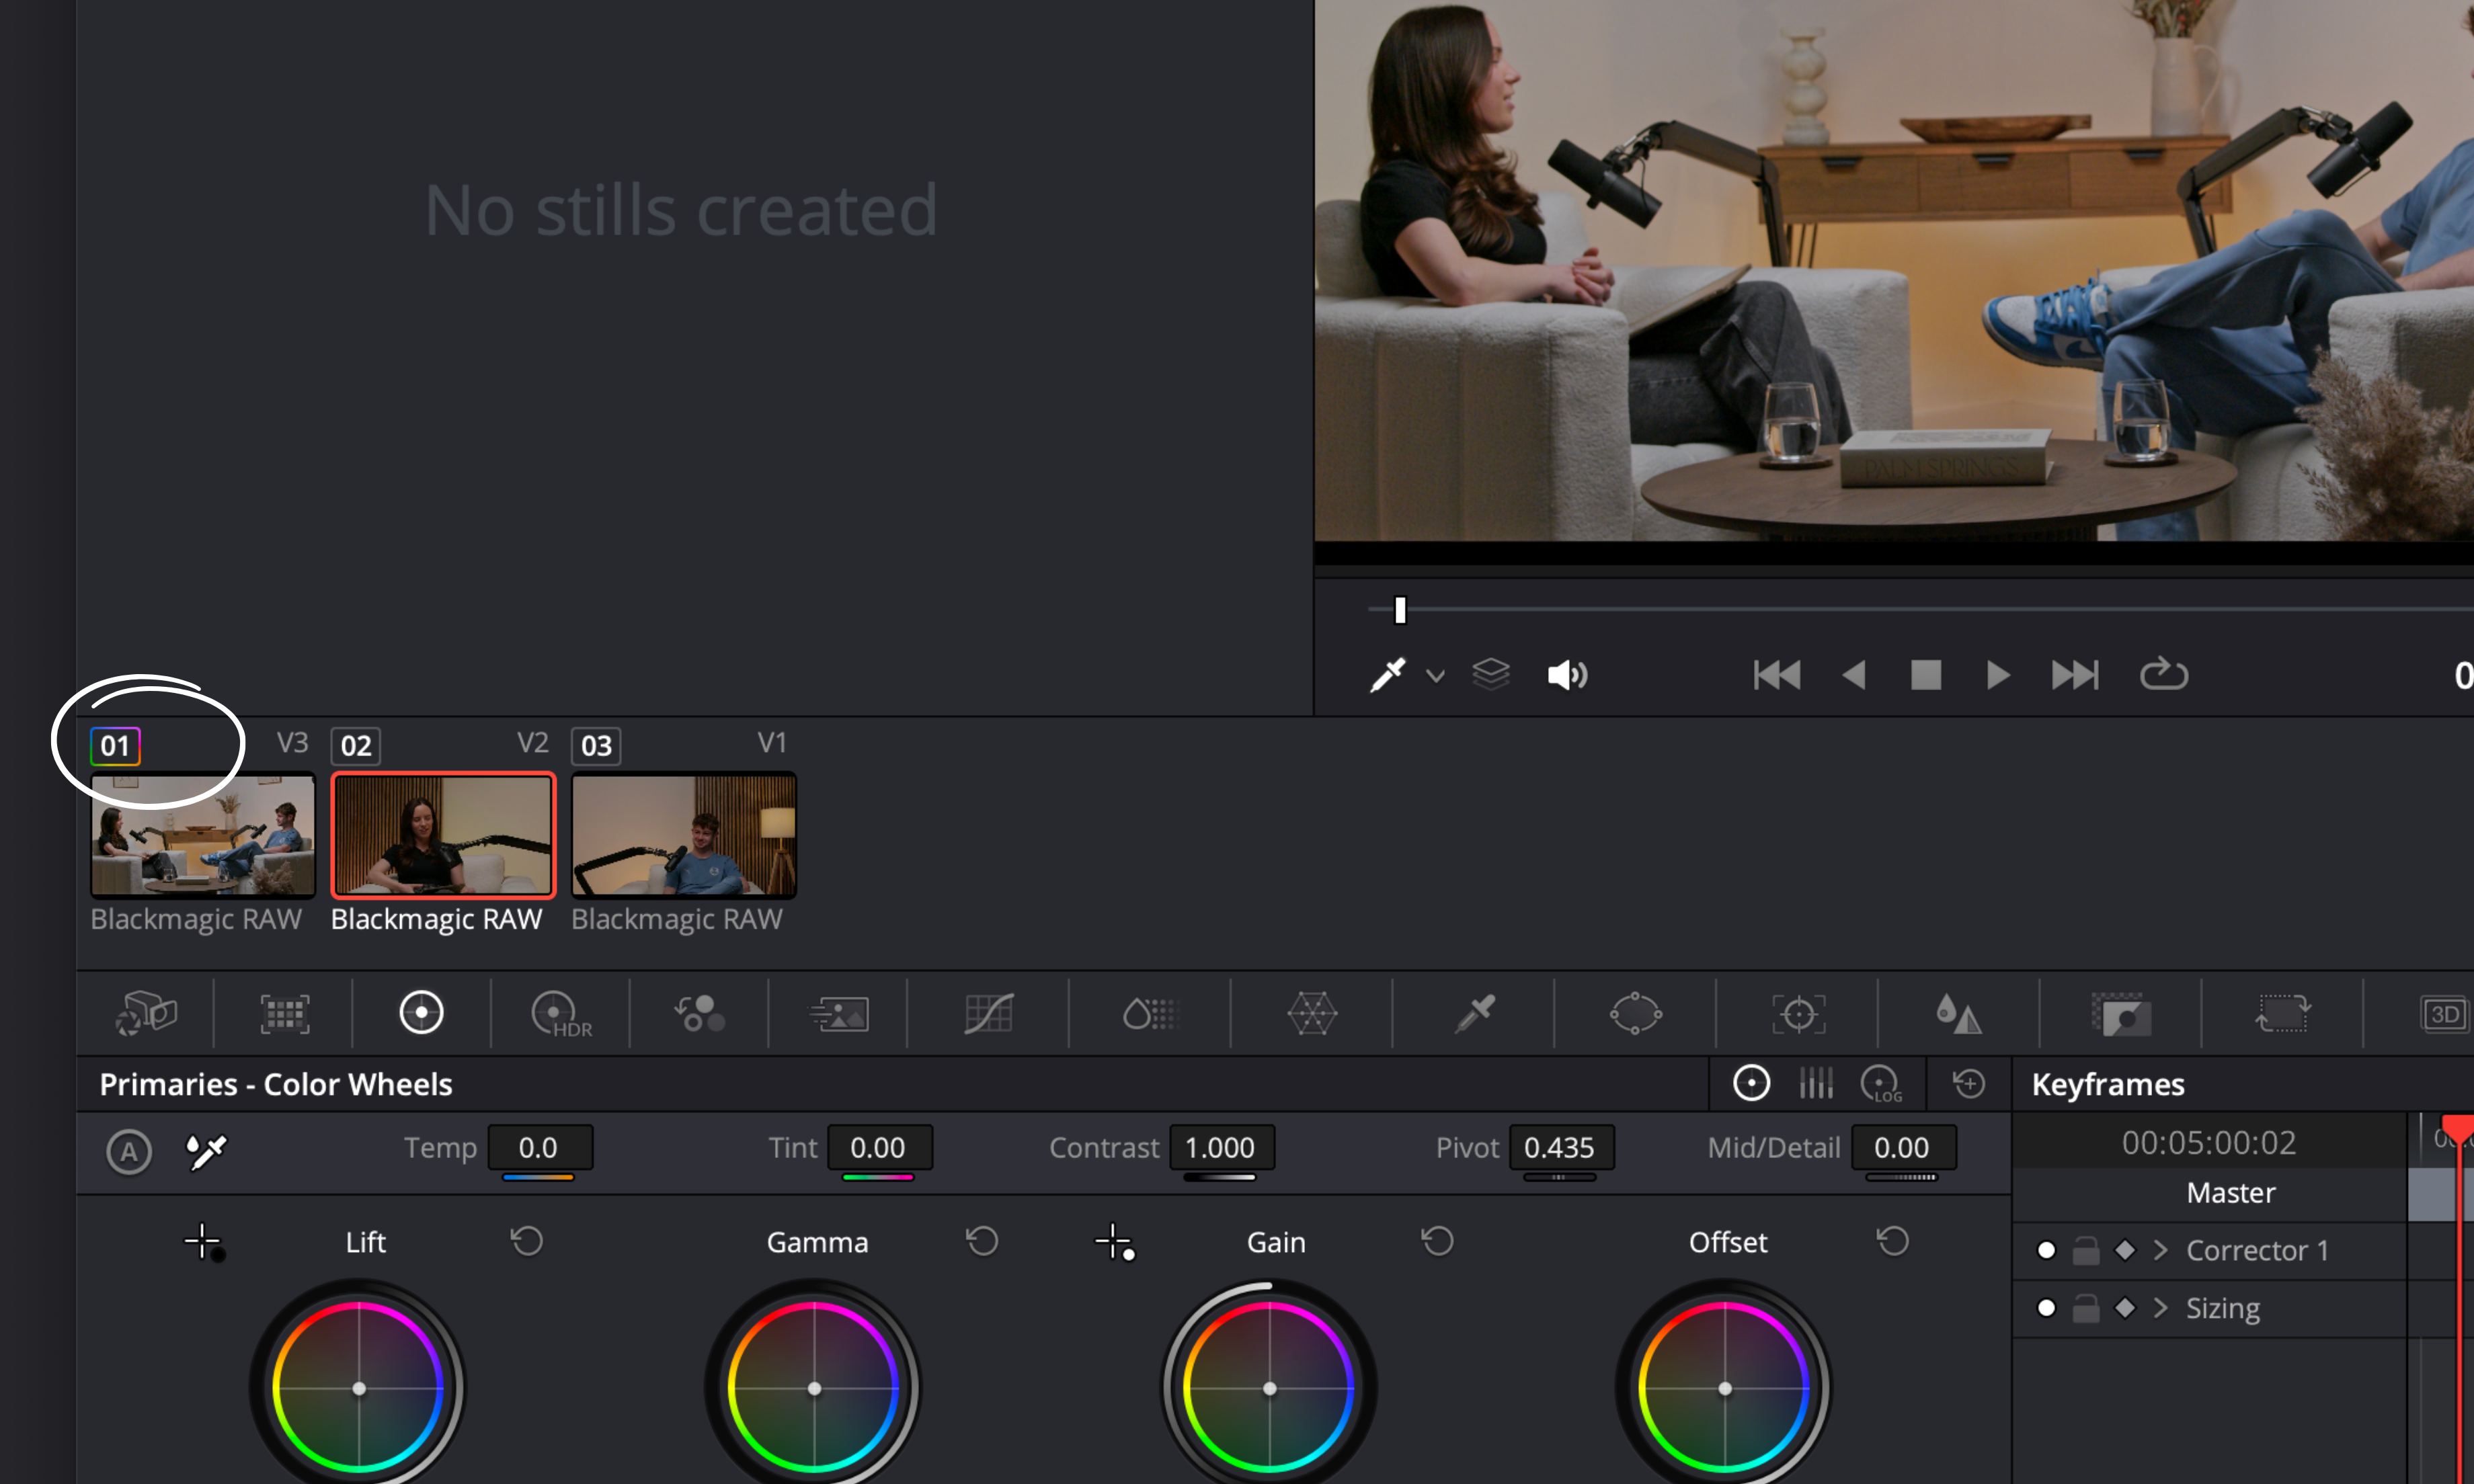
Clips that have been colour edited will have a multi-coloured border around the clip number as shown below so you can clearly see which clips have had the colour edit applied.
Step 6 - Video Editing
Tips to get started
Now your clips are beautifully colour edited you can head back to the edit tab.
I prefer to use the cursor icon at all times and work through the tracks by pressing space bar to play and pause and cmd B to split
Split means making a cut between clips
Alternatively, you can use the Blade tool (razor icon) to cut clips. If you choosde to do it this way, remember to switch back to the cursor (Selection Tool) after you’re done cutting, or you’ll keep making unwanted cuts wherever you click!
Use the Link icon in the timeline to link/unlink audio and video clips. This is different from syncing - linking keeps them together during cuts
To move clips, just click and drag them around the timeline
Syncing the audio means you’re replacing the camera audio with the high quality mic audio. This will still display as an audio track and a video track in your timeline.
Linking the clips means locking together the video and audio tracks. Without this, you’ll need to make a cut it both the audio and video tracks each time, and when moving the tracks around, you’ll need to move both the audio and video tracks which can cause clips to misalign if you aren’t extremely careful.
By linking the tracks, you essentially (although still displayed as two) create one track and can make cuts and move them around simultaneously.
🎥 Editing a Multi-Camera Podcast in the Timeline**
So you’ve set up your timeline ready to edit a multi-camera podcast. Now here’s how to edit and show the camera angles you’d like when you’d like them.
✂️ Cut to Switch Between Angles
You’ll be cutting and revealing the angles you want to show:
Use command B to cut the top-layer clips (V3 and V2) where you want them to appear or disappear
Use the Selection Tool (A) and backspace to delete sections of those clips you don’t want showing — the layers below will then automatically show through
🎥 Think of it like layers in Photoshop: whatever is on top in the timeline is what your audience will see.
📌 Pro Tips
Zoom in to make precise cuts
When you first watch the footage back before starting to edit, you can use Markers (M key) to flag where you want to switch shots as you review the video. Literally just press M at the relevant points.
Make sure no clips overlap unnecessarily — you don’t want to cut to an angle that has no subject in frame
Use Cross Dissolve transitions between cuts only if needed — sharp cuts are often better for a clean podcast style
if you need to cut in the middle of one persons segment, the cut will likely be obviously if you keep the same clip running. It’s a good idea, to switch to the wide angle for a moment, before returning to their close up camera, for avoid a harsh and obvious cut.
🧠 Example Workflow
Let’s say you want:
• Your wide shot (V1) playing by default
• Close-up of the host (V2) when they’re speaking
• Guest shot (V3) when the guest responds
You would:
As V3 (the wide shot) is the top ‘layer’ of video tracks, this will be the default view
To show V2, you would cut and delete that section of V3, so V2 now shows as the ‘top’ clip.
If you’d like to show V1, you would cut the same section of V3 and V2 - to leave just V3 showing.
For this, you want to make sure the link icon is off.
If you are to leave the link icon on, it will cut through every track, including the audio track
Turning link off, means it will only make a cut through the track you’re looking to cut
Press spacebar to start running through the clips and spacebar again to pause the playhead where you’d like to make a cut
Remember it’s a good idea to zoom in on the timeline, to make finer cuts.
Now select V3, then press Cmd + B.
If you’re wanting to show V1 here, repeat the above step on V2 (make sure the playhead stays exactly in place to create a smooth cut across both clips).
Once the cuts are made, press spacebar to continue playback and press it again when you’d like the cut to end.
Make sure the playhead is precisely aligned where you want to cut.
Repeat the above step on both V3 and V2.
Delete the cut section from both V3 and V2 — this will reveal V1 underneath.
You’ve now revealed the camera angle you wish to show at this time.
Your timeline should start to look something like this -
If you are making complete cuts to sections you want to fully remove from the podcast you can use the link icon to make cuts to every track at once
This will also remove the audio from that section
It’s important when doing this to make these cuts as smooth as possible so the podcast still audibly and visually looks natural and as ‘unedited’ as possible
As mentioned in the Pro Tips - it’s always a good idea to switch to an alternate track after a cut
Step 7 -Adding B-Roll:
B-roll plays over the main footage, useful for hiding cuts or showing extra context while the main audio continues uninterrupted
To add b-roll clips -
Import B-roll footage into the Media Pool
You can stay in the edit tab for this and just right click in the media pool to the left of the timeline > Import Media
Drag B-roll onto a track above your main video in the timeline (this will create a V4 track)
Removing Unwanted Audio :
When you add a b-roll or additional clips, they may include their own audio. To keep your main synced mic audio only:
Select the new clip
Click the Link icon to unlink video from audio
Select the audio only (shift and select) and hit Backspace to delete it
Step 8 - Adding Music:
Add your own music file to the Media Pool, then drag it into a new audio track in the timeline
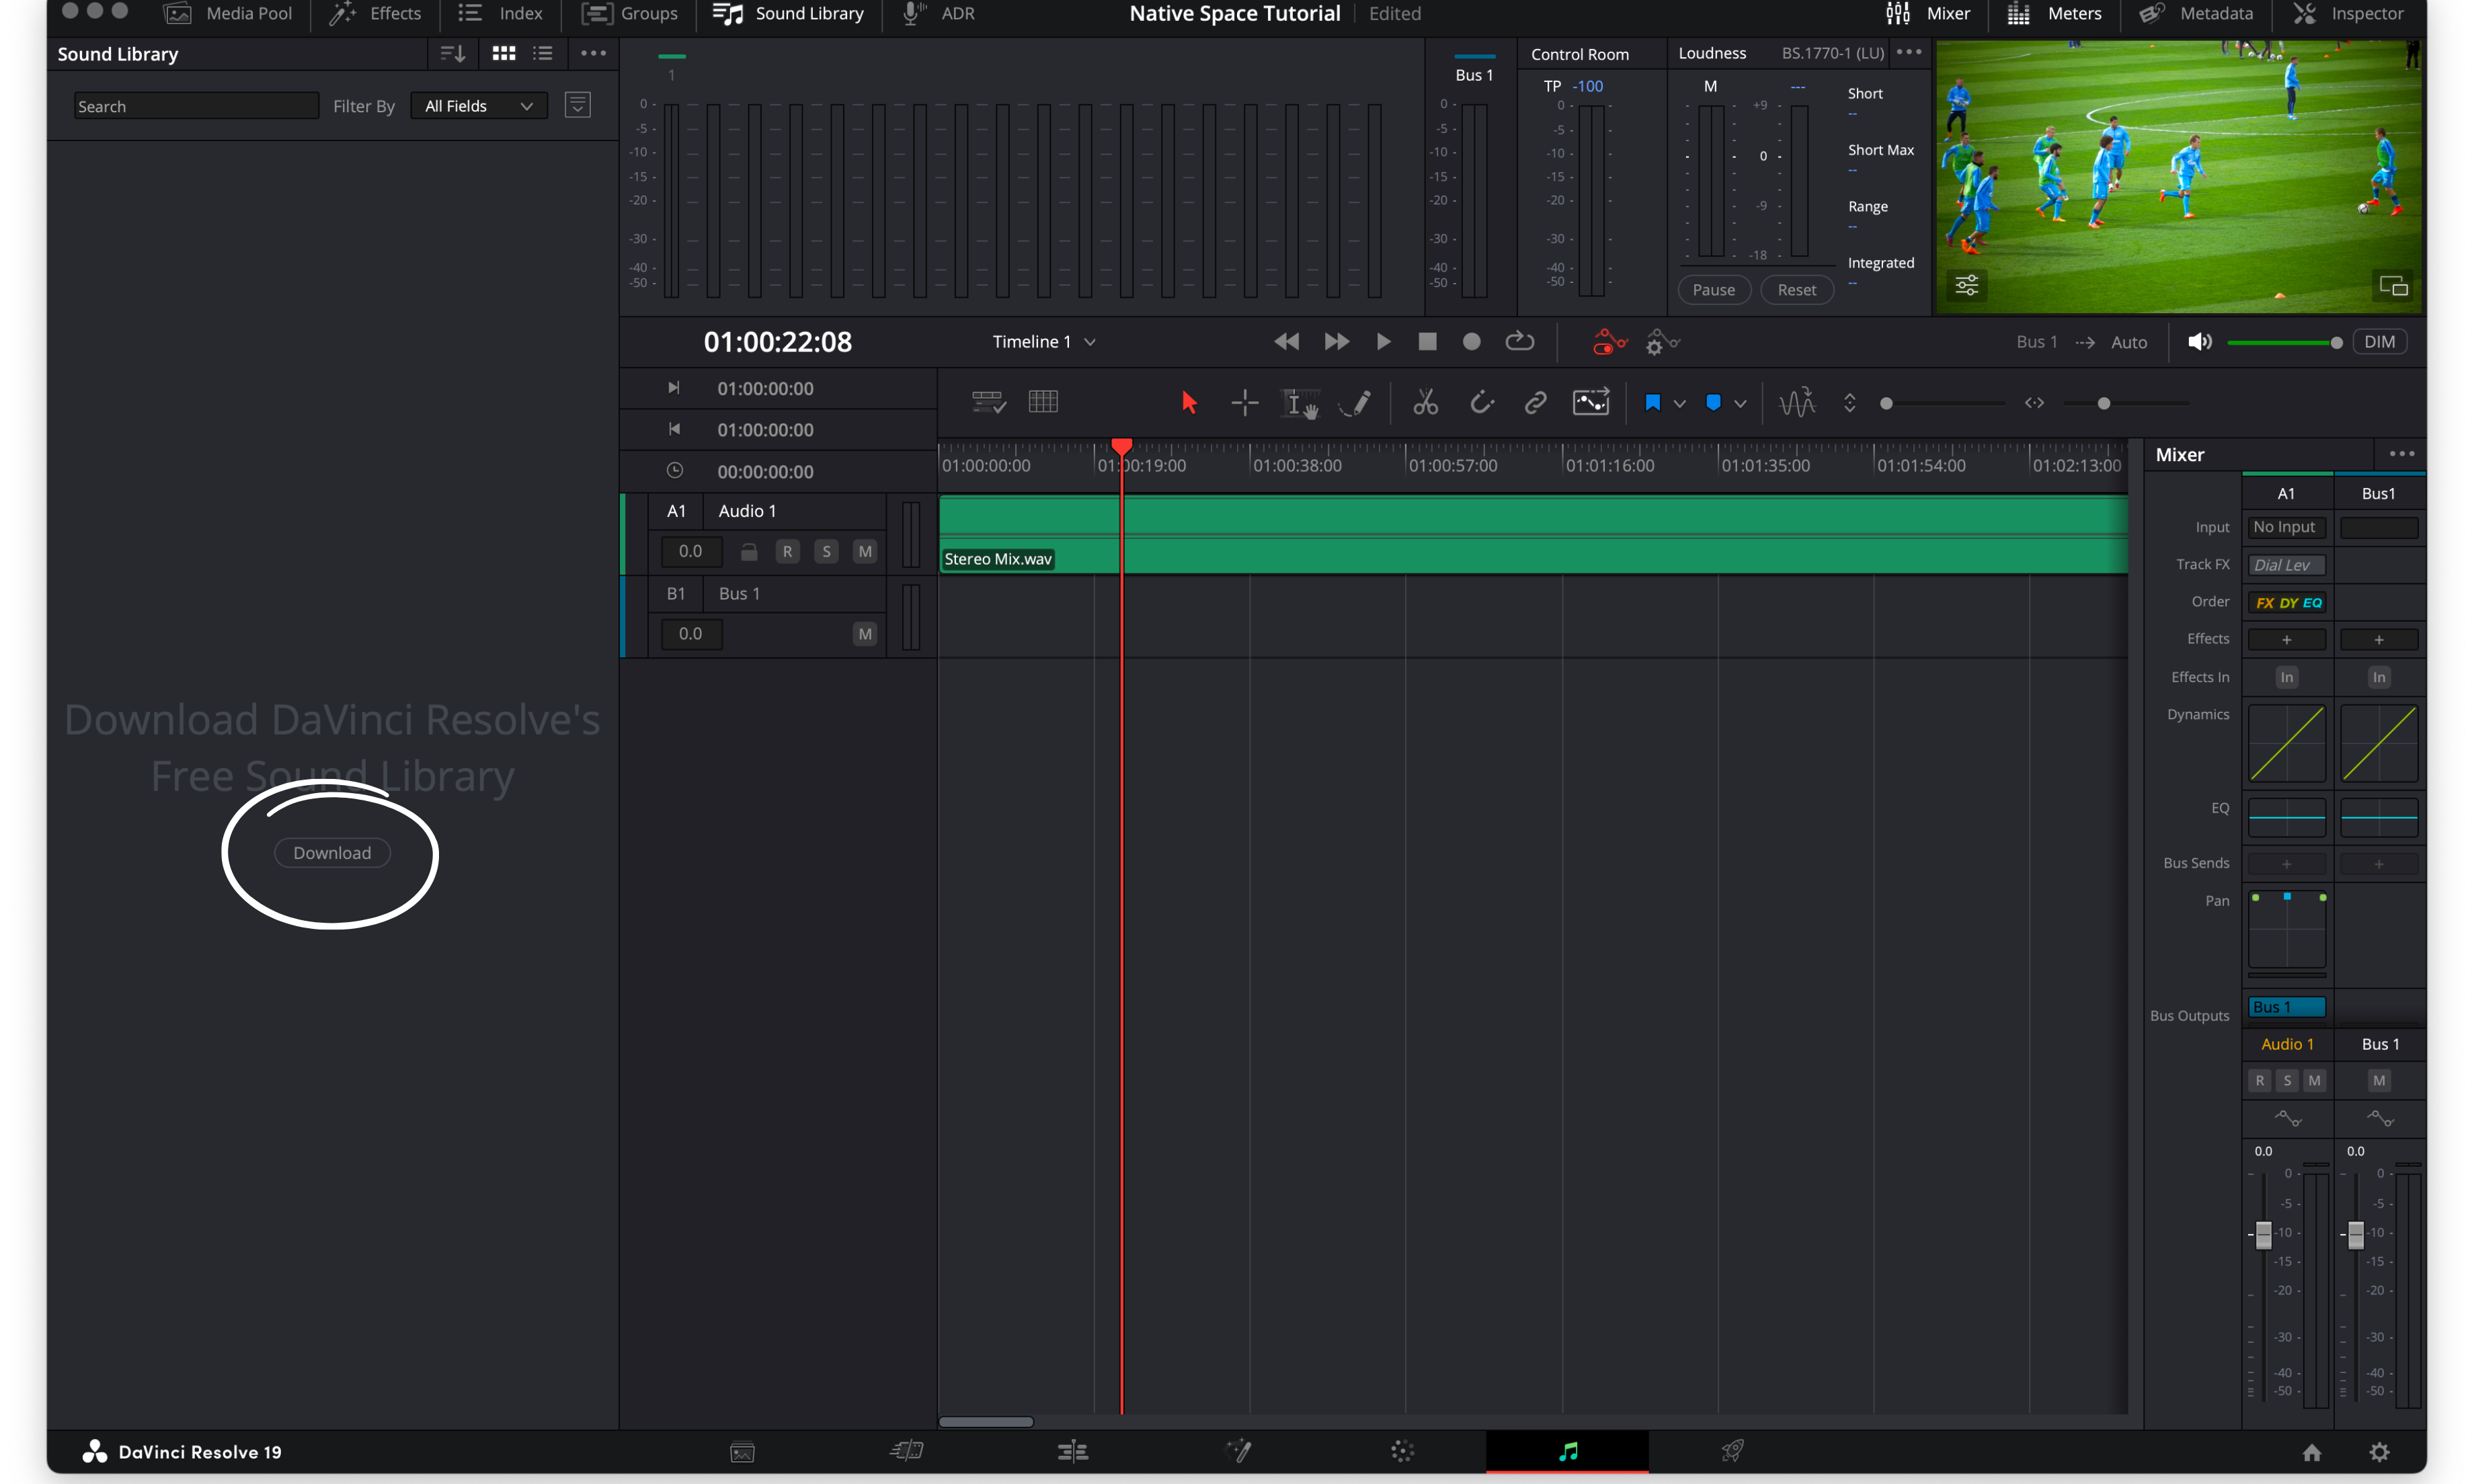
To add music or sound effects from Resolve, you can switch to the music tab
Choose ‘sound library’ along the top tabs
Download Davinci Resolve’s Free Sound Library and follow the steps
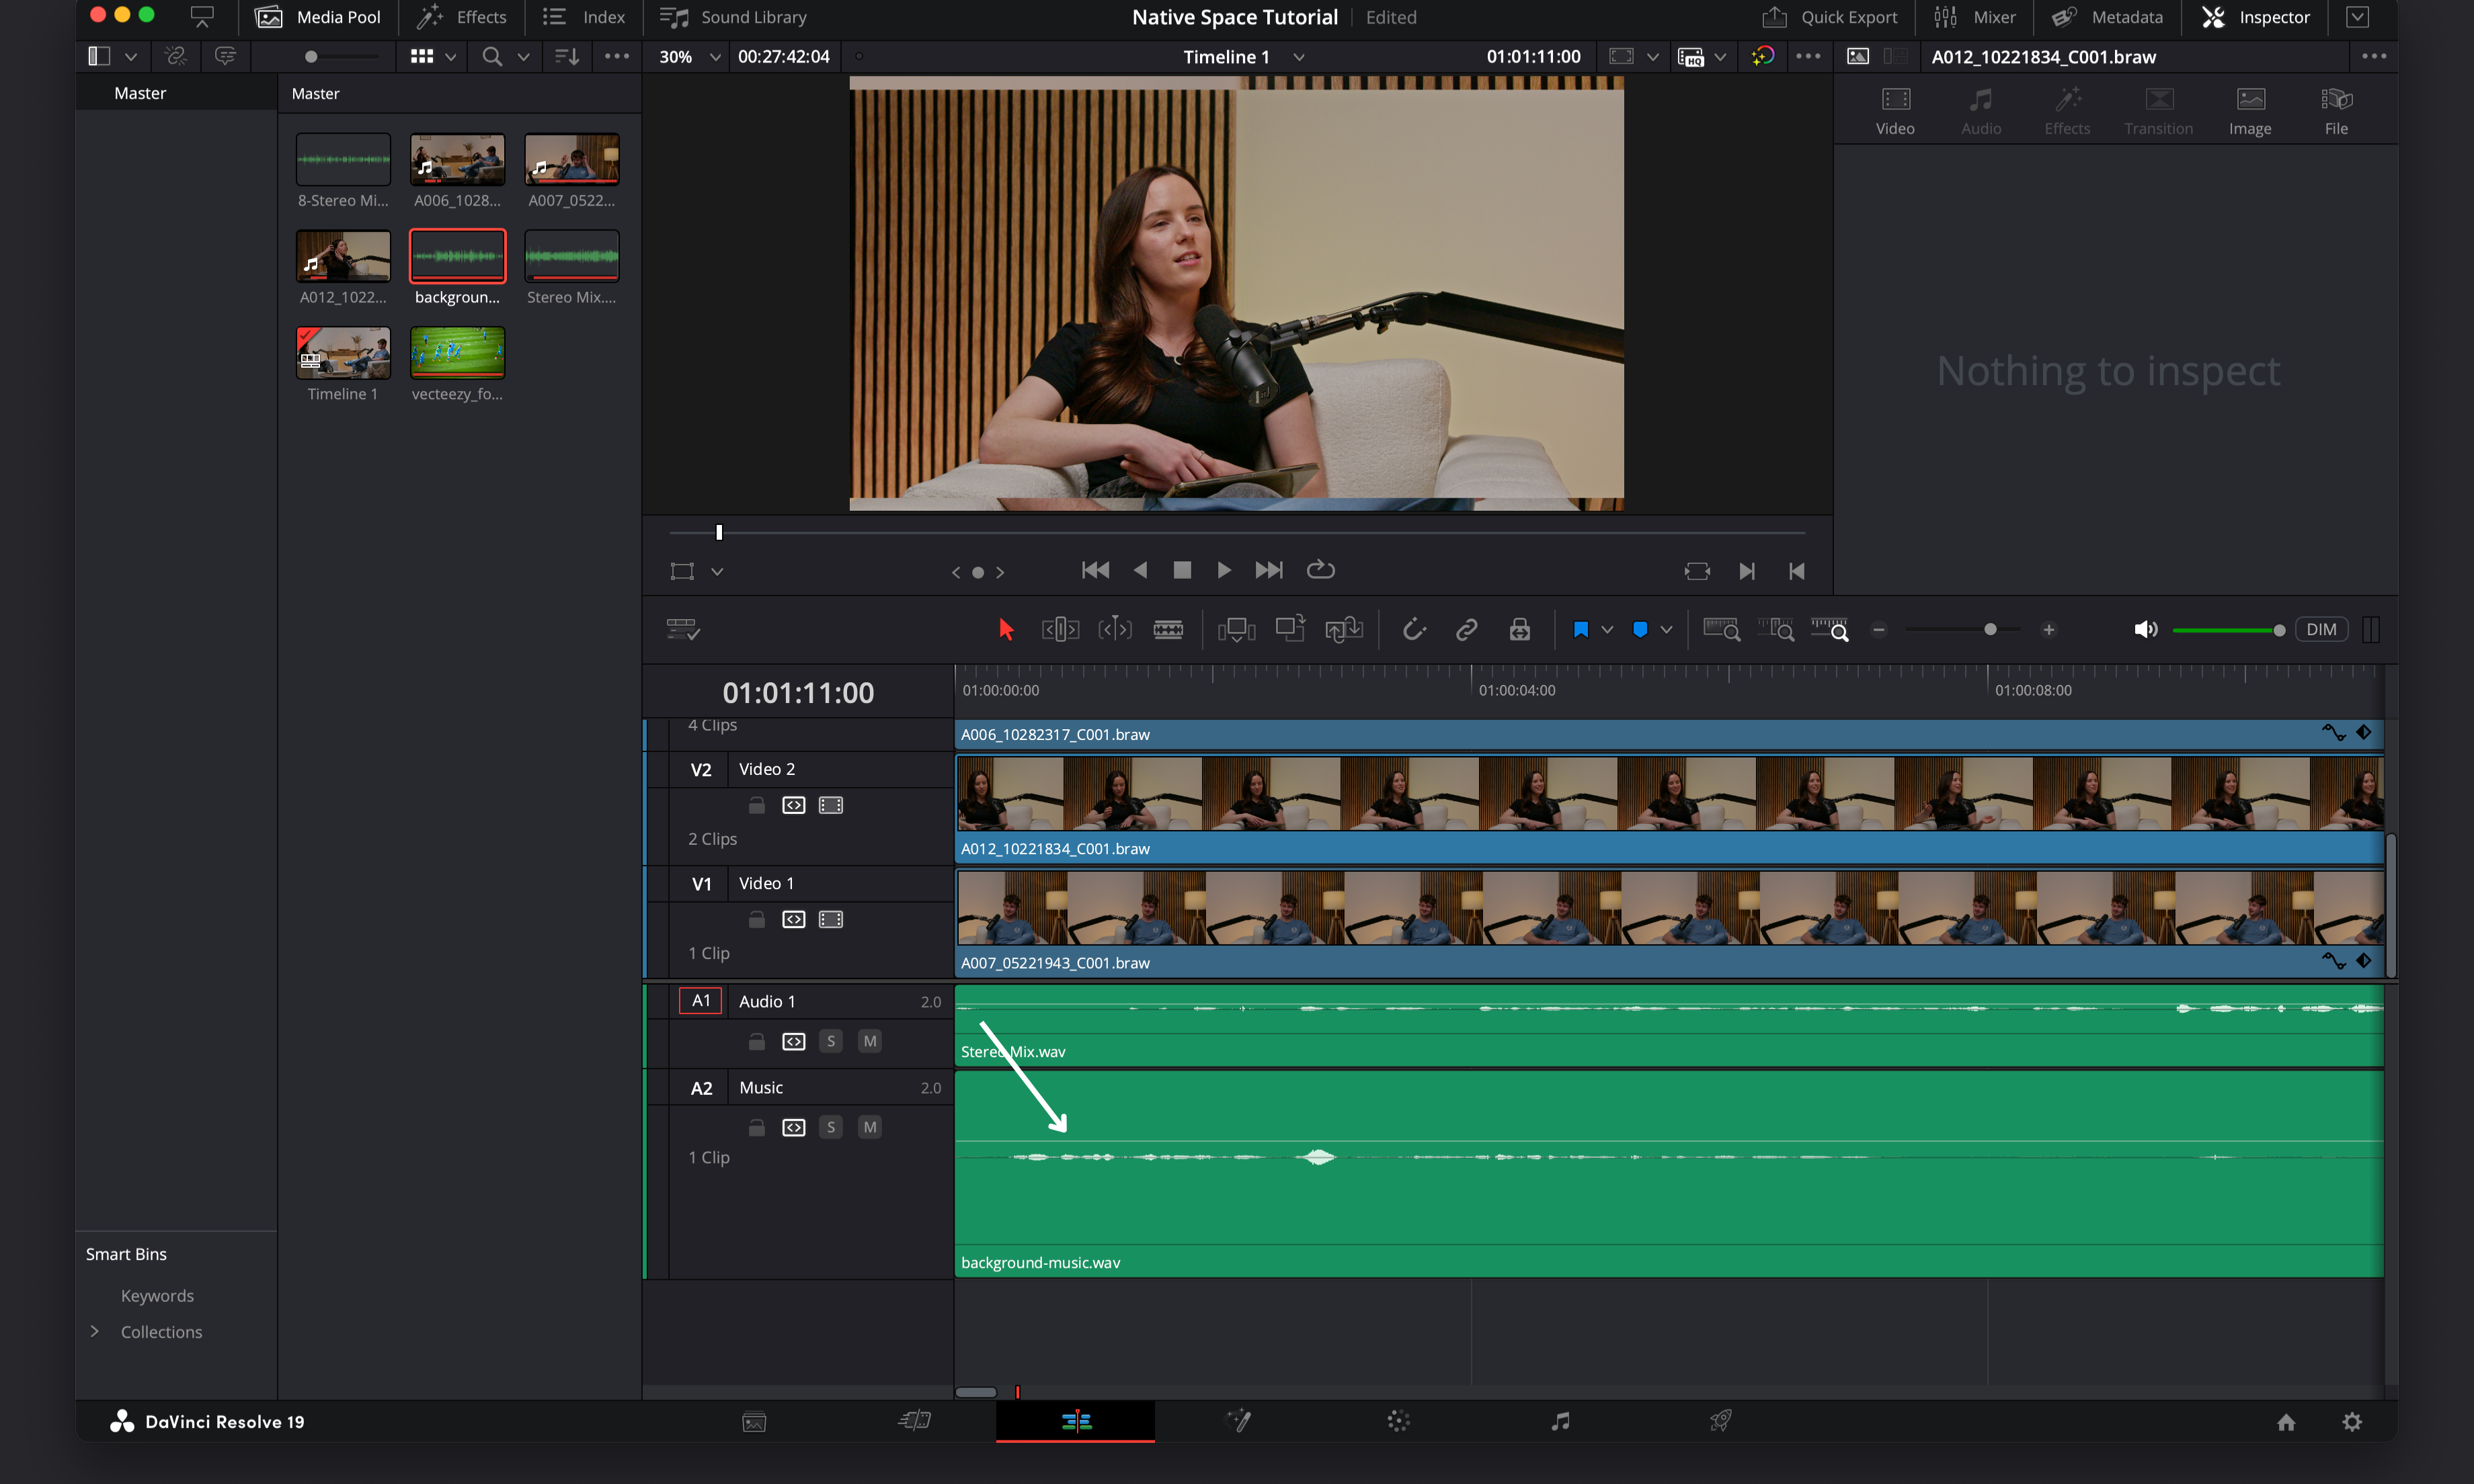
You can widen the audio track height and find the faint white volume line
Drag this line down to -20dB or -25dB to sit comfortably under speech
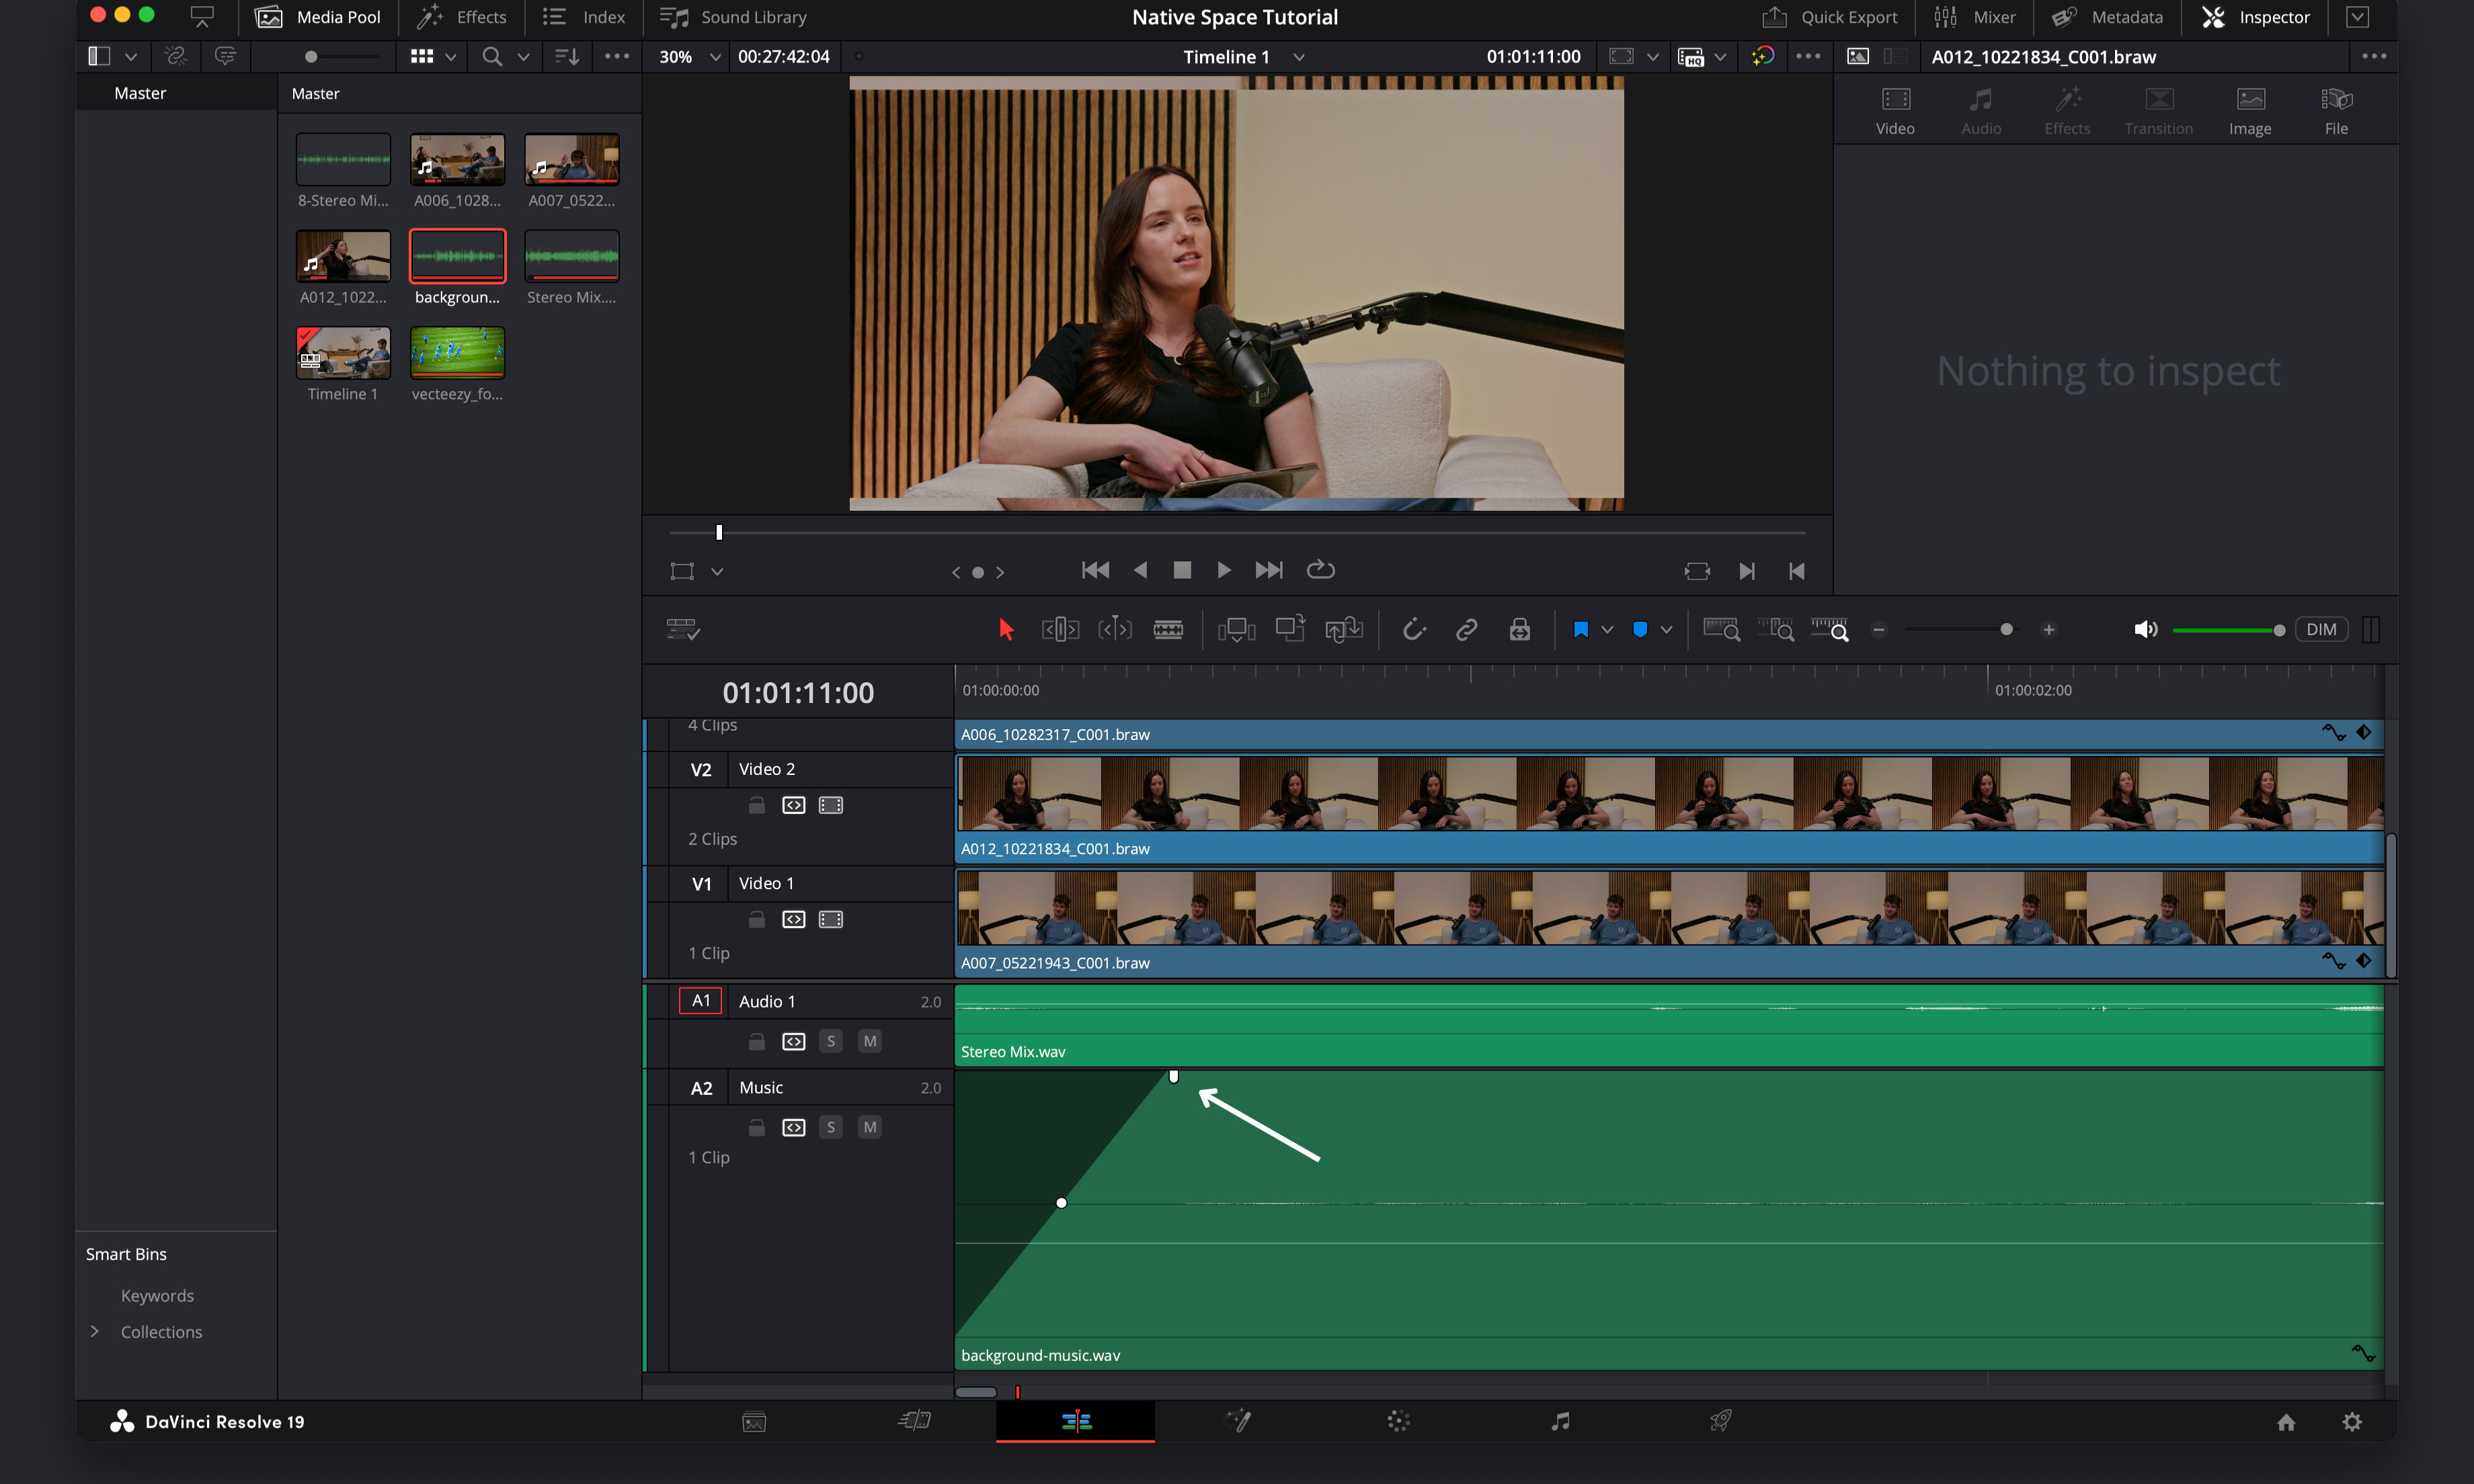
Fading Music and Fixing Audio Spikes:
Drag the small white handles at the start or end of a music clip to create fade-in/fade-out effects
To reduce loud spikes:
Enable the Keyframe icon on the audio track
Click to create keyframe diamonds at the start and end of the loud section
Add two more diamonds around the peak, then drag the middle section’s line downward
Monitoring Audio Levels:
Check the waveform meters on the right-hand side of the interface (Control Room panel)
Spoken voice should hover around -10dB, peak at -5dB, and never hit 0dB to avoid distortion
Extra’s
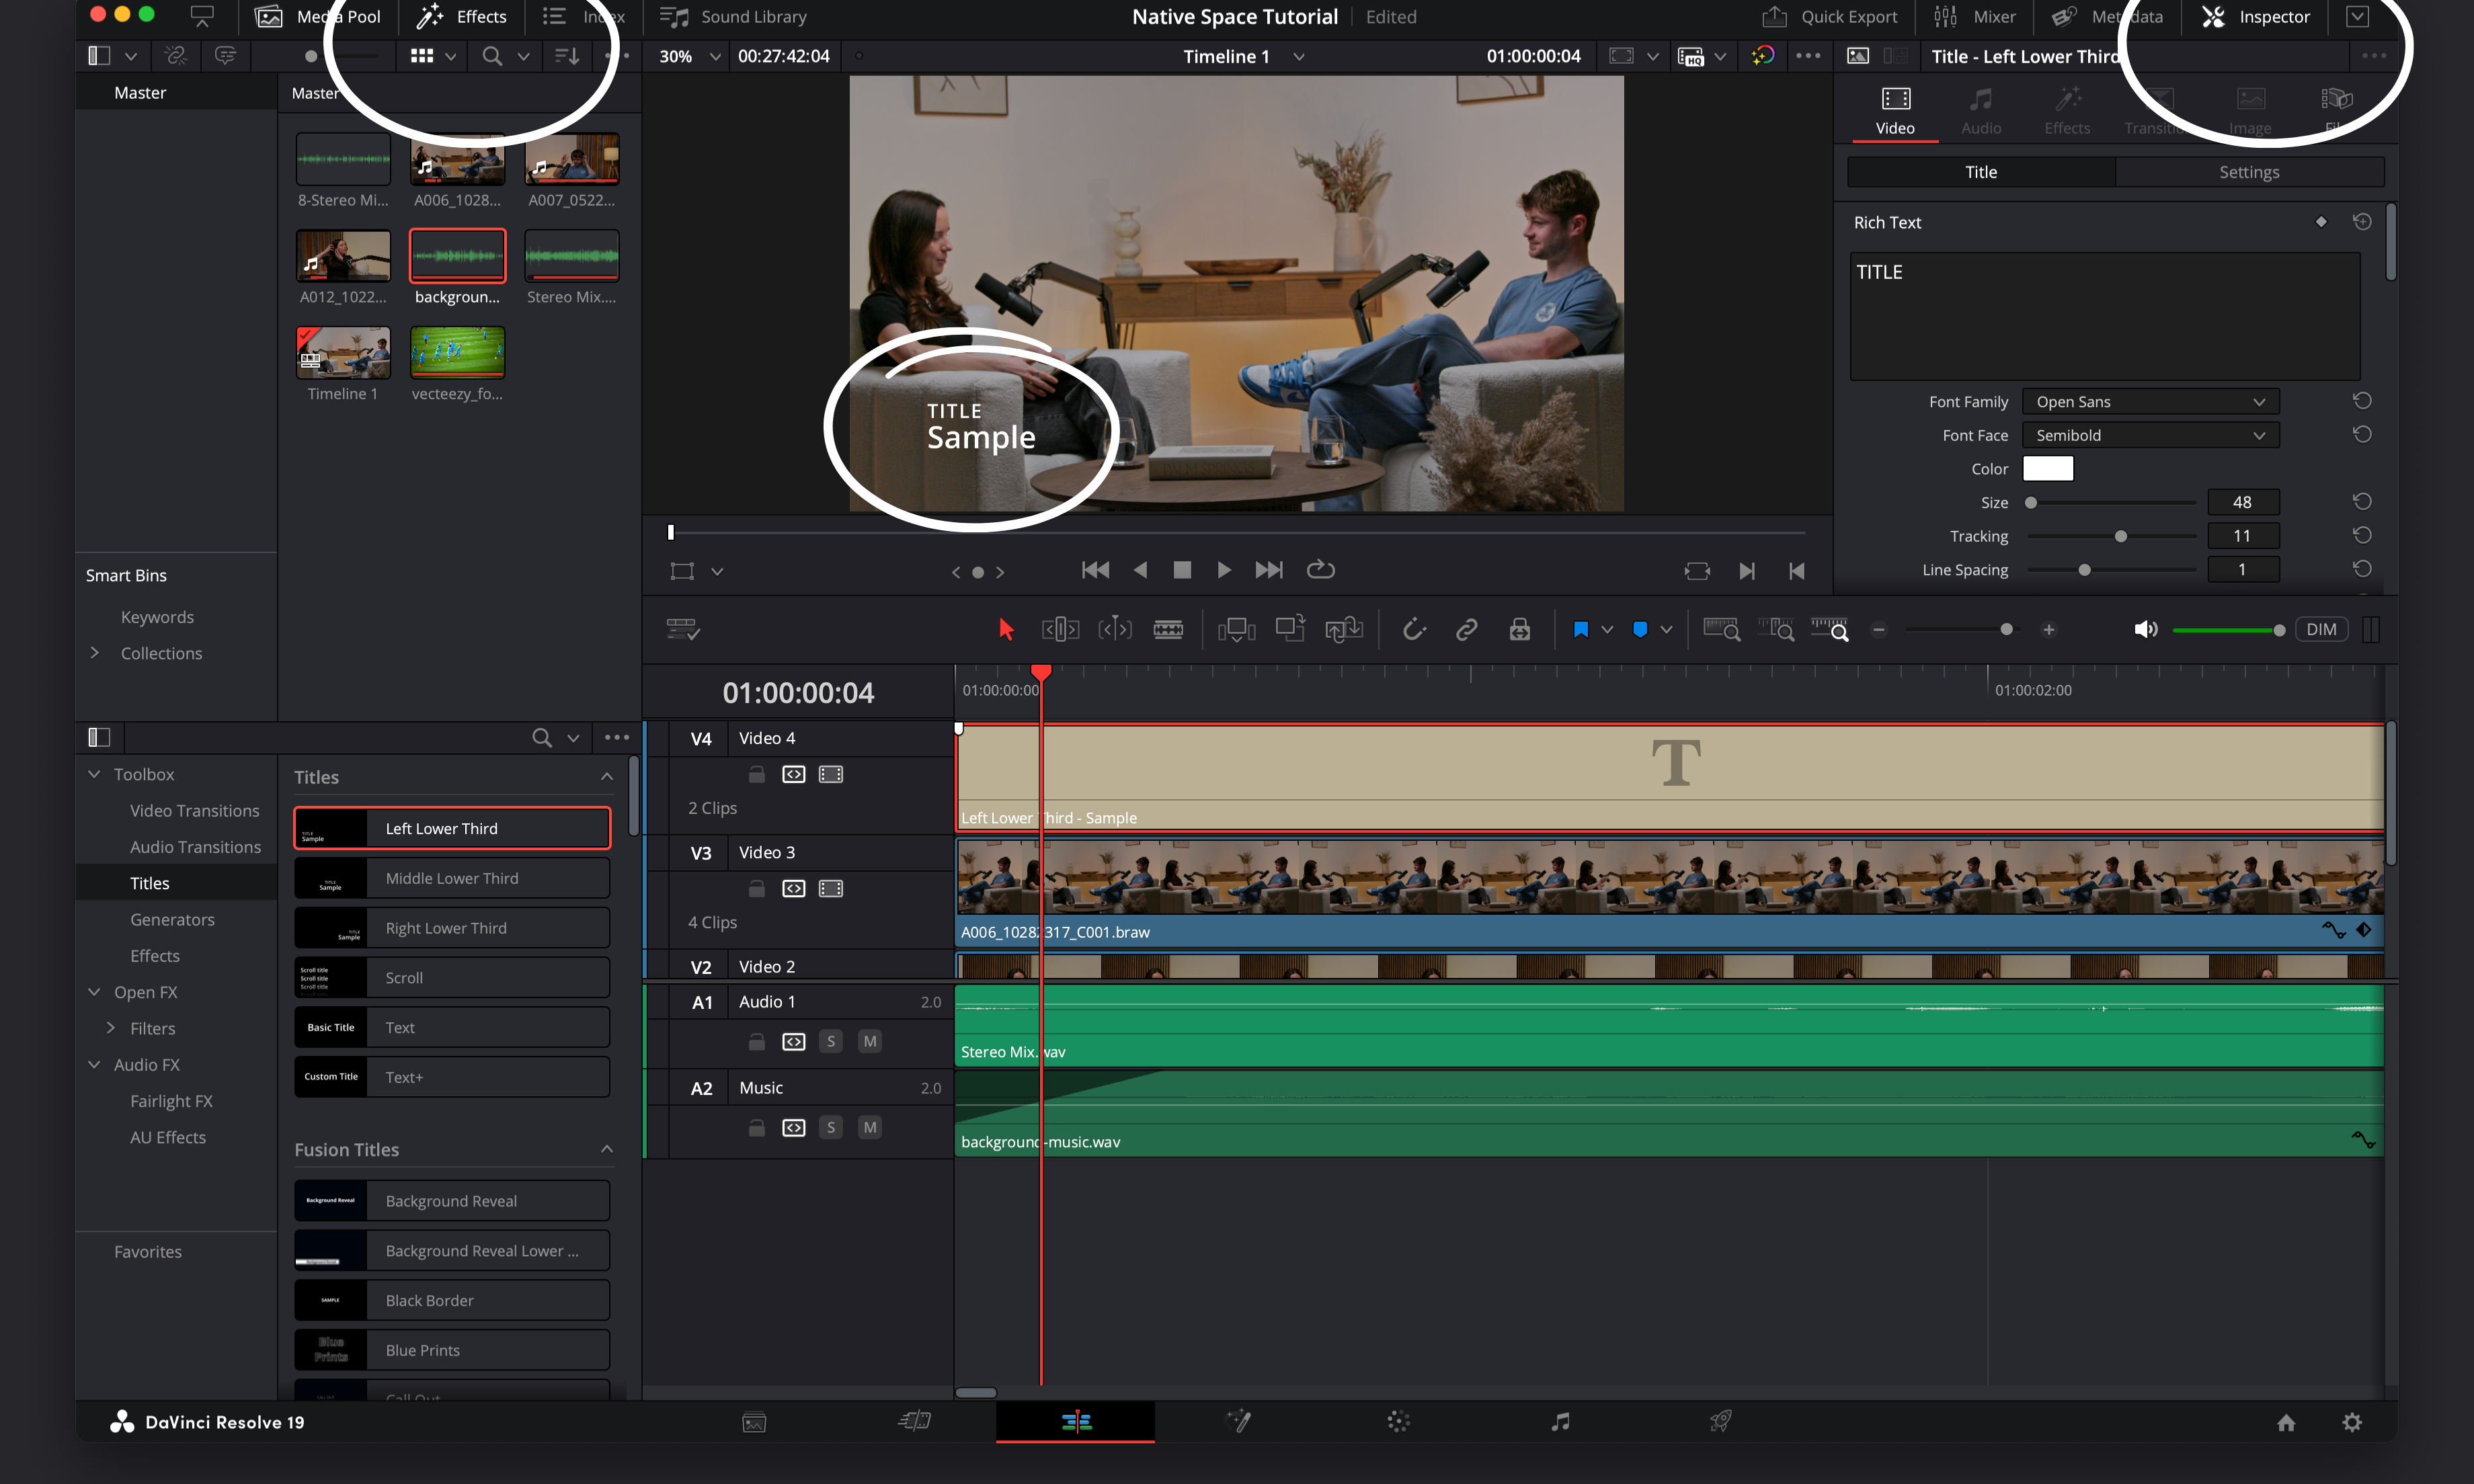
Adding Titles:
In the Effects panel, go to Titles
Drag a title (like Text or Text+) above your video in the timeline
Customise using the Inspector panel: change font, size, colour, position, and animations
Adding Transitions:
From the Effects panel > Video Transitions, drag a transition onto the start or end of a clip
Use built-in transitions rather than Fusion for ease when starting out
These aren’t essential, especially to begin with, but a fade in and out of the entire show is a nice touch.
Step 9: Skip Fairlight (For Now)
The Fairlight tab is for advanced audio editing and mixing — but if you’ve already adjusted your audio levels and spikes in the Edit tab, you don’t need to use this tab as a beginner.
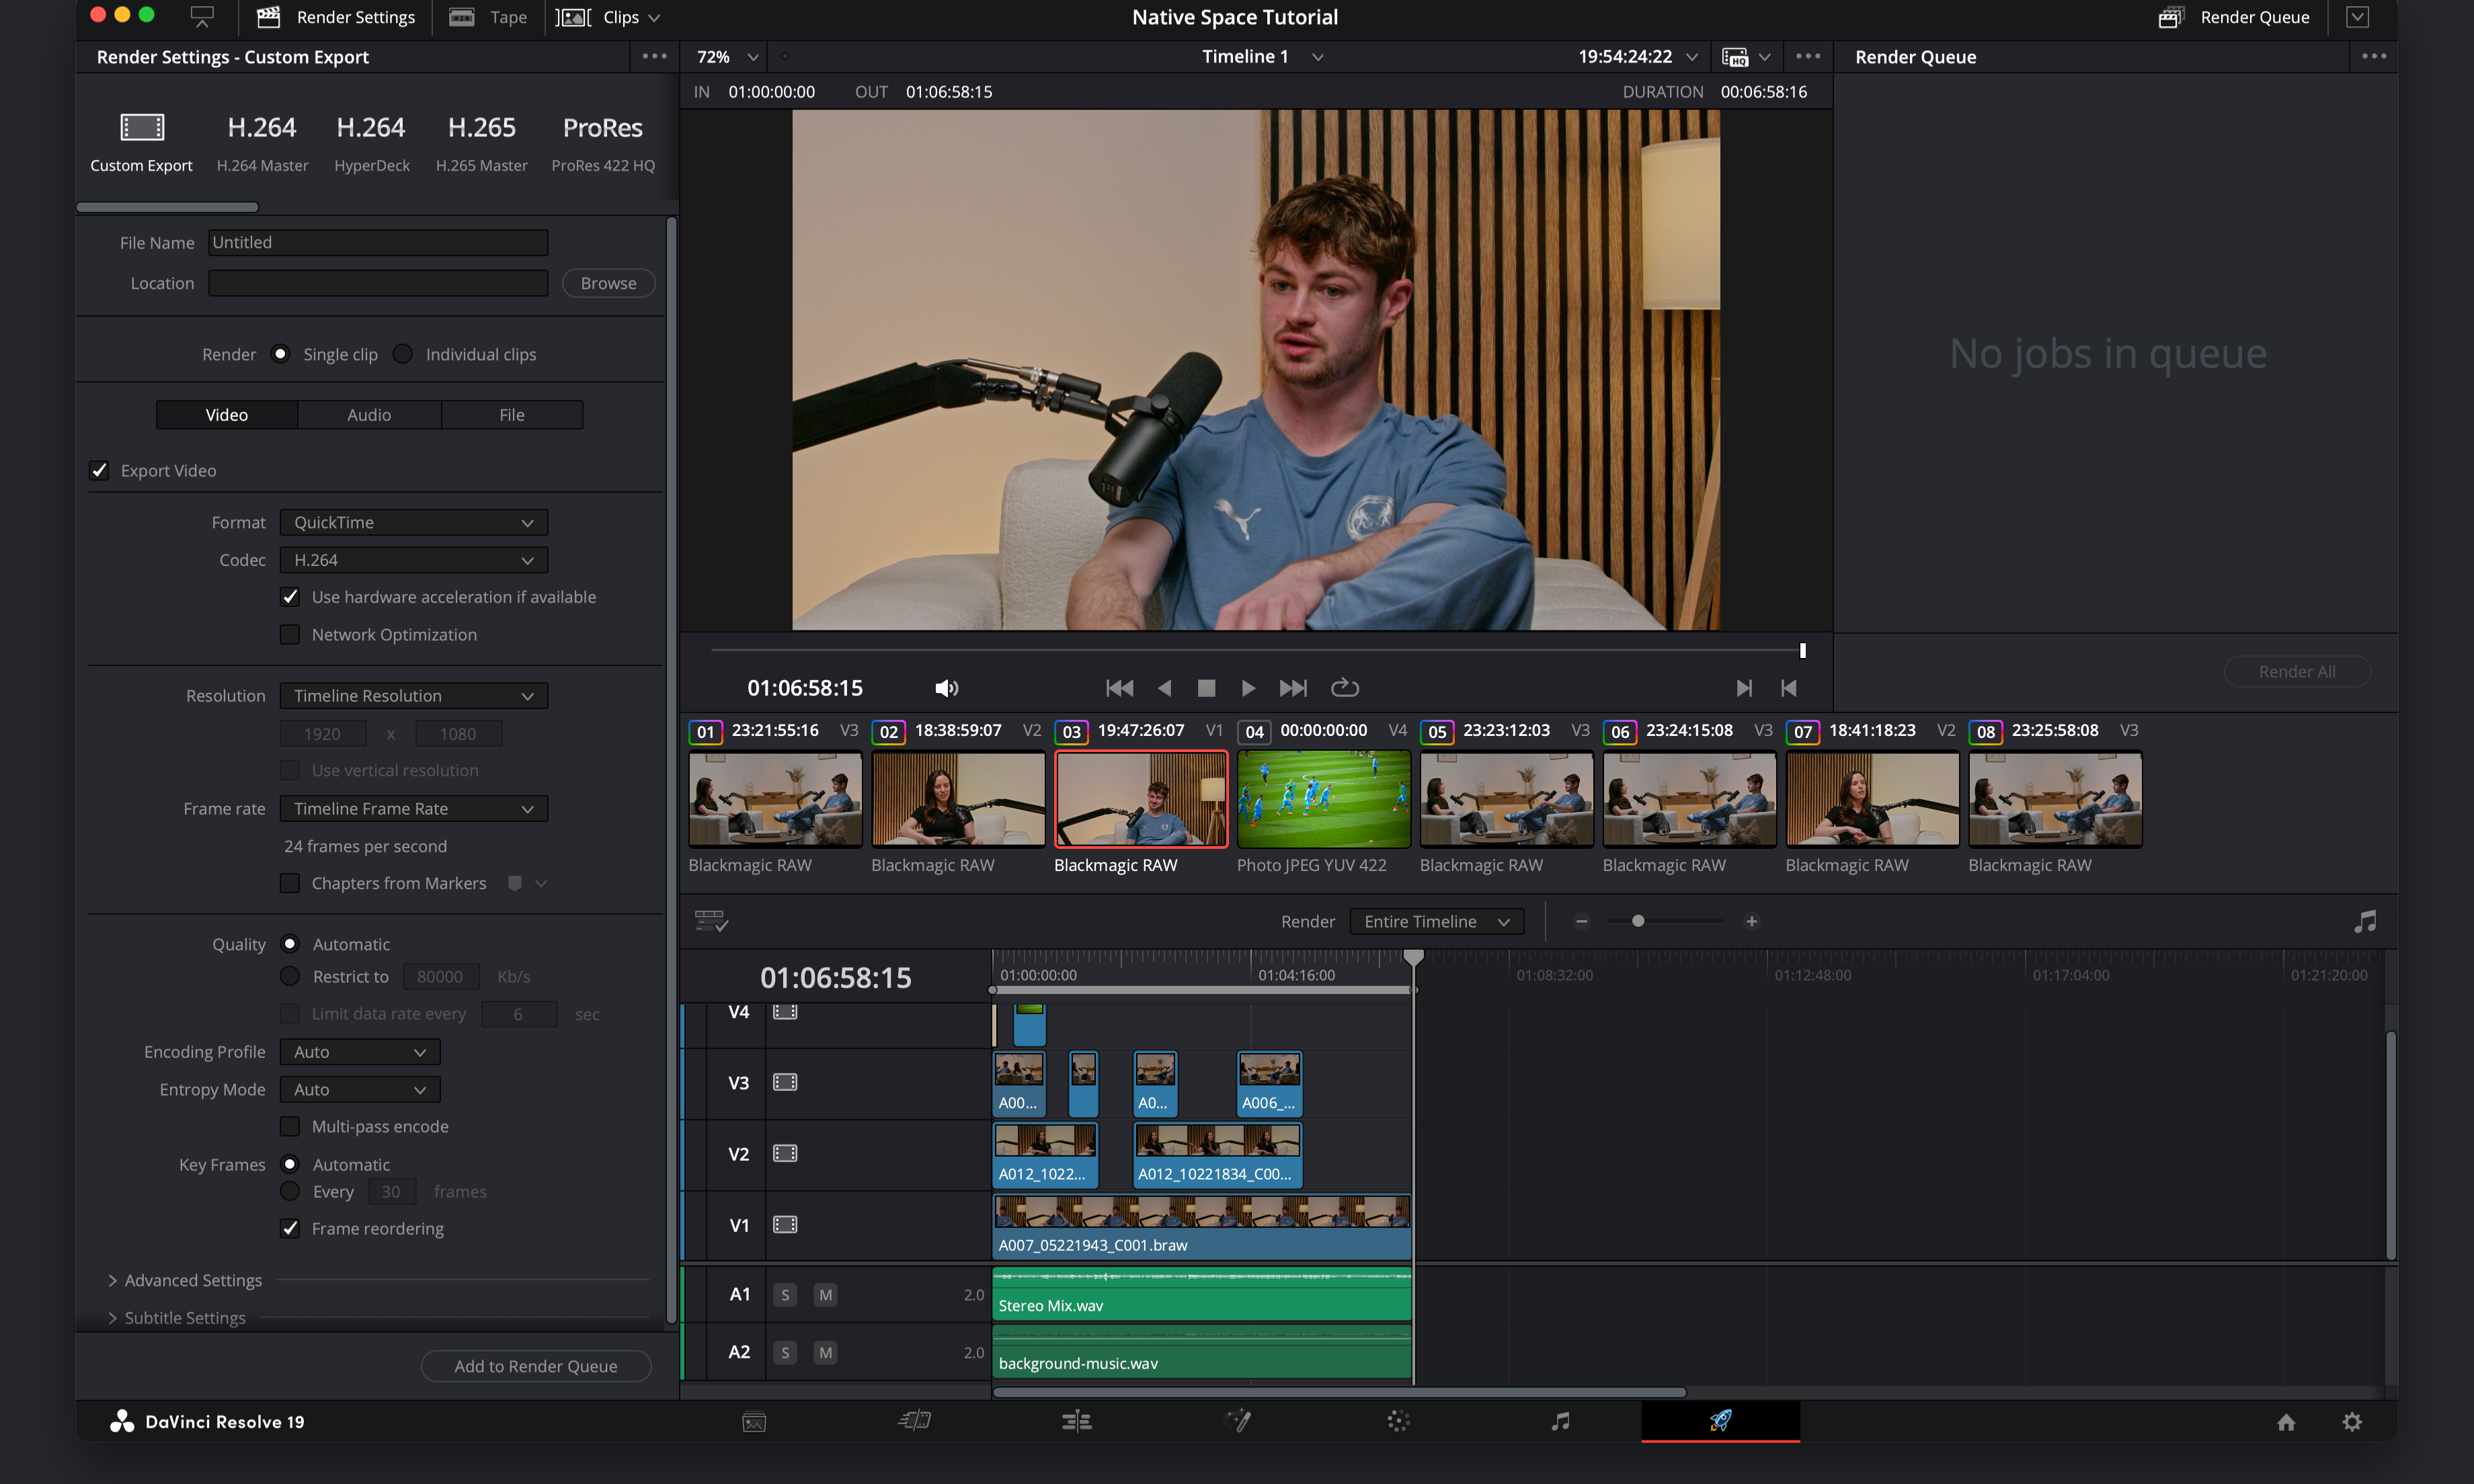
Step 10: Exporting in the Deliver Tab
Head to the Deliver tab when your project is finished
If you’re exporting the whole video, you can just continue with the next steps
Double check the render settings:
In the render setting panel check for these recommended settings are the same as when you first set up the project back at step 1 -
Format: H.264
Resolution: Match your timeline setting (Ultra HD for 4K or HD for 1080p)
Frame rate: Double-check it matches your source footage
If you’re only exporting part of the video - set your In (key I) and Out (key O) points around your finished video
To do so, move the playhead to your in point (the start of the video you’d like to export) and key I
Move the playhead to the out point (where you’d like the exported video to end) and key O
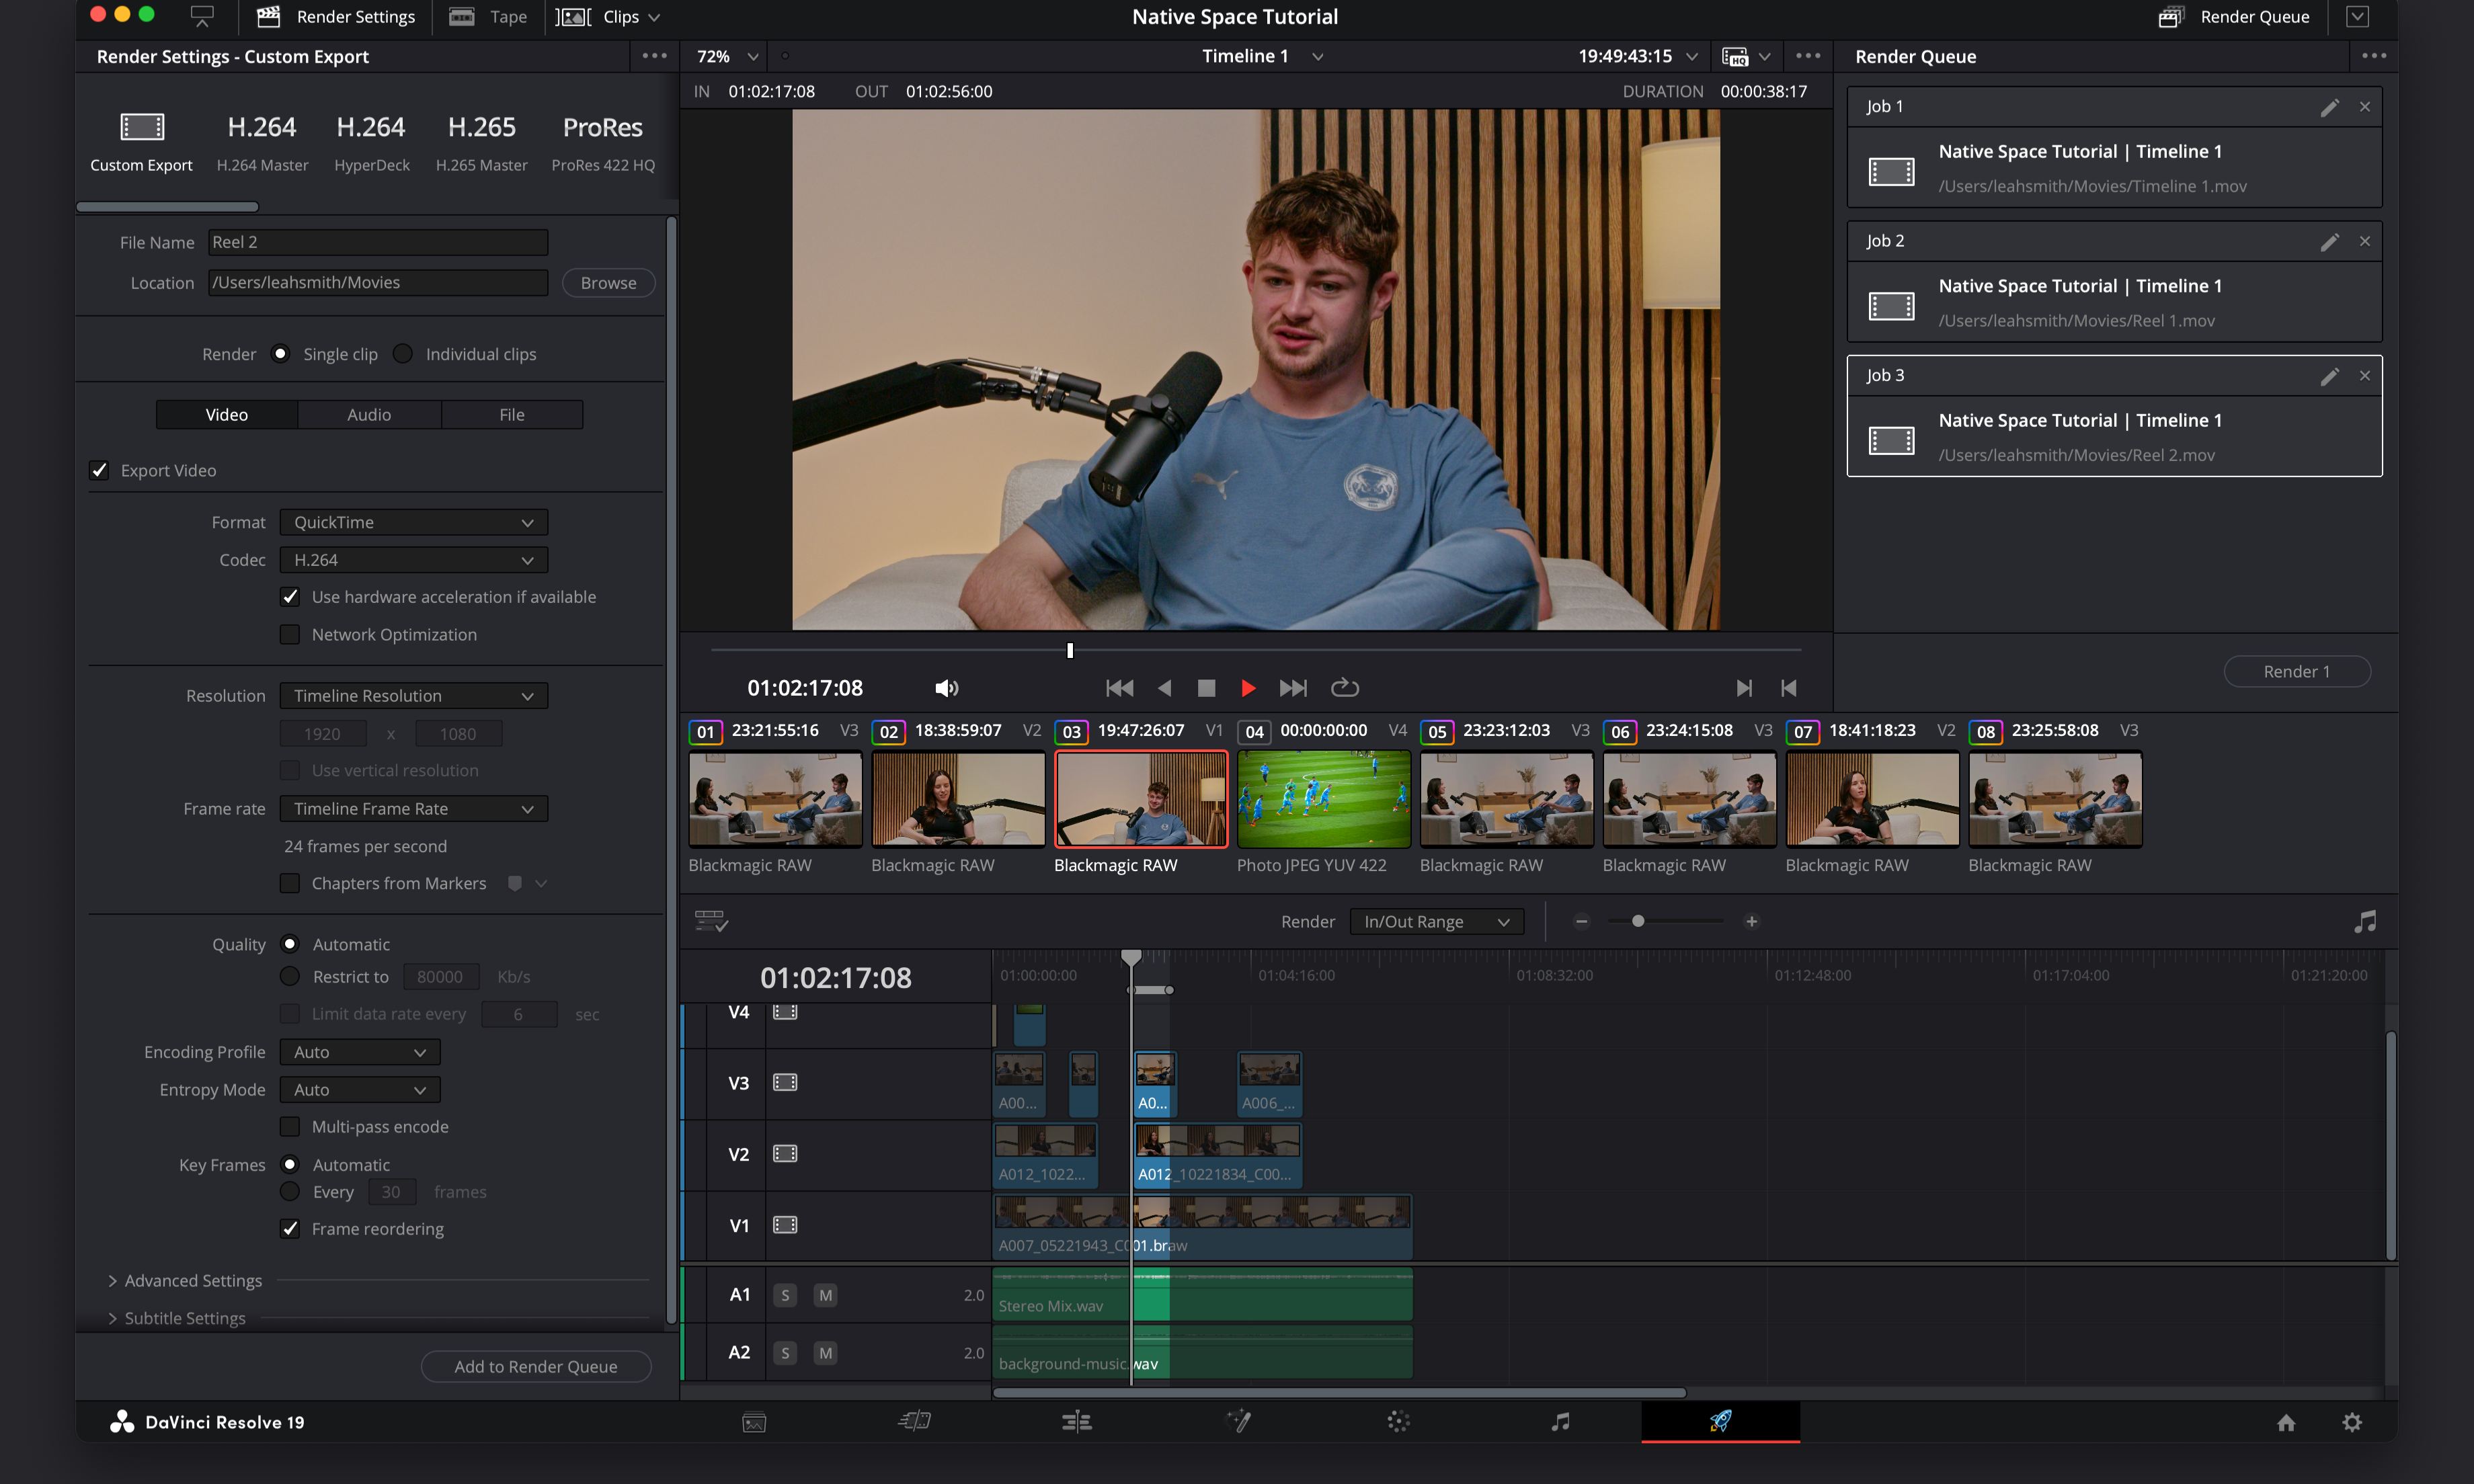
Exporting multiple clips
If you’re looking to export several shorter clips from your video, you can follow the steps above to set your in and out points
Repeat for each section you’d like to export adding to the render queue each time
Once they’re all in the render queue, select Render All
You’re ready to export!
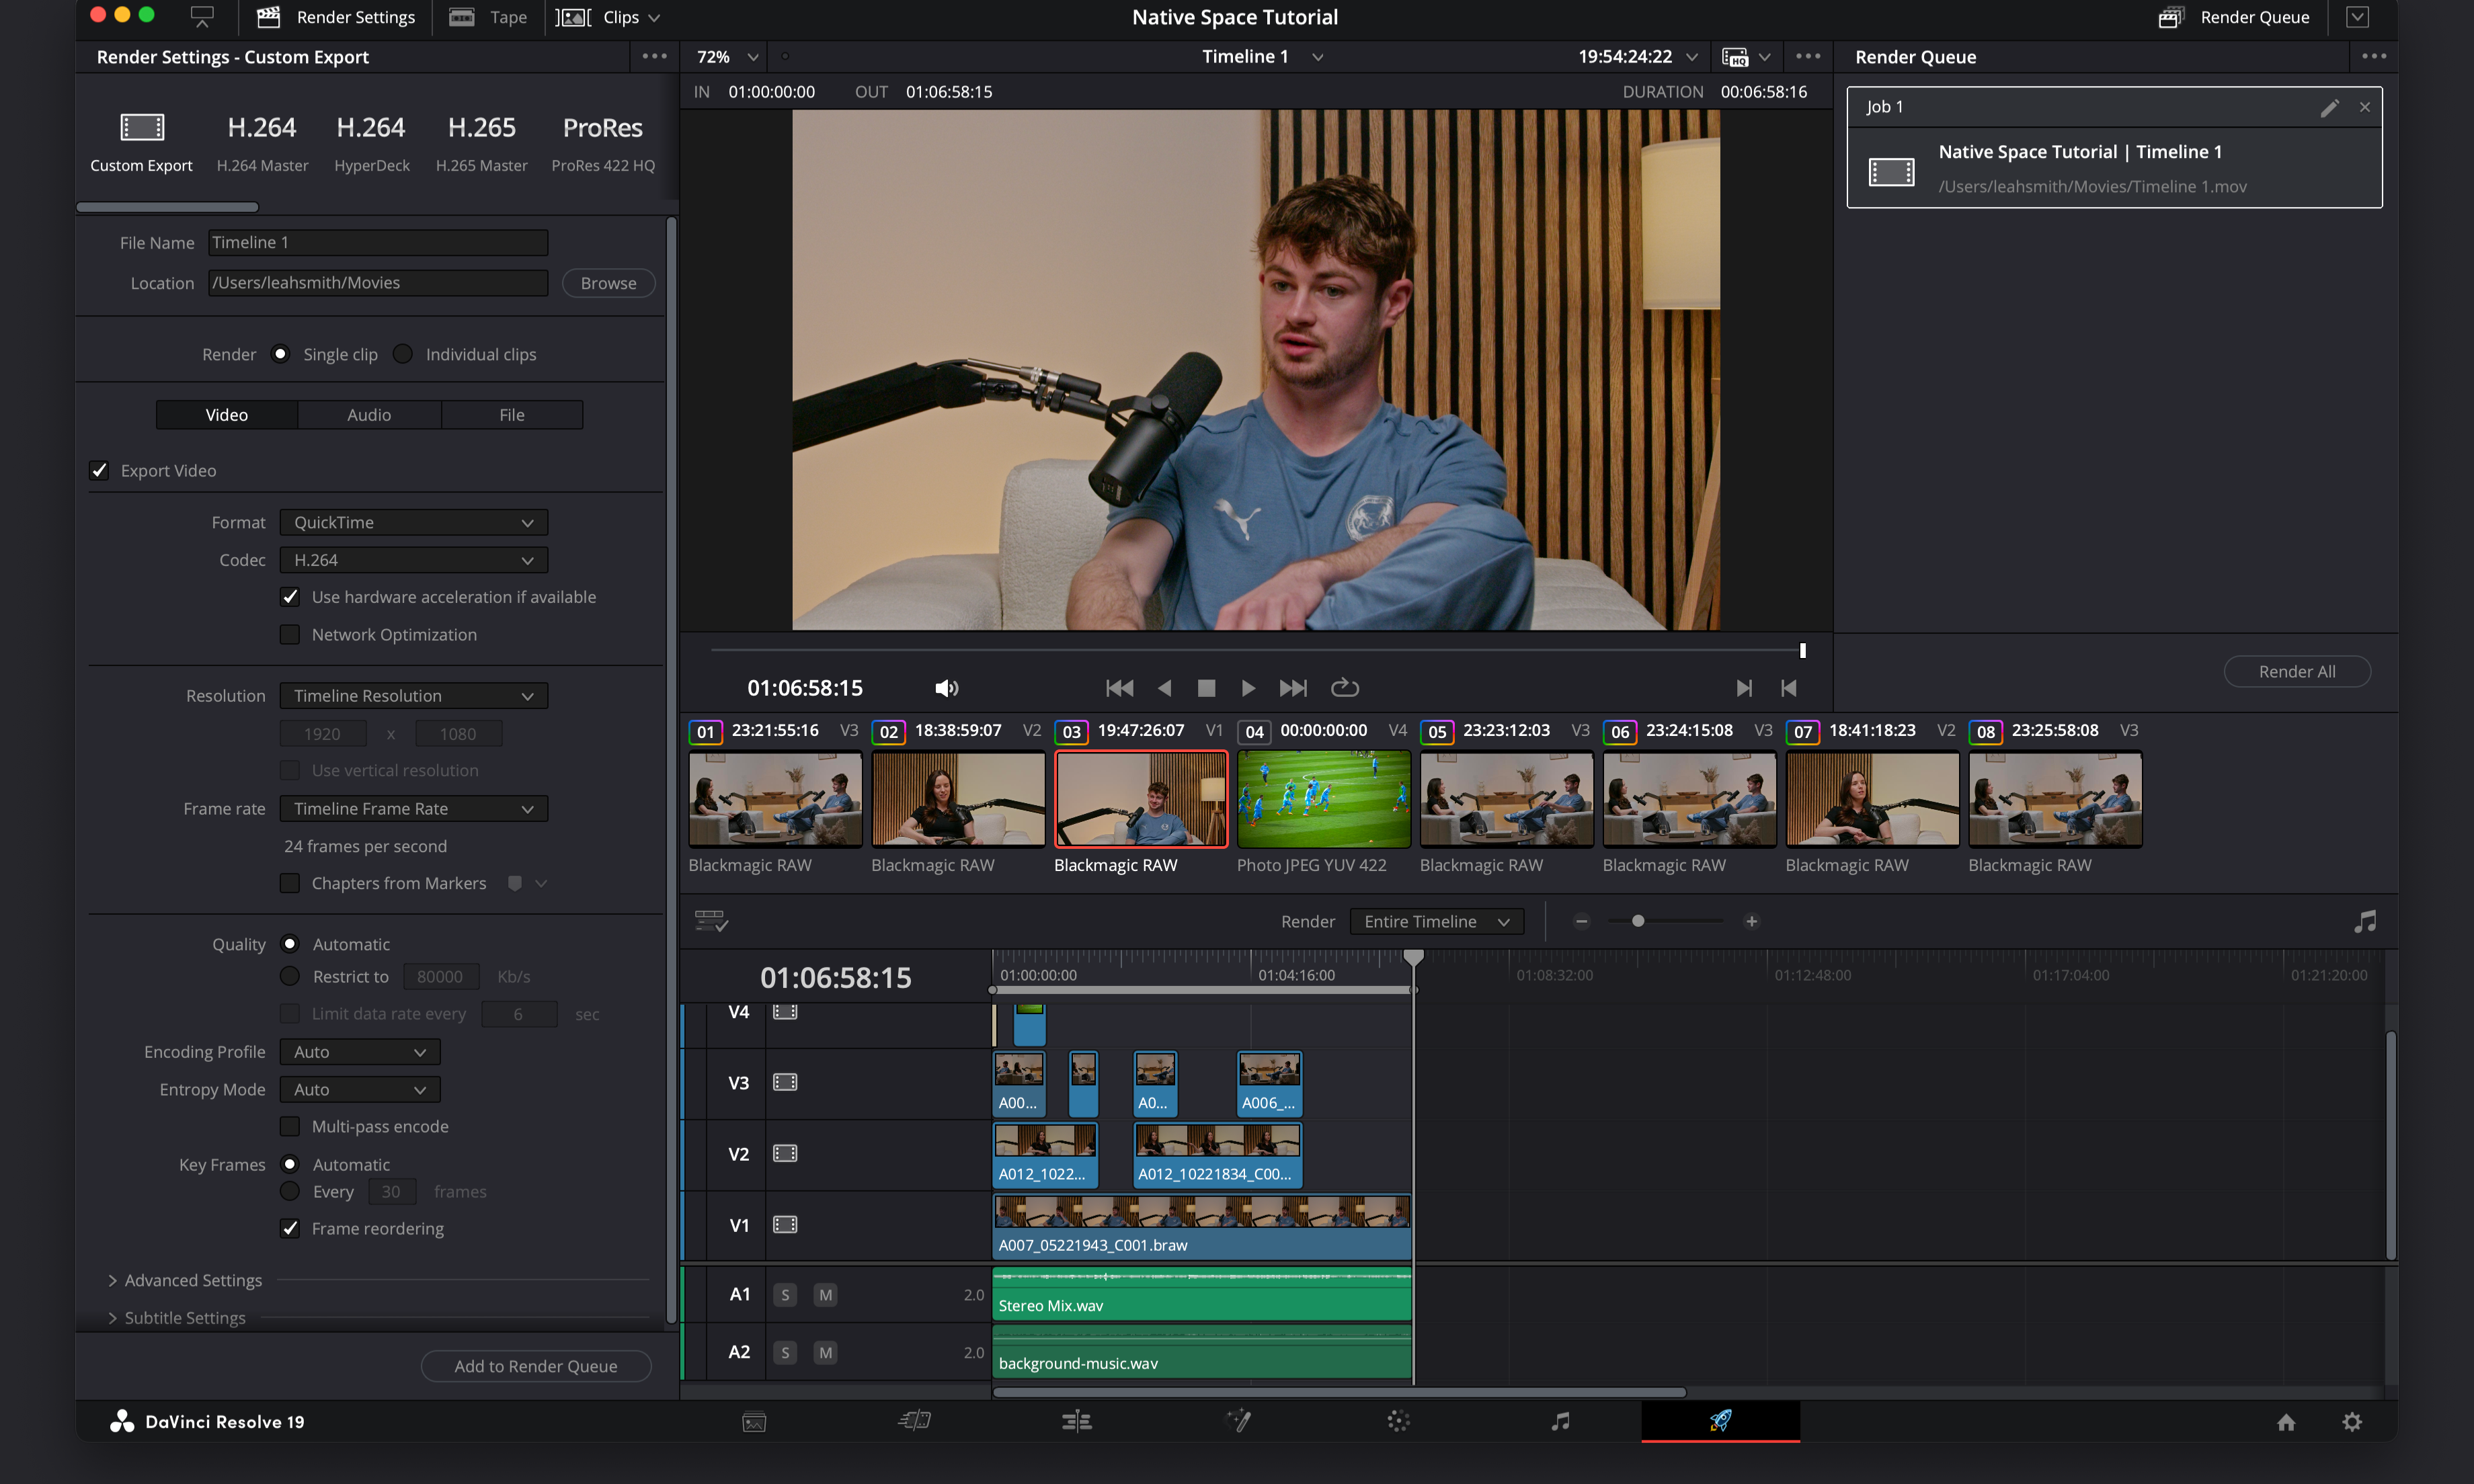
Click Add to Render Queue
Then click Render All to export your final video
🎉 Done! Your video is now ready to upload or share.